Bootstrap Lesson 2: Typography and Tables

Hello everybody,

Michael here, and today’s lesson will cover typography and tables in Bootstrap.

Bootstrap typography

Now, before I show you how to work with tables in Bootstrap, let’s first discuss Bootstrap typography, because it works a little different than your standard HTML/CSS typography.

Take a look at the font used on our first Bootstrap website (from the previous lesson):

Bootstrap uses a default Arial-like size-14 pixel font, as seen in the photo above. However, the size-14 pixel font is just a framework-wide default, as it’s applied to any element inside a <body> or <p> tag. The six main HTML headings <h1><h6> utilize the same Arial-like font, however the text sizes for each main HTML heading are as follows:

  • <h1>-size-36
  • <h2>-size-30
  • <h3>-size-24
  • <h4>-size-18
  • <h5>-size-14
  • <h6>-size-12

And if you don’t like the default Bootstrap typography, you can always change it with a little CSS, as shown below:

h1{
  font-family: "Times New Roman";
  font-size: 40px;
  color: "red"
}

And remember to link your CSS file to your HTML file (see line highlighted in red):

<!DOCTYPE html>
<link href="https://cdn.jsdelivr.net/npm/bootstrap@5.2.0/dist/css/bootstrap.min.css" rel="stylesheet" integrity="sha384-gH2yIJqKdNHPEq0n4Mqa/HGKIhSkIHeL5AyhkYV8i59U5AR6csBvApHHNl/vI1Bx" crossorigin="anonymous">
<link rel="stylesheet" href="BootstrapSite.css">
<script src="https://cdn.jsdelivr.net/npm/bootstrap@5.2.0/dist/js/bootstrap.bundle.min.js" integrity="sha384-A3rJD856KowSb7dwlZdYEkO39Gagi7vIsF0jrRAoQmDKKtQBHUuLZ9AsSv4jD4Xa" crossorigin="anonymous"></script>
<head>
  <body>
    <h1>Here's your first Bootstrap site!!!</h1>
  </body>
</head>
  • To make things easier on yourself, give your CSS file the same name as your corresponding HTML file. For instance, since I named my HTML file BootstrapSite.html, I named my connected CSS file BootstrapSite.css.

And here’s the site with the changed font:

Tables

Now that we’ve discussed Bootstrap typography, let’s move on to Bootstrap tables. How do you create a table in Bootstrap? Take a look at the code below, which shows you an HTML table without any Bootstrap:

<!DOCTYPE html>
<link href="https://cdn.jsdelivr.net/npm/bootstrap@5.2.0/dist/css/bootstrap.min.css" rel="stylesheet" integrity="sha384-gH2yIJqKdNHPEq0n4Mqa/HGKIhSkIHeL5AyhkYV8i59U5AR6csBvApHHNl/vI1Bx" crossorigin="anonymous">
<link rel="stylesheet" href="BootstrapSite.css">
<script src="https://cdn.jsdelivr.net/npm/bootstrap@5.2.0/dist/js/bootstrap.bundle.min.js" integrity="sha384-A3rJD856KowSb7dwlZdYEkO39Gagi7vIsF0jrRAoQmDKKtQBHUuLZ9AsSv4jD4Xa" crossorigin="anonymous"></script>
<head>
  <body>
    <table>
      <tr>
        <th>Movie</th>
        <th>Release Date</th>
        <th>Genre</th>
      </tr>
      <tr>
        <td>Don't Worry Darling</td>
        <td>September 23</td>
        <td>Mystery</td>
      </tr>
      <tr>
        <td>Black Panther Wakanda Forever</td>
        <td>November 11</td>
        <td>Superhero</td>
      </tr>
      <tr>
        <td>Halloween Ends</td>
        <td>October 14</td>
        <td>Horror</td>
      </tr>
    </table>
  </body>
</head>

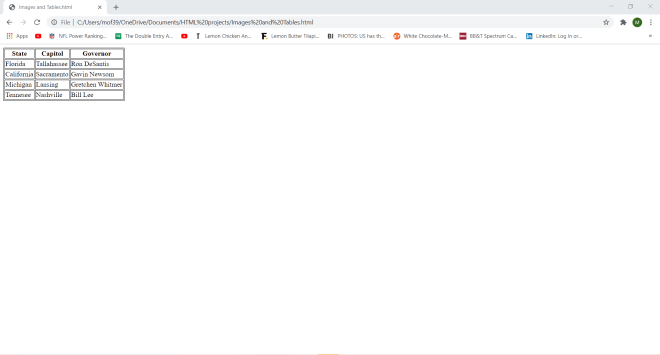
As you can see, I have created a simple table in HTML, but with no Bootstrap applied. As a result, the table displays just fine, but doesn’t look all that great. How can we fix this? Apply a little Bootstrap, of course (hey, this is a Bootstrap lesson after all)! Pay attention to the highlighted lines of code to see how you can apply a little Bootstrap magic to your HTML table (note-there is no CSS code attached here):

<!DOCTYPE html>
<link href="https://cdn.jsdelivr.net/npm/bootstrap@5.2.0/dist/css/bootstrap.min.css" rel="stylesheet" integrity="sha384-gH2yIJqKdNHPEq0n4Mqa/HGKIhSkIHeL5AyhkYV8i59U5AR6csBvApHHNl/vI1Bx" crossorigin="anonymous">
<script src="https://cdn.jsdelivr.net/npm/bootstrap@5.2.0/dist/js/bootstrap.bundle.min.js" integrity="sha384-A3rJD856KowSb7dwlZdYEkO39Gagi7vIsF0jrRAoQmDKKtQBHUuLZ9AsSv4jD4Xa" crossorigin="anonymous"></script>
<head>
  <body>
    <h1>Fall 2022 Movies</h1>
    <div class="table">
      <table class="table">
        <tr>
          <th>Movie</th>
          <th>Release Date</th>
          <th>Genre</th>
        </tr>
        <tr>
          <td>Don't Worry Darling</td>
          <td>September 23</td>
          <td>Mystery</td>
        </tr>
        <tr>
          <td>Black Panther Wakanda Forever</td>
          <td>November 11</td>
          <td>Superhero</td>
        </tr>
        <tr>
          <td>Halloween Ends</td>
          <td>October 14</td>
          <td>Horror</td>
        </tr>
      </table>
    </div>
  </body>
</head>

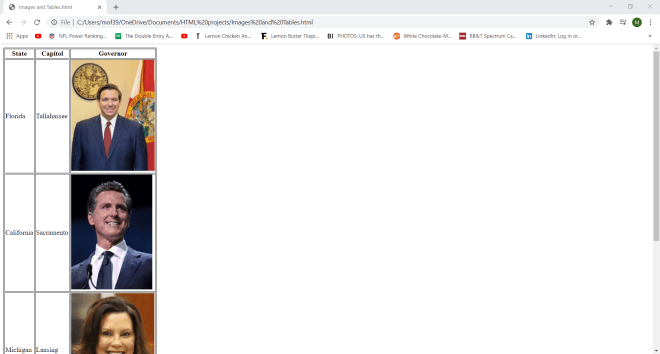
In order to apply Bootstrap stylings to my HTML table, I wrapped the code for my HTML table inside a <div> tag and specified which one of Bootstrap’s table stylings I’d like to apply-in this case, I chose the basic table styling table and specified the styling in the line <div class="table">.

Oh, but here’s the fun part about Bootstrap table stylings! Bootstrap has 7 different ways you can style your table, six of which include:

  • table-Just a plain Bootstrap table (like the example above)
  • table-striped-Gives the table “zebra stripes” (alternating grey and white rows)
  • table-bordered-Adds a border around all sides of the table and around all cells
  • table-hover-Any rows that you hover over turn grey
  • table-condensed-Makes a table more compact by reducing cell padding by half
  • table-responsive-Allows you to scroll through the table horizontally on small devices (anything less than 768 pixels wide); for devices wider than 768 pixels, there is no difference in how the table is displayed

To give your HTML table any of these stylings, wrap the HTML table code inside a <div> tag and use this syntax to apply the Bootstrap styling-<div class="Bootstrap table styling">.

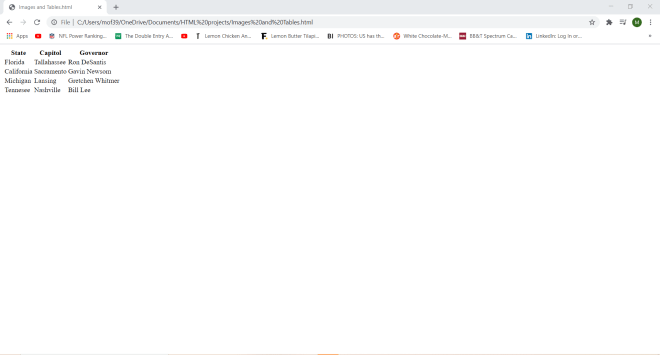
Now, notice how I said you can choose seven different Bootstrap table stylings for your HTML table, but I only mentioned six stylings above. That’s because the seventh styling doesn’t involve wrapping your HTML table code in a <div> tag. Rather, the seventh styling comes in the form of contextual classes, which are table stylings that you can apply to individual table rows (<tr> tag) or table cells (<td> tag).

Let’s see how the contextual classes work:

<!DOCTYPE html>
<html lang="en">
<head>
  <title>Bootstrap Example</title>
  <meta charset="utf-8">

  <link rel="stylesheet" href="https://maxcdn.bootstrapcdn.com/bootstrap/3.4.1/css/bootstrap.min.css">

</head>
<body>

<div class="container">
  <h1>2021 AFC Standings</h1>
  <table class="table">
    <thead>
      <tr>
        <th>Team</th>
        <th>Record</th>
        <th>Seeding</th>
      </tr>
    </thead>
    <tbody>
      <tr class="success">
        <td>Tennessee Titans</td>
        <td>12-5</td>
        <td>1</td>
      </tr>
      <tr class="success">
        <td>Kansas City Chiefs</td>
        <td>12-5</td>
        <td>2</td>
      </tr>
      <tr class="success">
        <td>Buffalo Bills</td>
        <td>11-6</td>
        <td>3</td>
      </tr>
      <tr class="success">
        <td>Cincinnati Bengals</td>
        <td>10-7</td>
        <td>4</td>
      </tr>
      <tr class="warning">
        <td>Las Vegas Raider</td>
        <td>10-7</td>
        <td>5</td>
      </tr>
      <tr class="warning">
        <td>New England Patriots</td>
        <td>10-7</td>
        <td>6</td>
      </tr>
      <tr class="warning">
        <td>Pittsburgh Steelers</td>
        <td>9-7-1</td>
        <td>7</td>
      </tr>
      <tr class="danger">
        <td>Indianapolis Colts</td>
        <td>9-8</td>
        <td>8</td>
      </tr>
      <tr class="danger">
        <td>Miami Dolphins</td>
        <td>9-8</td>
        <td>9</td>
      </tr>
      <tr class="danger">
        <td>Los Angeles Chargers</td>
        <td>9-8</td>
        <td>10</td>
      </tr>
      <tr class="danger">
        <td>Cleveland Browns</td>
        <td>8-9</td>
        <td>11</td>
      </tr>
      <tr class="danger">
        <td>Baltimore Ravens</td>
        <td>8-9</td>
        <td>12</td>
      </tr>
      <tr class="danger">
        <td>Denver Broncos</td>
        <td>7-10</td>
        <td>13</td>
      </tr>
      <tr class="danger">
        <td>New York Jets</td>
        <td>4-13</td>
        <td>14</td>
      </tr>
      <tr class="danger">
        <td>Houston Texans</td>
        <td>4-13</td>
        <td>15</td>
      </tr>
      <tr class="danger">
        <td>Jacksonville Jaguars</td>
        <td>3-14</td>
        <td>16</td>
      </tr>
    </tbody>
  </table>
</div>

</body>
</html>

As you can see, we have created a colorful table showing 2021 NFL AFC (American Football Conference for those unaware) standings for all 16 AFC teams using Bootstrap’s contextual table classes. How did we accomplish this?

In this example, I used the success class for the top 4 rows, which indicates the four AFC teams that won their divisions last year. To apply the success class styling to the first four rows of this table, I used the line <tr class="success"> before the table row code for each of these rows. I then applied the same logic to style the rows for the wildcard teams (seeds 5-7) and the teams that didn’t make playoffs last year (seeds 8-16), except I replaced the success class with the warning and danger classes, respectively.

  • Another thing I’d like to note-I’ve used Atom text editor for my HTML, CSS and Bootstrap lessons, however Atom text editor will be retired by GitHub on December 15, 2022. You’ll likely still be able to download it after that date, but it won’t be updated anymore. If you’re looking for a new IDE for your web development, Sublime Text Editor and Microsoft’s Visual Studio Code are great text editors.

Thanks for reading!

Michael

HTML Lesson 4: Images and Tables

Hello everybody,

It’s Michael, and today’s HTML lesson will be on inserting images and tables into HTML.

As you have seen from the previous three lessons, there’s quite a bit you can do with HTML. Now let me show you how to include images in HTML. Here’s a simple example of how to do so:

<!DOCTYPE html>
<!DOCTYPE html>
<html lang="en" dir="ltr">
  <head>
    <meta charset="utf-8">
    <title></title>
  </head>
  <body>
    <h2>A photo of me on a basketball court:</h2>
    <img src="C:\\Users\\mof39\\OneDrive\\Pictures\\ball.png" alt="basketball court">
  </body>
</html>

In this example, I inserted the H2 line of “A blurry photo of me on a park basketball court” along with an image of me on a park basketball court (now you all get to see what I look like) onto my HTML webpage.

How did I get the image onto my webpage? Well, I used the HTML tag for images-<img>-and filled it in with the two necessary attributes-src for the file path of the image and alt for alternate text for the image.

  • Alternate text provides a user with a brief description of the image if the user can’t view it for any reason (such as slow connection, the user needs a screen reader, etc.).
  • The <img> tag is an empty tag since it only has attributes and no closing tag.

Adding an image to a webpage with HTML is fairly simple. What if you wanted to play around with the image’s height and width. Here’s how to do so (using the same image from the previous example):

<!DOCTYPE html>
<html lang="en" dir="ltr">
  <head>
    <meta charset="utf-8">
    <title></title>
  </head>
  <body>
    <h2>A photo of me on a basketball court:</h2>
    <img src="C:\\Users\\mof39\\OneDrive\\Pictures\\ball.png" alt="basketball court" style="width:300px;height:450px;">
  </body>
</html>

For this webpage, I used the exact same code I used in the previous example, however I did add the style attribute to the <img> tag. In the style attribute, I specified the height and width I wanted for the image in pixels (all sizes in HTML are measures with pixels or px). I then refreshed the webpage and VOILA-you get to see the manipulated image. Notice how all I did was simply manipulate the image’s size-I didn’t crop it at all (I’ll likely cover image cropping when I start posting CSS content).

  • Instead of doing the width:X;height:X; thing I did to specify the image’s width and height, you could also list the width and height separately like this-width="300", height="450". However, using the style attribute is an efficient shortcut.

Now, one thing you probably didn’t know about HTML images is that you can also post animated GIFs (Graphics Interchange Format) to your HTML webpage. Here’s how to do so:

<!DOCTYPE html>
<html lang="en" dir="ltr">
  <head>
    <meta charset="utf-8">
    <title></title>
  </head>
  <body>
    <h2>Gronk spike:</h2>
    <img src="C:\\Users\\mof39\\OneDrive\\Pictures\\gronk.gif" alt="Rob Gronkowski spikes a football">
  </body>
</html>

To add a GIF to the webpage, I used the same <img> tag that I would with normal images and included both the src and alt attributes.

Also, since I can’t show the GIF animation with a webpage screenshot, here’s the Gronk spike GIF in all its glory (FYI, I don’t own any of the GIFs/images I’ll be using):

Pretty neat stuff so far, right? Well, now let me show you how to use an image as a link to another website:

<!DOCTYPE html>
<html lang="en" dir="ltr">
  <head>
    <meta charset="utf-8">
    <title></title>
  </head>
  <body>
    <h2>Here's a link to South Park Studios:</h2>
    <a href="https://southpark.cc.com/">
      <img src="C:\\Users\\mof39\\OneDrive\\Pictures\\south park.png" alt="The four main characters on South Park">
    </a>
  </body>
</html>

And here’s what happens once you click the image:

In this example, the image serves as a link to the South Park Studios website. In order to make an image a link, wrap the <img> tag and its attributes in an <a> tag-the <a> tag is typically used for links (which I’ll cover more in the next post). The <a> tag has an attribute-href; set the value of this attribute to the website/webpage you want to link to.

Alright, now that we’ve covered the basics of using images with HTML, now let’s cover creating tables in HTML. Here’s a simple example of HTML tables:

<!DOCTYPE html>
<html lang="en" dir="ltr">
  <head>
    <meta charset="utf-8">
    <title></title>
  </head>
  <body>
    <table>
      <tr>
        <th>State</th>
        <th>Capitol</th>
        <th>Governor</th>
      </tr>
      <tr>
        <td>Florida</td>
        <td>Tallahassee</td>
        <td>Ron DeSantis</td>
      </tr>
      <tr>
        <td>California</td>
        <td>Sacramento</td>
        <td>Gavin Newsom</td>
      </tr>
      <tr>
        <td>Michigan</td>
        <td>Lansing</td>
        <td>Gretchen Whitmer</td>
      </tr>
      <tr>
        <td>Tennesee</td>
        <td>Nashville</td>
        <td>Bill Lee</td>
      </tr>
    </table>
  </body>
</html>

As you can see here, I have created a simple HTML table. How did I make this table? Well, all tables in HTML use these four tags-<table>, <tr>, <th> and <td>. The <table> tag creates the table itself, <tr> creates the table rows, <th> creates the table headers, and <td> creates the table details (these are the main non-header elements of the table).

OK, this is a great start. But how would I add borders to the table? Here’s how:

<!DOCTYPE html>
<html lang="en" dir="ltr">
  <head>
    <meta charset="utf-8">
    <title></title>
    <style>
table, th, td {
  border: 1px solid black;
}
</style>
  </head>
  <body>
    <table>
      <tr>
        <th>State</th>
        <th>Capitol</th>
        <th>Governor</th>
      </tr>
      <tr>
        <td>Florida</td>
        <td>Tallahassee</td>
        <td>Ron DeSantis</td>
      </tr>
      <tr>
        <td>California</td>
        <td>Sacramento</td>
        <td>Gavin Newsom</td>
      </tr>
      <tr>
        <td>Michigan</td>
        <td>Lansing</td>
        <td>Gretchen Whitmer</td>
      </tr>
      <tr>
        <td>Tennesee</td>
        <td>Nashville</td>
        <td>Bill Lee</td>
      </tr>
    </table>
  </body>
</html>

To add borders to the table, I used the <style> tag and added a 1 pixel solid black border to any element with a table, th, or td tag.

  • The table border demo is just a preview of the exciting things to come in my CSS series of posts!

OK, this table looks even better, but what if we wanted to add some images of the governors of these four states? Here’s how to do so:

<!DOCTYPE html>
<html lang="en" dir="ltr">
  <head>
    <meta charset="utf-8">
    <title></title>
    <style>
table, th, td {
  border: 1px solid black;
}
</style>
  </head>
  <body>
    <table>
      <tr>
        <th>State</th>
        <th>Capitol</th>
        <th>Governor</th>
      </tr>
      <tr>
        <td>Florida</td>
        <td>Tallahassee</td>
        <td><img src="C:\Users\mof39\OneDrive\Pictures\desantis.jfif"></td>
      </tr>
      <tr>
        <td>California</td>
        <td>Sacramento</td>
        <td><img src="C:\Users\mof39\OneDrive\Pictures\newsom.jfif"></td>
      </tr>
      <tr>
        <td>Michigan</td>
        <td>Lansing</td>
        <td><img src="C:\Users\mof39\OneDrive\Pictures\whitmer.jfif"></td>
      </tr>
      <tr>
        <td>Tennesee</td>
        <td>Nashville</td>
        <td><img src="C:\Users\mof39\OneDrive\Pictures\lee.jfif"></td>
      </tr>
    </table>
  </body>
</html>

In this example, I simply replaced each governor’s name with their image (using a file path from my computer). Yes, you can use images as table elements in HTML (just remember to use the <img> tag).

Now, let’s say you wanted a table with a cell that spans several columns. Here’s how to create one:

<!DOCTYPE html>
<html lang="en" dir="ltr">
  <head>
    <meta charset="utf-8">
    <title></title>
    <style>
table, th, td {
  border: 1px solid black;
}
</style>
  </head>
  <body>
    <table>
    <tr>
      <th>Manager</th>
      <th colspan="5">Direct Reports</th>
    </tr>
    <tr>
      <td>Katie</td>
      <td>Tyler</td>
      <td>James</td>
      <td>Max</td>
      <td>McKenna</td>
      <td>Maria</td>
    </tr>
    <tr>
      <td>Paul</td>
      <td>Douglas</td>
      <td>Brianna</td>
      <td>William</td>
      <td>Nicole</td>
      <td>Tony</td>
    </tr>
  </table>
  </body>
</html>

To create a table with a cell that spans several columns, you would need to specify which table header you want to span several columns-in this example, the Direct Reports header will span several columns. To specify how many columns you would like to stretch a cell, use the colspan attribute inside the <th> tag of the column you want to expand; in this example, I stretched the Direct Reports cell for 5 columns.

Now, what if I wanted to stretch a table cell for multiple rows? Here’s how to do so:

<!DOCTYPE html>
<html lang="en" dir="ltr">
  <head>
    <meta charset="utf-8">
    <title></title>
    <style>
table, th, td {
  border: 1px solid black;
}
</style>
  </head>
  <body>
    <table>
      <tr>
        <th>Manager:</th>
        <td>Madison</td>
      </tr>
      <tr>
        <th rowspan="6">Direct Reports:</th>
        <td>Jeff</td>
      </tr>
      <tr>
        <td>Amanda</td>
      </tr>
      <tr>
        <td>Marcus</td>
      </tr>
      <tr>
        <td>Stan</td>
      </tr>
      <tr>
        <td>Allison</td>
      </tr>
    </table>
  </body>
</html>

This example is conceptually identical to the previous example (since both tables show a manager and their direct reports). However, this table shows the manager in one row and their direct reports on six different rows.

So, where did I make a cell span multiple rows? Take a look at the Direct Reports cell. I wrapped this cell in a <th> tag and use the rowspan attribute to make the cell span five rows (one for each of the manager’s direct reports). In order to show all of the direct reports in five different rows, I had to wrap each name in its own <tr> tag. Note how I wrapped the first name-Jeff-in the same <tr> tag as the Direct Reports table header (this was important to do in order to ensure that the rowspan tool worked properly).

Now what if I wanted to add a caption to the table? Here’s how to do so (using the same table from the previous example):

<!DOCTYPE html>
<html lang="en" dir="ltr">
  <head>
    <meta charset="utf-8">
    <title></title>
    <style>
table, th, td {
  border: 1px solid black;
}
</style>
  </head>
  <body>
    <table>
      <caption>Organizational Chart at Department X</caption>
      <tr>
        <th>Manager:</th>
        <td>Madison</td>
      </tr>
      <tr>
        <th rowspan="5">Direct Reports:</th>
        <td>Jeff</td>
      </tr>
      <tr>
        <td>Amanda</td>
      </tr>
      <tr>
        <td>Marcus</td>
      </tr>
      <tr>
        <td>Stan</td>
      </tr>
      <tr>
        <td>Allison</td>
      </tr>
    </table>
  </body>
</html>

To add a caption, all I did was wrap the caption I wanted to use inside a <caption> tag. When you’re adding a caption to your HTML table, remember to place the <caption> tag right after the opening <table> tag. The <caption> tag won’t work if you place it right before the closing </table> tag,

Thanks for reading,

Michael