Hello everybody,
It’s Michael, and I thought the prefect place to continue from last post would be to show you guys how to launch the database as well as insert records into the database.
But first, I have some corrections to make. This will be the diagram we will use

It’s similar to the one in the previous post, except for one less foreign key in the Awards table that should not have been there along with some other added and modified attributes such as
- The release year for album has been changed to release date.
- The featured artist and singer tables have new and/or modified attributes, which include
- Gender-the gender of the singer/featured artists (it can be null if we are analyzing a group)
- This is the only addition to the singer table.
- Age-the age of the featured artist as of August 1, 2018.
- Birthplace-the birthplace of the featured artist (or where a group was formed)
- Death-the date of death of the singer/featured artist
- This was a new column for the featured artist table, but it was on the singer table (I just changed the name from “Date of Death” to Death”)
Now that I got that clarified, the next question would be “How do we launch the database?” We do so with a process called forward engineering (under the database drop-down menu click forward engineering). Forward engineering allows us to export our diagram to an SQL server.
- You’ll also see an option for reverse engineering in the drop-down menu. You won’t need it to launch the database, but just if you’re wondering what reverse engineering is, it’s essentially the opposite of forward engineering, where you can extract the ER diagram from a launched database (this process can come in handy if you want to modify attributes or relationships in the diagram, but remember to forward engineer again)
Alright, now here’s how to forward engineer your database.
First step is connection options. Choose “new connection” for stored connection and “Standard (TCP/IP)” for connection method. Keep everything else as is.

Next step would be setting up options for the database to be created. Personally, the only two boxes I would check include “Generate INSERT statements for tables” and “Include model attached scripts”.

Next we have to select the objects to forward engineer. Since there are only table objects so far in this diagram, then table objects are the only thing we will be forward engineering. If you’re wondering what the show filter button does, it just allows you to select which tables you don’t want to (or want to) include in the final diagram. Since all five tables are relevant to the database, ignore the show filter column.
If your forward engineering process succeeds, then you will see green checkmarks by each item and the message “Forward Engineer Finished Successfully”.
- However, if your forward engineering process had errors, then you will be notified. There will be a white box showing you what exactly your error is. This happened to me the first time I tried to forward engineer, as the fields of data type TIME() had 10 as the maximum length while 6 can be the maximum length for fields with data type TIME(). I fixed the error, ran the forward engineering process again, and it worked, as shown below.

Now let’s check to see if our database successfully launched.To do so, click on the schemas tab, then click the loading icon. If you see something called “mydb”, then the database successfully loaded onto the MySQL server.

Now our database is active, but it’s also empty. So, let’s fill it up (and we’re gonna need to fill up all 5 tables separately). So, we use SELECT * FROM mydb.(whatever table you want to insert data into) to first check out the table (the output is shown in the bottom half of the screen). The output, as seen on the bottom half of the picture, shows that the table is empty.

Now let’s add a record to the table and see what happens.
- Note-this was before I decided to add a gender field. But the procedure is basically the same.


If the “Apply Script Process” is successful, then the next time you run the (SELECT * FROM mydb.Singer) prompt, you should see the record added into the database.

The same procedure applies to fill in other records for this table

- The process wasn’t successful for me at first, but this was only because my “Date of Death” values should have been formatted like Year-Month-Day, not Month/Day/Year.
Here’s a screenshot of the database with the gender field filled out.

Now let’s fill out the album table (because it connects to the idSinger column)
- And if you’re wondering what to put for Singer_idSinger, refer back to the Singer table to figure out which primary key in that table corresponds to the album.
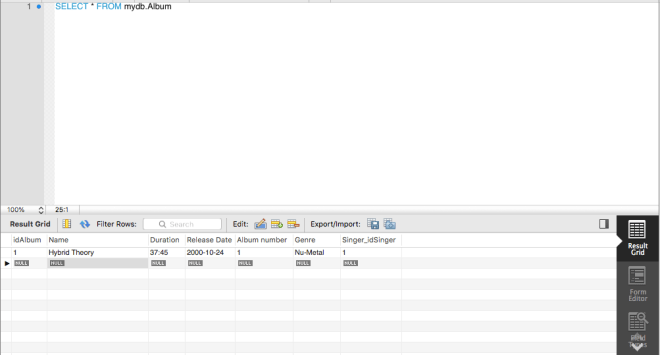
And if forward engineering succeeds, then this record should pop up the next time you run (SELECT * FROM mydb.Album).

Let’s add two more records to see what happens.

Here’s the output, and in case you’re wondering, I set the idAlbum primary key field to auto-increment, so all I had to do was type 1 as the Hybrid Theory primary key, then the primary keys for the rest of the albums were automatically generated.

If you know how to fill in one table, then you can figure out how to fill out the rest. I’ll actually get into querying with my next post.
Thanks for reading,
Michael