Hello everyone,
Michael here, and today’s post will be a lesson on how to use bounding boxes in OCR.
You’ll recall that in my 7th anniversary post The Seven-Year Coding Wonder I did an introduction to Python OCR with the Tesseract package. Now, I’ll show you how to make bounding boxes, which you can use in your OCR analyses.
But first, what are bounding boxes?
That’s a very good question. Simply put, it’s a rectangular region that denotes the location of a specific object-be it text or something else-within a given space.
For instance, let’s take this restaurant sign. The rectangle I drew on the COME ON IN part of the sign would serve as a bounding box

In this case, the red rectangular bounding box would denote the location of the COME ON IN text.
You can use bounding boxes to find anything in an image, like other text, other icons on the sign, and even the shadow the sign casts on the sidewalk.
Bounding boxes, tesseract style!
Now that we’ve explained what bounding boxes are, it’s time to test them out on an image with Tesseract!
Here’s the image we’ll test our bounding boxes on:

Now, how do we get our bounding boxes? Here’s how:
- Keep in mind, I will continue from where I left off on my 7-year anniversary post, so if you want to know how to read the image and print the text to the IDE, here’s the post you should read-The Seven-Year Coding Wonder.
First, install the OpenCV package:
!pip install opencv-pythonNext, run pytesseract’s image_to_data() method on the image and print out the resulting dictionary:
sevenYears = pytesseract.image_to_data(testImageNP, output_type=pytesseract.Output.DICT)
print(sevenYears)

{'level': [1, 2, 3, 4, 5, 5, 5, 5, 4, 5, 5], 'page_num': [1, 1, 1, 1, 1, 1, 1, 1, 1, 1, 1], 'block_num': [0, 1, 1, 1, 1, 1, 1, 1, 1, 1, 1], 'par_num': [0, 0, 1, 1, 1, 1, 1, 1, 1, 1, 1], 'line_num': [0, 0, 0, 1, 1, 1, 1, 1, 2, 2, 2], 'word_num': [0, 0, 0, 0, 1, 2, 3, 4, 0, 1, 2], 'left': [0, 528, 528, 571, 571, 1069, 1371, 1618, 528, 528, 1297], 'top': [0, 502, 502, 502, 504, 529, 502, 504, 690, 690, 692], 'width': [2129, 1205, 1205, 1124, 452, 248, 200, 77, 1205, 714, 436], 'height': [1399, 313, 313, 125, 97, 98, 99, 95, 125, 99, 123], 'conf': [-1, -1, -1, -1, 96, 96, 96, 96, -1, 96, 96], 'text': ['', '', '', '', 'Thank', 'you', 'for', '7', '', 'wonderful', 'years!']}
Now, what does all of this juicy data mean? Let’s dissect it key-by-key:
level-The element level in Tesseract output (1 indicates page, 2 indicates block, 3 indicates paragraph, 4 indicates line and 5 indicates word)page_num-The page number on the document where the object was found; granted, this is just a one-page image we’re working with, so this information isn’t terribly useful (though if we were working with a PDF or multi-page document, this would be very helpful information)block_num-This indicates which chunk of connected text (paragraph, column, etc.) an element belongs to (this runs on a 0-index system, so 0 indicates the first chunk)par_num-The paragraph number that a block element belongs to (also runs on a 0-index system)line_num-The line number within a paragraph (also runs on a 0-index system)word_num-The word number within a line (also runs on a 0-index system)left&top-The X-coordinate for the left boundary and Y-coordinate for the top boundary of the bounding box, respectivelywidth&height-The width & height in pixels, respectively, of the bounding boxconf-The OCR confidence value (from 0-100, 100 being an exact match) that the correct word was detected in the bounding box. If you see aconfof -1, the element has no confidence value as its not a wordtext-The actual text in the bounding box
Wow, that’s a lot of information to dissect! Another thing to note about the above output-not all of it is relevant. Let’s clean up the output to only display information related to the words in the image:
import pandas as pd

sevenYearsDataFrame = pd.DataFrame(sevenYears)
sevenYearsWords = sevenYearsDataFrame[sevenYearsDataFrame['level'] == 5]
print(sevenYearsWords)

    level  page_num  block_num  par_num  line_num  word_num  left  top  width  \
4       5         1          1        1         1         1   571  504    452
5       5         1          1        1         1         2  1069  529    248
6       5         1          1        1         1         3  1371  502    200
7       5         1          1        1         1         4  1618  504     77
9       5         1          1        1         2         1   528  690    714
10      5         1          1        1         2         2  1297  692    436

    height  conf       text
4       97    96      Thank
5       98    96        you
6       99    96        for
7       95    96          7
9       99    96  wonderful
10     123    96     years!
Granted, it’s not necessary to convert the image dictionary into a dataframe, but I chose to do so since dataframes are quite versatile and easy to filter. As you can see here, we have all the same metrics we got before, just for the words (which is what we really wanted).
And now, let’s see some bounding boxes!
Now that we know how to find all the information about an image’s bounding boxes, let’s figure out how to display them on the image. Granted, the pytesseract library won’t actually draw the boxes onto the images. However, we can use another familiar library to help us out here-OpenCV (which I did a series on in late 2023).
First, let’s install the opencv-python module onto our IDE if it’s not already there:
!pip install opencv-python- Remember, no need for the exclamation point at the front of the string if your running this command on a CLI.
Next, let’s read the image into the IDE:
import cv2
from google.colab.patches import cv2_imshow

sevenYearsTestImage = cv2.imread('7 years.png', cv2.IMREAD_COLOR)
cv2_imshow(sevenYearsTestImage)
cv2.waitKey(0)
After installing the opencv module in the IDE, we then read the image into the IDE using the cv2.imread() method. The cv2.IMREAD_COLOR ensures we read and display this image in its standard color format.
- You may be wondering why we’re reading the image into the IDE again, especially after reading it in with pytersseract. We need to read the image again as pytesseract will only read the image string into the IDE, not the image itself. We need to read in the actual image in order to display the bounding boxes.
- If you’re not using Google Colab as your IDE, no need to include this line-
from google.colab.patches import cv2_imshow. The reason Google Colab makes you include this line is because the cv2.imshow() method caused Google Colab to crash, so think of this line as Google Colab’s fix to the problem. It’s annoying I know, but it’s just one of those IDE quirks.
Drawing the bounding boxes
Now that we’ve read the image into the IDE, it’s time for the best part-drawing the bounding boxes onto the image. Here’s how we can do that:
sevenYearsWords = sevenYearsWords.reset_index(drop=True)

howManyBoxes = len(sevenYearsWords['text'])

for h in range(howManyBoxes):
  (x, y, w, h) = (sevenYearsWords['left'][h], sevenYearsWords['top'][h], sevenYearsWords['width'][h], sevenYearsWords['height'][h])
  sevenYearsTestImage = cv2.rectangle(sevenYearsTestImage, (x, y), (x + w, y + h), (255, 0, 0), 3)

cv2_imshow(sevenYearsTestImage)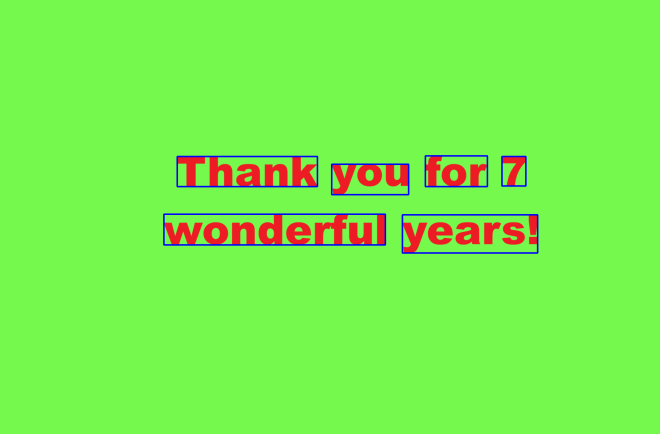
As you can see, we can now see our perfectly blue bounding boxes on each text element in this image. The process also worked like a charm, as each text element is captured perfectly inside each bounding box-then again, it helped that each text element had a 96 OCR confidence score (which ensured high detection accuracy).
How did we get these perfectly blue bounding boxes?
- I first reset the index on the
sevenYearsWordsdataframe because when I first ran this code, I got an indexing error. Since thesevenYearsWordsdataframe is essentially a subset of the largersevenYearsDataFrame(the one with all elements, not just words), the indexing for thesevenYearsWordsdataframe would be based off of the original dataframe, so I needed to use thereset_index()command to reset the indexes of thesevenYearsWordsdataframe to start at 0. - Keep this method (
reset_index()) in mind whenever you’re working with dataframes generated as subsets of larger dataframes. howManyBoxeswould let the IDE know how many bounding boxes need to be drawn-normally, you’d need as many bounding boxes as you have text elements- The loop is essentially iterating through the elements and drawing a bounding box on each one using the
cv2.rectangle()method. The parameters for this method are: the image where you want to draw the bounding boxes, the x & y coordinates of each box, the x-coordinate plus width and y-coordinate plus height for each box, the BGR color tuple of the boxes, and the thickness of the boxes in pixels (I went with 3-px thick blue boxes).
Come find the code on my GitHub-https://github.com/mfletcher2021/blogcode/blob/main/OCR_bounding_boxes.ipynb.
Thanks for reading!
Michael