OCR Scenario 4: How Well Can Tesseract Read My Handwriting?

Hello everyone,

Michael here, and in today’s post, we’ll take a look at how well Tesseract could possibly read a sample of my handwriting.

So far, we’ve tested Tesseract against standard computer-font text, a photo of a banner with text, and a common US tax document. Aside from the standard computer-font text, Tesseract didn’t work well with either the banner or the tax document.

However, can Tesseract work well with reading my handwriting? Let’s find out!

But first, a little pre-processing…

Before we test Tesseract on my handwriting, let’s follow the pre-processing steps we’ve followed for the other three Tesseract scenarios: pip install the necessary packages and import them onto the IDE.

First, the pip installing:

!pip install pytesseract
!pip install opencv-python

Next, let’s import the necessary packages:

import pytesseract
import numpy as np
from PIL import Image

And now, the initial handwriting Tesseract test

Now, upon initial testing, how well can Tesseract read this sample of my handwriting?:

Let’s find out, shall we:

testImage = 'handwriting.png'
testImageNP = np.array(Image.open(testImage))
testImageTEXT = pytesseract.image_to_string(testImageNP)
print(testImageTEXT)

Output: 

Interestingly, Tesseract didn’t seem to pick up any text. I thought it might’ve picked up something, as the image simply contains black text on a white background. After all, there are no other objects in the image, nor is the information arranged like a document.

Could a little bit of image preprocessing be of any use with this image? Let’s find out!

Preprocessing time!

For this example, let’s try the same technique we used in the other two lessons-thresholding!

First off, let’s grayscale this image:

import cv2
from google.colab.patches import cv2_imshow

handwriting = cv2.imread('handwriting.png')
handwriting = cv2.cvtColor(handwriting, cv2.COLOR_BGR2GRAY)
cv2_imshow(handwriting)

Next, let’s do a little thresholding on the image. Since the image is black font with white text, let’s see how a different thresholding technique (THRESH_BINARY_INV) might be able to assist us here:

ret, thresh = cv2.threshold(handwriting, 127, 255, cv2.THRESH_BINARY_INV)
cv2_imshow(thresh)

The technique we used here-THRESH_BINARY_INV-is the opposite of what we used for the previous two lessons. In inverse binary thresholding, pixels above a certain threshold (127 in this case) turn black while pixels below this threshold turn white. I think this type of thresholding could be quite useful for handling black text on a white background, as was the case here.

Any luck reading?

Once we’ve done the thresholding, let’s see if that made a difference in the image’s Tesseract readability:

handwritingTEXT = pytesseract.image_to_string(thresh)
print(handwritingTEXT)

Output: 

Interestingly, unlike the previous two Tesseract scenarios we tested (the photo of the banner and the W-2 document), no text was read at all after thresholding.

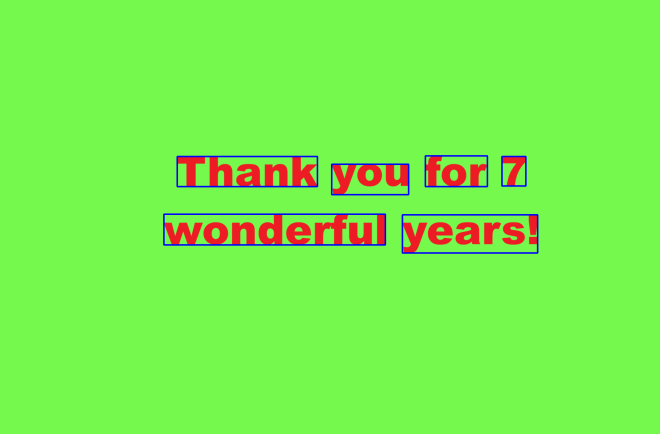
Honestly, I thought the handwriting scenario would do far better than the banner photo or W-2 given that the contents of this image are simply black text on a white background. I mean, Tesseract was able to perfectly read the image in The Seven-Year Coding Wonder, and that was red text on a lime-green background. I guess this goes to show that while Tesseract has its potential, it also has several limitations as we’ve discovered.

Here’s the GitHub link to the Google Colab notebook for this post-https://github.com/mfletcher2021/blogcode/blob/main/OCR_handwriting_readings.ipynb.

Thanks for reading,

Michael

OCR Scenario 2: How Well Can Tesseract Read Photos?

Hello everyone,

Michael here, and in today’s post, we’ll see how well OCR and PyTesseract can read text from photos!

Here’s the photo we will be reading from:

This is a photo of a banner at Nashville Farmer’s Market, taken by me on August 29, 2025. I figured this would be a good example to testing how well OCR can read text from photos, as this banner contains elements in different colors, fonts, text sizes, and text alignments (I know you might not be able to notice at first glance, but the Nashville in the Nashville Farmers Market logo on the bottom right-hand corner of this banner is on a small yellow background).

Let’s begin!

But first, the setup!

Before we dive right in to text extraction, let’s read the image to the IDE and install & import any necessary packages. First, if you don’t already have these modules installed, run the following commands on either your IDE or CLI:

!pip install pytesseract
!pip install opencv-python

Next, let’s import the following modules:

import pytesseract
import numpy as np
from PIL import Image

And now, let’s read the image!

Now that we’ve got all the necessary modules installed and imported, let’s read the image into the IDE:

testImage = 'farmers market sign.jpg'
testImageNP = np.array(Image.open(testImage))
testImageTEXT = pytesseract.image_to_string(testImageNP)
print(testImageTEXT)

Output: [no text read from image]

Unlike the 7 years image I used in the previous lesson, no text was picked up by PyTesseract from this image. Why could that be? I have a few theories as to why no text was read in this case:

  • There’s a lot going on in the background of the image (cars, pavilions, etc.)
  • PyTesseract might not be able to understand the fonts of any of the elements on the banner as they are not standard computer fonts
  • Some of the elements on the banner-specifically the Nashville Farmers’ Market logo on the bottom right hand corner of the banner don’t have horizontally-aligned text and/or the text is too small for PyTesseract to read.

Can we solve this issue? Let’s explore one possible method-image thresholding.

A little bit about thresholding

First of all, I figured we can try image thresholding to read the image text for two reasons: it might help PyTesseract read at least some of the banner text AND it’s a new concept I haven’t yet covered in this blog, so I figured I could teach you all something new in the process.

Now, as for image thresholding, it’s the process where grayscale images are converted to a two-colored image using a specific pixel threshold (more on that later). The two colors used in the new thresholding image are usually black and white; this helps emphasize the contrast between different elements in the image.

And now, let’s try some thresholding!

Now that we know a little bit about what image thresholding is, let’s try it on the banner image to see if we can extract at least some text from it.

First, let’s read the image into the IDE using cv2.read() and convert it to grayscale (thresholding only works with gray-scaled images):

import cv2
from google.colab.patches import cv2_imshow

banner = cv2.imread('farmers market sign.jpg')
banner = cv2.cvtColor(banner, cv2.COLOR_BGR2GRAY)
cv2_imshow(banner)

As you can see, we now have a grayscale image of the banner that can be processed for thresholding.

The thresholding of the image

Here’s how we threshold the image using a type of thresholding called binary thresholding:

ret, thresh = cv2.threshold(banner, 127, 255, cv2.THRESH_BINARY)
cv2_imshow(thresh)

The cv2.threshold() method takes four parameters-the grayscale image, the pixel threshold to apply to the image, the pixel value to use for conversion for pixels above and below the threshold, and the thresholding method to use-in this case, I’m using cv2.THRESH_BINARY.

Now, what is the significance of the numbers 127 and 255? 127 is the threshold value, which means that any pixel with an intensity less than or equal to this threshold will be set to black (intensity 0) while any pixel with an intensity above this value will be set to white (intensity 255). While 127 isn’t a required threshold value, it’s ideal because it’s like a midway point between the lowest and highest pixel intensity values (0 and 255, respectively). In other words, 127 is a quite useful threshold value for helping to establish black-and-white contrast in image thresholding. 255, on the other hand, represents the pixel intensity value to use for any pixels above the 127 intensity threshold. As I mentioned earlier, white pixels have an intensity of 255, so any pixels in the image above a 127 intensity are converted to a 255 intensity, so those pixels turns white while pixels at or below the threshold are converted to a 0 intensity (black).

  • A little bit about the ret parameter in the code: this value represent the pixel intensity threshold value you want to use for the image. Since we’re doing simple thresholding, ret can be used interchangeably with the thresholding value we specified here (127). For more advanced thresholding methods, ret will contain the calculated optimal threshold.

And now the big question…will Tesseract read any text with the new image?

Now that we’ve worked OpenCV’s thresholding magic onto the image, let’s see if PyTesseract picks up any text from the image:

bannerTEXT = pytesseract.image_to_string(thresh)
print(bannerTEXT)

a>
FU aba tee
RKET

Using the PyTesseract image_to_string() method on the new image, the only real improvement here is that there was even text read at all. It appears that even after thresholding the image, PyTesseract’s output didn’t even pick up anything close to what was on the banner (although it surprisingly did pick up the RKET from the logo on the banner).

All in all, this goes to show that even with some good image preprocessing methods, PyTesseract still has its limits. I still have several other scenarios that I will test with PyTesseract, so stay tuned for more!

Here’s the GitHub link to the Colab notebook used for this tutorial (you will need to upload the images again to the IDE, which can easily be done by copying the images from this post, saving them to your local drive, and re-uploading them to the notebook)-https://github.com/mfletcher2021/blogcode/blob/main/OCR_photo_text_extraction.ipynb.

Thanks for reading,

Michael

How To Use OCR Bounding Boxes

Hello everyone,

Michael here, and today’s post will be a lesson on how to use bounding boxes in OCR.

You’ll recall that in my 7th anniversary post The Seven-Year Coding Wonder I did an introduction to Python OCR with the Tesseract package. Now, I’ll show you how to make bounding boxes, which you can use in your OCR analyses.

But first, what are bounding boxes?

That’s a very good question. Simply put, it’s a rectangular region that denotes the location of a specific object-be it text or something else-within a given space.

For instance, let’s take this restaurant sign. The rectangle I drew on the COME ON IN part of the sign would serve as a bounding box

In this case, the red rectangular bounding box would denote the location of the COME ON IN text.

You can use bounding boxes to find anything in an image, like other text, other icons on the sign, and even the shadow the sign casts on the sidewalk.

Bounding boxes, tesseract style!

Now that we’ve explained what bounding boxes are, it’s time to test them out on an image with Tesseract!

Here’s the image we’ll test our bounding boxes on:

Now, how do we get our bounding boxes? Here’s how:

  • Keep in mind, I will continue from where I left off on my 7-year anniversary post, so if you want to know how to read the image and print the text to the IDE, here’s the post you should read-The Seven-Year Coding Wonder.

First, install the OpenCV package:

!pip install opencv-python

Next, run pytesseract’s image_to_data() method on the image and print out the resulting dictionary:

sevenYears = pytesseract.image_to_data(testImageNP, output_type=pytesseract.Output.DICT)
print(sevenYears)

{'level': [1, 2, 3, 4, 5, 5, 5, 5, 4, 5, 5], 'page_num': [1, 1, 1, 1, 1, 1, 1, 1, 1, 1, 1], 'block_num': [0, 1, 1, 1, 1, 1, 1, 1, 1, 1, 1], 'par_num': [0, 0, 1, 1, 1, 1, 1, 1, 1, 1, 1], 'line_num': [0, 0, 0, 1, 1, 1, 1, 1, 2, 2, 2], 'word_num': [0, 0, 0, 0, 1, 2, 3, 4, 0, 1, 2], 'left': [0, 528, 528, 571, 571, 1069, 1371, 1618, 528, 528, 1297], 'top': [0, 502, 502, 502, 504, 529, 502, 504, 690, 690, 692], 'width': [2129, 1205, 1205, 1124, 452, 248, 200, 77, 1205, 714, 436], 'height': [1399, 313, 313, 125, 97, 98, 99, 95, 125, 99, 123], 'conf': [-1, -1, -1, -1, 96, 96, 96, 96, -1, 96, 96], 'text': ['', '', '', '', 'Thank', 'you', 'for', '7', '', 'wonderful', 'years!']}

Now, what does all of this juicy data mean? Let’s dissect it key-by-key:

  • level-The element level in Tesseract output (1 indicates page, 2 indicates block, 3 indicates paragraph, 4 indicates line and 5 indicates word)
  • page_num-The page number on the document where the object was found; granted, this is just a one-page image we’re working with, so this information isn’t terribly useful (though if we were working with a PDF or multi-page document, this would be very helpful information)
  • block_num-This indicates which chunk of connected text (paragraph, column, etc.) an element belongs to (this runs on a 0-index system, so 0 indicates the first chunk)
  • par_num-The paragraph number that a block element belongs to (also runs on a 0-index system)
  • line_num-The line number within a paragraph (also runs on a 0-index system)
  • word_num-The word number within a line (also runs on a 0-index system)
  • left & top-The X-coordinate for the left boundary and Y-coordinate for the top boundary of the bounding box, respectively
  • width & height-The width & height in pixels, respectively, of the bounding box
  • conf-The OCR confidence value (from 0-100, 100 being an exact match) that the correct word was detected in the bounding box. If you see a conf of -1, the element has no confidence value as its not a word
  • text-The actual text in the bounding box

Wow, that’s a lot of information to dissect! Another thing to note about the above output-not all of it is relevant. Let’s clean up the output to only display information related to the words in the image:

import pandas as pd

sevenYearsDataFrame = pd.DataFrame(sevenYears)
sevenYearsWords = sevenYearsDataFrame[sevenYearsDataFrame['level'] == 5]
print(sevenYearsWords)

    level  page_num  block_num  par_num  line_num  word_num  left  top  width  \
4       5         1          1        1         1         1   571  504    452   
5       5         1          1        1         1         2  1069  529    248   
6       5         1          1        1         1         3  1371  502    200   
7       5         1          1        1         1         4  1618  504     77   
9       5         1          1        1         2         1   528  690    714   
10      5         1          1        1         2         2  1297  692    436   

    height  conf       text  
4       97    96      Thank  
5       98    96        you  
6       99    96        for  
7       95    96          7  
9       99    96  wonderful  
10     123    96     years!  

Granted, it’s not necessary to convert the image dictionary into a dataframe, but I chose to do so since dataframes are quite versatile and easy to filter. As you can see here, we have all the same metrics we got before, just for the words (which is what we really wanted).

And now, let’s see some bounding boxes!

Now that we know how to find all the information about an image’s bounding boxes, let’s figure out how to display them on the image. Granted, the pytesseract library won’t actually draw the boxes onto the images. However, we can use another familiar library to help us out here-OpenCV (which I did a series on in late 2023).

First, let’s install the opencv-python module onto our IDE if it’s not already there:

!pip install opencv-python
  • Remember, no need for the exclamation point at the front of the string if your running this command on a CLI.

Next, let’s read the image into the IDE:

import cv2
from google.colab.patches import cv2_imshow

sevenYearsTestImage = cv2.imread('7 years.png', cv2.IMREAD_COLOR)
cv2_imshow(sevenYearsTestImage)
cv2.waitKey(0)

After installing the opencv module in the IDE, we then read the image into the IDE using the cv2.imread() method. The cv2.IMREAD_COLOR ensures we read and display this image in its standard color format.

  • You may be wondering why we’re reading the image into the IDE again, especially after reading it in with pytersseract. We need to read the image again as pytesseract will only read the image string into the IDE, not the image itself. We need to read in the actual image in order to display the bounding boxes.
  • If you’re not using Google Colab as your IDE, no need to include this line-from google.colab.patches import cv2_imshow. The reason Google Colab makes you include this line is because the cv2.imshow() method caused Google Colab to crash, so think of this line as Google Colab’s fix to the problem. It’s annoying I know, but it’s just one of those IDE quirks.

Drawing the bounding boxes

Now that we’ve read the image into the IDE, it’s time for the best part-drawing the bounding boxes onto the image. Here’s how we can do that:

sevenYearsWords = sevenYearsWords.reset_index(drop=True)

howManyBoxes = len(sevenYearsWords['text'])

for h in range(howManyBoxes):
  (x, y, w, h) = (sevenYearsWords['left'][h], sevenYearsWords['top'][h], sevenYearsWords['width'][h], sevenYearsWords['height'][h])
  sevenYearsTestImage = cv2.rectangle(sevenYearsTestImage, (x, y), (x + w, y + h), (255, 0, 0), 3)

cv2_imshow(sevenYearsTestImage)

As you can see, we can now see our perfectly blue bounding boxes on each text element in this image. The process also worked like a charm, as each text element is captured perfectly inside each bounding box-then again, it helped that each text element had a 96 OCR confidence score (which ensured high detection accuracy).

How did we get these perfectly blue bounding boxes?

  • I first reset the index on the sevenYearsWords dataframe because when I first ran this code, I got an indexing error. Since the sevenYearsWords dataframe is essentially a subset of the larger sevenYearsDataFrame (the one with all elements, not just words), the indexing for the sevenYearsWords dataframe would be based off of the original dataframe, so I needed to use the reset_index() command to reset the indexes of the sevenYearsWords dataframe to start at 0.
  • Keep this method (reset_index()) in mind whenever you’re working with dataframes generated as subsets of larger dataframes.
  • howManyBoxes would let the IDE know how many bounding boxes need to be drawn-normally, you’d need as many bounding boxes as you have text elements
  • The loop is essentially iterating through the elements and drawing a bounding box on each one using the cv2.rectangle() method. The parameters for this method are: the image where you want to draw the bounding boxes, the x & y coordinates of each box, the x-coordinate plus width and y-coordinate plus height for each box, the BGR color tuple of the boxes, and the thickness of the boxes in pixels (I went with 3-px thick blue boxes).

Come find the code on my GitHub-https://github.com/mfletcher2021/blogcode/blob/main/OCR_bounding_boxes.ipynb.

Thanks for reading!

Michael

Python Lesson 47: Image Rotation (AI pt. 13)

Hello loyal readers,

Michael here, and in this post, we’ll cover another fun OpenCV topic-image rotation!

Let’s rotate an image!

First off, let’s figure out how to rotate images with OpenCV. Here’s the image we’ll be working with in this example:

This is an image of the Jumbotron at First Horizon Park in Nashville, TN, home ballpark of the Nashville Sounds (Minor League Baseball affilate of the Milwaukee Brewers)

Now, how do we rotate this image? First, let’s read in our image in RGB colorscale:

import cv2
import matplotlib.pyplot as plt

ballpark=cv2.imread(r'C:\Users\mof39\Downloads\20230924_140902.jpg', cv2.IMREAD_COLOR)
ballpark=cv2.cvtColor(ballpark, cv2.COLOR_BGR2RGB)
plt.figure(figsize=(10, 10))
plt.imshow(ballpark)

Now, how do we rotate this image? Let’s start by analyzing a 90-degree clockwise rotation:

clockwiseBallpark = cv2.rotate(ballpark, cv2.ROTATE_90_CLOCKWISE)
plt.figure(figsize=(10, 10))
plt.imshow(clockwiseBallpark)

All it takes to rotate an image in OpenCV is the cv2.rotate() method and two parameters-the image you wish to rotate and one of the following OpenCV rotation codes (more on these soon):

  • cv2.ROTATE_90_CLOCKWISE (rotates image 90 degrees clockwise)
  • cv2.ROTATE_180 (rotates image 180 degrees clockwise)
  • cv2.ROTATE_90_COUNTERCLOCKWISE (rotates image 270 degrees clockwise-or 90 degrees counterclockwise)

Let’s analyze the image rotation with the other two OpenCV rotation codes-first off, the ballpark image rotated 180 degrees clockwise:

clockwiseBallpark = cv2.rotate(ballpark, cv2.ROTATE_180)
plt.figure(figsize=(10, 10))
plt.imshow(clockwiseBallpark)

Alright, pretty impressive. It’s an upside down Jumbotron!

Now to rotate the image 270 degrees clockwise:

clockwiseBallpark = cv2.rotate(ballpark, cv2.ROTATE_90_COUNTERCLOCKWISE)
plt.figure(figsize=(10, 10))
plt.imshow(clockwiseBallpark)

Well well, it’s the amazing rotating Jumbotron!

And yes, in case you’re wondering, the rotation code cv2.ROTATE_90_COUNTERCLOCKWISE is the correct rotation code for a 270 degree clockwise rotation because a 90 degree counterclockwise rotation is the same thing as a 270 degree clockwise rotation.

Now, I know I just discussed three possible ways to rotate an image. However, what if you wanted to rotate an image in a way that’s not 90, 180, or 270 degrees. Well, if you try to do so with the cv2.rotate() method, you’ll get an error:

clockwiseBallpark = cv2.rotate(ballpark, 111)
plt.figure(figsize=(10, 10))
plt.imshow(clockwiseBallpark)

TypeError: Image data of dtype object cannot be converted to float

When I tried to rotate this image 111 degrees clockwise, I got an error because the cv2.rotate() method will only accept one of the three rotation codes I mentioned above.

Let’s rotate an image (in any angle)!

However, if you want more freedom over how you rotate your images in OpenCV, use the cv2.getRotationMatrix2D() method. Here’s an example as to how to use it:

height, width = ballpark.shape[:2]
center = (width/2, height/2)
rotationMatrix = cv2.getRotationMatrix2D(center,55,1)
rotatedBallpark = cv2.warpAffine(ballpark, rotationMatrix,(height, width)) 
plt.figure(figsize=(10, 10))
plt.imshow(rotatedBallpark)

To rotate an image in OpenCV using an interval that’s not a multiple of 90 degrees (90, 180, 270), you’ll need to use both the cv2.getRotationMatrix2D() and the cv2.warpAffine() method. The former method sets the rotation matrix, which refers to the degree (either clockwise or counterclockwise) that you wish to rotate this image. The latter method actually rotates the image.

Since both of these are new methods for us, let’s dive into them a little further! First off, let’s explore the parameters of the cv2.getRotationMatrix2D() method:

  • center-this parameter indicates the center of the image, which is necessary for rotations not at multiples-of-90-degrees. To get the center, first retrieve the image’s shape and from there, retrieve the height and width. Once you have the image’s height and width, create a center 2-element tuple where you divide the image’s width and height by 2. It would also be ideal to list the width before the height, but that’s just a programmer tip from me.
  • angle-the angle you wish to use for the image rotation. In this example, I used 55, indicating that I want to rotate the image 55 degrees clockwise. However, if I wanted to rotate the image 55 degrees counterclockwise, I would’ve used -55 as the value for this parameter.
  • scale-This is an integer that represents the factor you wish to use to zoom in the rotated image. In this example, I used 1 as the value for this parameter, indicating that I don’t want to zoom in the rotated image at all. If I’d used a value greater than 1, I’d be zooming in, and if I was using a value less than 1, I’d be zooming out.

Next, let’s explore the parameters of the cv2.warpAffine() method!

  • src-The image you wish to rotate (in this example, I used the base ballpark image)
  • M-The rotation matrix you just created for the image using the cv2.getRotationMatrix2D() method (ideally you would’ve stored the rotation matrix in a variable).
  • dsize-A 2-element tuple indicating the size of the rotated image; in this example, I used the base image’s height and width to keep the size of the rotated image the same.

Now for some extra notes:

  • Why is the rotation method called warpAffine()? This is because the rotation we’re performing on the image is also known as an affine transformation, which transforms the image (in this case rotating it) while keeping its same shape.
  • You’ll notice that after rotating the image using the cv2.warpAffine method, the entire image isn’t visible on the plot. I haven’t figured out how to make the image visible on the plot but when I do, I can certainly share my findings here. Though I guess a good workaround solution would be to play around with the size of the plot.

Thanks for reading, and for my readers in the US, have a wonderful Thanksgiving! For my readers elsewhere on the globe, have a wonderful holiday season (and no, this won’t be my last post for 2023)!

Python Lesson 46: Image Blurring (AI pt. 12)

Hello everybody,

Michael here, and in this post, we’ll explore image blurring! Image blurring is a pretty self-explanatory process since the whole point of image blurring is to make the image, well, blurry. This process has many uses, such as blurring the background on your work video calls (and yes, I do that all the time during work video calls).

Intro to image blurring

Now that we know a little bit about image blurring, let’s explore it with code. Here’s the image that we’ll be using:

The photo above is of Stafford Park, a lovely municipal park in Miami Springs, FL.

Unlike image eroding, image blurring has a pretty self-explanatory description since the aim of this process is to, well, blur images. How can we accomplish this through OpenCV?

Before we get into the fun image-blurring code, let’s discuss the three main types of image blurring that are possible with OpenCV:

  • Gaussian blur-this process softens out any sharp edges in the image
  • Median blur-this process helps remove image noise* by changing pixel colors wherever necessary
  • Bilateral blur-this process makes the central part of the image clearer while making any non-central part of the image fuzzier

*For those unfamiliar with image processing, image noise is (usually unwanted) random brightness or color deviations that appear in an image. Median blurring assists you with removing image noise.

Now that we know the three different types of image blurring, let’s see them in action with the code

Gaussian blur

Before we start to blur the image, let’s read in the image in RGB colorscale:

import cv2
import matplotlib.pyplot as plt

park=cv2.imread(r'C:\Users\mof39\OneDrive\Documents\20230629_142648.jpg', cv2.IMREAD_COLOR)
park=cv2.cvtColor(park, cv2.COLOR_BGR2RGB)
plt.figure(figsize=(10, 10))
plt.imshow(park)

Next, let’s perform a Gaussian blur of the image:

gaussianPark = cv2.GaussianBlur(park, (7, 7), 10, 10)
plt.figure(figsize=(10,10))
plt.imshow(gaussianPark)

Notice anything different about this image? The sharp corners in this photo (such as the sign lettering) have been smoothed out, which is the point of Gaussian blurring (to smooth out rough edges in an image).

Now, what parameters does the cv2.GaussianBlur() method take?

  • The image you wish to blur (park in this case)
  • A 2-integer tuple indicating the size of the kernel you wish to use for the blurring process-yes, this is similar to the kernels we used for image erosion in the previous post Python Lesson 45: Image Resizing and Eroding (AI pt. 11) (we’re using a 7-by-7 kernel here).
  • Two integers that represent the sigmaX and sigmaY of the Gaussian blur that you wish to perform. What are sigmaX and sigmaY? Both integers represent the numerical factors you wish to use for the image blurring-sigmaX being the factor for horizontal blurring and sigmaY being the factor for vertical blurring.

A few things to keep in mind regarding the Gaussian blurring process:

  • Just as you did with image erosion, ensure that both dimension of the blurring kernel are positive and odd-numbered integers (like the 7-by-7 kernel we used above).
  • sigmaX and sigmaY are optional parameters, but keep in mind if you don’t include a value for either of them, both will default to a 0 value, which might not blur your picture the way you intended. Likewise, if you use a very high value for both sigmas, you’ll end up with a very, very blurry picture.

Median blur

Since median blurring helps remove image noise, we’re going to be using this altered park image with a bunch of noise for our demo:

Next up, let’s explore the median blur with our noisyPark image:

medianPark = cv2.medianBlur(noisyPark, 5)
plt.figure(figsize=(10,10))
plt.imshow(medianPark)

As you can see, median blurring the noisyPark image cleared out a significant chunk of the image noise! But how does this function work? Let’s explore some of its parameters:

  • The image you wish to blur (noisyPark in this case)
  • A single integer indicating the size of the kernel you wish to use for the blurring process-yes, this is similar to the kernels we used for Gaussian blurring, but you only need a single integer instead of a 2-integer tuple (we’re using a 5-by-5 kernel here). The integer must be a positive and odd number since the kernel must be an odd number (same rules as the Gaussian blur apply here for kernel creation).

Bilateral blur

Last but not least, let’s explore bilateral blurring! This time, let’s use the non-noise altered park image.

bilateralPark = cv2.bilateralFilter(park, 12, 120, 120) 
plt.figure(figsize=(10,10))
plt.imshow(bilateralPark)

Wow! As I mentioned earlier, the purpose of bilteral blurring is to make a central part of the image clearer while make other, non-central elements of the image blurrier. And boy, does that seem to be the case here since the central element of the image (the park sign and all its lettering) really pops out while everything in the background seems a bit blurrier.

How does the cv2.bilateralFilter() function work its magic? Here’s how:

  • The image you wish to blur (park in this case)
  • The diameter (in pixels) of the region you wish to iterate through to blur-in this case, I chose a 12-pixel diameter as my “blurring region”. It works in a similar fashion to the kernels we used for our “erosion region” in the previous lesson.
  • The next two integers-both 120-are the sigmaColor and sigmaSpace variables, respectively. The sigmaColor variable is a factor that considers how much color should be considered in the blurring process while the sigmaSpace variable is a factor that considers the proximity of several elements in the image (such as the runners in the background). The higher both of these values are, the blurrier the background will be.

Thanks for reading,

Michael

Python Lesson 45: Image Resizing and Eroding (AI pt. 11)

Hello everybody,

Michael here, and today’s lesson will be our first foray into image manipulation with OpenCV. We’ll learn two new techniques for image manipulation-resizing and eroding.

Let’s begin!

Resizing images

First off, let’s start this post by exploring how to resize images in OpenCV. Here is the image we’ll be working with throughout this post

This is an image of a hawk on a soccer goal at Sevier Park (Nashville, TN), taken in August 2021.

Now, how could we possible resize this image? Take a look at the code below (and yes, we’ll work with the RGB colorscale version of the image) to first upload and display the image:

import cv2
import matplotlib.pyplot as plt

hawk=cv2.imread(r'C:\Users\mof39\Downloads\20210807_172420.jpg', cv2.IMREAD_COLOR)
hawk=cv2.cvtColor(hawk, cv2.COLOR_BGR2RGB)
plt.figure(figsize=(9, 9))
plt.imshow(hawk)

Before we start with resizing the image, let’s first get the image’s size (I’ll explain why this information will be helpful later):

print(hawk.shape)

(3000, 4000, 3)

To get the image’s size, use the print([image variable].shape) method. This method returns a 3-integer tuple that indicates height, width and dimensions; in the case of the hawk image, the image is 3000 px tall by 4000 px wide and 3-dimensional overall (px stands for pixels-recall that computer image dimensions are measured in pixels).

Now, how can we resize this image? Take a look at the code below:

smallerHawk = cv2.resize(hawk, (2000, 1500))
plt.imshow(smallerHawk)

As you can see here, we reduced the size of the hawk image in half without cropping out any of the image’s elements. How did we do that? We used the cv2.resize() method and passed in not only the hawk image but also a 2-integer tuple-(2000, 1500)-to indicate that I wanted to reduced the size of the hawk image in half.

Now, there’s something interesting about the (2000, 1500) tuple I want to point out. See, when we listed the shape of the image, the 3-inter tuple that was returned (3000, 4000, 3) listed the image’s height before its width. However, in the tuple we passed to the cv2.resize() method, the image’s width (well, half of the image’s width) was listed before the image’s height (rather, half the height). Listing the width before the height allows you to properly resize the image the way you intended.

Now, what happens when we make this image bigger? Take a look at the following code:

largerHawk = cv2.resize(hawk, (6000, 8000))
plt.figure(figsize=(9, 9))
plt.imshow(largerHawk)

Granted, the image may not appear larger at first, but that’s mostly due to how we’re plotting it on MATPLOTLIB. If you look closely at the tick marks on each axis of the plot, you will see that the image size has indeed doubled to 6000 by 8000 px.

Image erosion

The next image manipulation technique I want to discuss is image erosion. What does image erosion do?

The simple answer is that image erosion, well, erodes away the boundaries on an image’s foreground object, whatever that may be (if it helps, think of the OpenCV image erosion process like geological erosion, only for images). How the image erosion is acoomplished is more complicated than a simple method like cv2.resize(), however let’s explore the image erosion process in the code below:

import numpy as np
kernel = np.ones((5,5), np.uint8)
erodedHawk = cv2.erode(hawk, kernel)
plt.figure(figsize=(10,10))
plt.imshow(erodedHawk)

OK, so aside from the cv2.erode() method, we’re also creating a numpy array. Why is that?

Well, the numpy array kernel (aptly called kernel) is essentially a matrix of 1s like so:

[1 1 1 1 1
 1 1 1 1 1
 1 1 1 1 1
 1 1 1 1 1
 1 1 1 1 1]

Since we specified that our matrix is of size (5, 5), we get a 5-by-5 matrix of ones. Pretty simple right? Here are some other things to keep in mind when creating the kernel:

  • Make sure the kernel’s dimensions are both odd numbers to ensure the presence of a central point in the kernel.
  • Theoretically, you could create a kernel of 0s, but a kernel of 1s is better suited for image erosion.
  • Ideally, you should also include np.uint8 as the second parameter in the kernel creation. For those who don’t know, np.unit8 stands for numpy unsigned 8-bit integer. The reason I suggest using this parameter is because doing so will store the matrix as 8-bit integers, which is beneficial for memory optimization in computer programs.

Now, how does this kernel help with image erosion? See, the 5-by-5 kernel that we just created iterates through the image we wish to erode (hawk in this case) by checking if each pixel that borders the kernel’s central pixel is set to 0 or 1. If all pixels that border the central pixel in the image are set to 1, then the central pixel is also set to 1. Otherwise, the central pixel is set to 0?

What do the 0s and 1s all mean here? Notice how the leaves on the tree in this eroded image look slightly darker than the tree leaves in the original image. That’s because image erosion manipulates an image’s foreground (in this case, OpenCV percieves the tree as the foreground) by removing pixels from the foreground’s boundaries, thus making certain parts of the image appear slightly darker after erosion. The slightly darker tree leaves make the image of the hawk stand out more than it did in the original image.

Thanks for reading,

Michael

Python Lesson 44: Image Color Spaces (AI pt. 10)

Hello everybody,

Michael here, and today’s post will cover how to understand color spaces in images.

Granted, I’ve previously discussed various colorscales you can find in computer programming in this post-Colors in Programming-but in this post, we’ll take a deeper dive into the use of colors in images.

But first, what is a color space?

Well, as the header above asks, what is a color space? In the context of images, a color space is a way to represent a certain color channel in an image.

Still confused? Let’s take the image we used in our first computer vision lesson (it can be found here Python Lesson 42: Intro To Computer Vision Part One-Reading Images (AI pt. 8)). Assuming we’re analyzing the RGB image of Orange Boy, the color spaces simply represent the intensities (or spaces) of red, blue and green light in the image.

And now let’s analyze colorspaces in OpenCV

As the header says, let’s examine color spaces in Open CV! Here’s the image we’ll be using for this tutorial:

This is a photo of autumn at Bicentennial Capitol Mall State Park in Nashville, TN, taken in October 2022.

Before we start exploring colorspaces, let’s read in this image to our IDE using the RGB colorscale (which means you should remember to convert the image’s default colorscale):

import cv2
import matplotlib.pyplot as plt
park=cv2.imread(r'C:\Users\mof39\Downloads\20221022_101648.jpg', cv2.IMREAD_COLOR)
park=cv2.cvtColor(park, cv2.COLOR_BGR2RGB)
plt.figure(figsize=(18, 18))
plt.imshow(park)

Great! Now that we have our RGB image, let’s explore the different color channels!

First off, let’s examine this image’s red colorspace! How can we do that? Take a look at the code below:

B, G, R = cv2.split(park)
plt.figure(figsize=(18, 18))
plt.imshow(R, cmap='Reds')

plt.show()

In this example, I used the first line of code (the one with B, G, R) to split the image into three distinct colorspaces-blue, green and red.

Aside from the standard plt.figure() functions, I did make a slight modification to the plt.imshow() function. Instead of simply passing in the park image, I passed in the R variable so that we see the image’s red colorspace AND passed in the cmap parameter with a value of Reds to display the red colorspace in, well, red.

Now, how can we show the green and blue colorspaces? We’d use the same logic as we did for the red colorspace, except swap the R in the plt.imshow() function for G and B for the green and blue colorspaces and change the cmap values to Greens and Blues, respectively.

Here’s the image’s blue colorspace:

plt.figure(figsize=(18, 18))
plt.imshow(B, cmap='Blues')
plt.show()

And here’s the image’s green colorspace:

plt.figure(figsize=(18, 18))
plt.imshow(G, cmap='Greens')
plt.show()

As you can see from all three of these color-altered images, the sky, park lawn, and buildings in the background are ceratinly more coloed than the trees, which look bright-white in all three color-altered images.

A little more on colorspace

Now that we’ve examined image colorspaces a bit, let’s see how we can find the most dominant color in an image! Take a look at the code below (which uses the park image):

from colorthief import ColorThief
colorthief =
ColorThief(r'C:\Users\mof39\Downloads\20221022_101648.jpg')
dominantColor = colorthief.get_color(quality=1)
print(dominantColor)

(120, 94, 72)

Granted, you could realistically use a package like numpy to find the most dominant color in an image, but the colortheif module is a much more efficient (and more fun) approach.

  • In case you didn’t know, you’ll need to pip install the colortheif module.

After creating a ColorTheif object (and passing in the image’s filepath on your computer), you’ll then need to use the get_color() method and pass in quality=1 as this method’s parameter. Using the quality=1 parameter will extract the most dominant color in an image.

  • You can certainly use a variable to store the most dominant color like I did here (I used the dominantColor variable) but that’s completely optional.

Once you print the dominant color, you’ll notice you don’t get a color name, but rather a 3-integer tuple that represents the frequency of red, blue and green in the image (the tuple is based off of the RGB colorscale). In this case, our most dominant color is RGB(120, 94, 72). What does that translate to?

In plain English, the most dominant color in this image is a very desaturated dark orange. If you take a look at the original RGB image, it makes sense not only because of the color of the park lawn but also due to all the trees and buildings in the image.

What if you want to know not only the most dominant color in an image, but also its color palette? The colortheif module can help you there too! Here’s how:

palette = colorthief.get_palette(color_count=5)
print(palette)

[(120, 94, 72), (179, 192, 208), (130, 160, 197), (28, 31, 32), (182, 141, 108)]

Just as colortheif did with the most dominant color in an image, all colors are represented as RGB 3-integer tuples. The get_palette() function helps returns the top X colors used in the image-the X is represented by the value of the color_count parameter. In plain English, five colors used in this image include:

  • very desaturated dark orange (the most dominant color)
  • grayish blue
  • slightly desaturated blue
  • very dark almost black blue
  • slightly desaturated orange.

This feature is like imagining a painter’s palette in Python form-pretty neat right! As you can see, our painter’s paletter for the park image has a lot of blues and oranges.

Thanks for reading!

Michael

Python Lesson 43: Intro to Computer Vision Part Two-Writing & Saving Images (AI pt. 9)

Hello everybody,

Michael here, and in today’s post, we’ll continue our introduction to computer vision, but this time we’ll explore how to write images to a certain place on your computer using OpenCV.

Let’s begin!

Let’s write an image!

Before we begin, here’s the image we will be working with:

This is an image of Simba/Orange Boy and his sister Marbles (on Christmas Day 2017 excited to get their presents), both of whom got an acknowledgement in The Glorious Five-Year Plan Part Two.

Now, here’s the code to read in the image to the IDE:

cats=cv2.imread(r'C:\Users\mof39\Downloads\IMG_4778 (1).jpg', cv2.IMREAD_COLOR)
cats=cv2.cvtColor(cats, cv2.COLOR_BGR2RGB)

Once this image is read onto the IDE, here’s the code we’d use to not only write this image but also save it to a certain directory on your computer:

import os

imagePath = r'C:\Users\mof39\Downloads\IMG_4778 (1).jpg'
imageDestination = r'C:\Users\mof39\OneDrive\Documents'

cats = cv2.imread(imagePath)
os.chdir(imageDestination)

savedImage = 'simbaandmarbles.jpg'
cv2.imwrite(savedImage, cats)

What does all of this code mean? Let me explain.

You’ll first need to import the os module (or pip install it if you haven’t already done so)-this will help you write and save the image to a specific directory.

The two variables that follow-imagePath and imageDestination-represent the current location of the image on my computer and the location on my computer where I wish to write and save the image, respectively. In this case, my image is currently located in my Downloads folder and I wish to send it to my Documents folder.

The cats variable is the result of reading in the image of the cats to the IDE. The os.chdir() function takes in one parameter-the string containing the image destination path. This function will allow you to set the destination of the image to ensure that your image is written and saved to the location you set in the imageDestination variable.

The savedImage variable allows you to set both the image name and the image extension to the image you wish to save and write-in this case, my image will be named simbaandmarbles and it will have a jpg extension.

Last but not least, use the cv2.imwrite() function to write and save the image to your desired directory (represented by the imageDestination variable). You’ll notice that this function takes two parameters-savedImage and cats in this example-but why might that be? Take a look at the code above and you’ll see why!

See, savedImage is the name we’d like to use for the saved image-this is a necessary paramater because we want OpenCV to save the image using the name/extension we specified. cats saves the image itself to the desired location (or imageDestination).

  • You should certainly change the values of imagePath, imageDestination and savedImage to reflect accurate image locations/destinations/names/extensions on your computer!

But wait! How do we know if our code worked? Take a look at the output below:

True

Since the output of this code returned True, the image was succesfully written and saved to the desired destination on our computer! Want another way to verify if our code worked? Take a look at my Documents folder (which was my imageDestination):

As you can see, my image was succesfully written to my Documents folder with the name/extension I specified (simbaandmarbles/JPG).

Now we know the image was succesfully written and saved to the Documents folder, but how do we know if the rendering worked? In other words, did OpenCV zoom in or crop too much of the image (or change the colorscale during the writing/saving process)? Click on the image to find out:

As you can see, not only did OpenCV correctly write and save the image to the correct location, but it also wrote and saved the image without changing the zoom-in/zoom-out view or the image’s colorscale!

And that, dear readers, is how you can write and save an image anywhere on your computer using eight simple lines of code!

Thanks for reading.

Michael