Hello everybody,
Michael here, and I’ve got an exciting Java lesson for you guys. Today, I’ll not only be covering how to work with lines and colors in Java but I’ll also be giving you guys an introduction to working with graphics in Java.
First, let’s discuss how to work with one of Java’s most important graphics classes-JFrame. The JFrame class allows you to create Java windows where you can add whatever graphics you want. Let’s create a simple JFrame object:
import javax.swing.JFrame;
public class Graphics101 {

    public static void main(String[] args) {
        JFrame frame = new JFrame("My first JFrame");
        frame.setSize(600, 600);
        frame.setDefaultCloseOperation(JFrame.EXIT_ON_CLOSE);
        frame.setVisible(true);
    }

}
And watch what appears when you run this code:

As you can see, a blank 600X600 window appears that serves as your programming canvas, where you can create whatever coding artistry you can imagine.
Now, how did this code manage to create this window? Well, for starters, we’d need to import the JFrame class in order to create a JFrame object; the line of code to import this class is import javax.swing.JFrame;. Next, as you all may have figured out, we’d need to create an object of the JFrame class (called frame in this example) in order to create a new JFrame window. In the JFrame object I created, I passed in the String parameter My first JFrame-this sets the title of the window as “My first JFrame”. I then used three JFrame class methods-.setSize(), .setDefaultCloseOperation(), .setVisible()-to fine-tune the window I’m creating.
Here’s a breakdown of each of these methods:
.setSize()-This method takes two integer parameters; the first parameter for width and the second parameter for height (both in pixels). These two parameters set the initial size of the JFrame window..setDefaultCloseOperation()-This method takes in a predefined constant from the JFrame class; oftentimes, that predefined constant isEXIT_ON_CLOSE, which simply closes the window when you click the X on the window’s upper right hand corner..setVisible()-This method simply takes in a boolean that tells the code whether or not to display the window when the code is run.
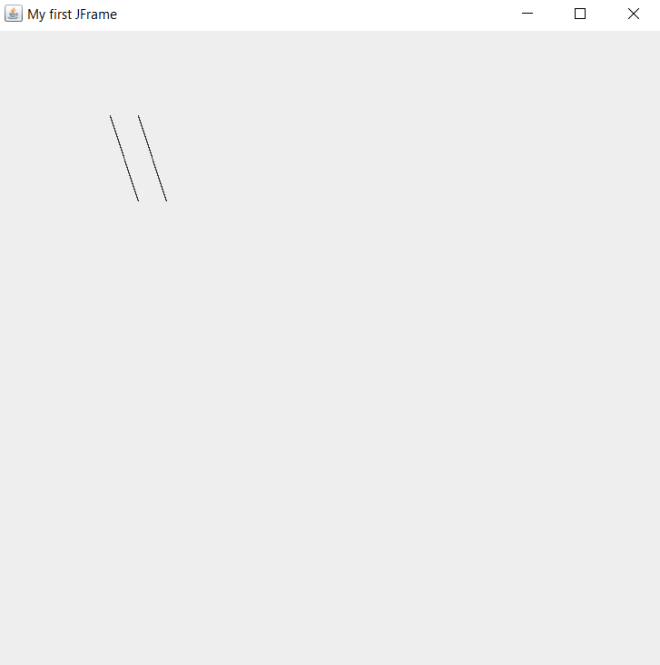
The blank JFrame is a great start, however, it looks awfully dull without anything on it. Before we start drawing cool shapes, let’s first draw a few lines onto our JFrame:
import javax.swing.*;
import java.awt.*;
import javax.swing.JComponent;

class LineDrawing extends JComponent {

    public void paint(Graphics g)
    {
        g.drawLine(100, 75, 125, 150);
        g.drawLine(125, 75, 150, 150);
    }
}

public class Graphics101 {

    public static void main(String[] args) {
        JFrame frame = new JFrame("My first JFrame");
        frame.setSize(600, 600);
        frame.setDefaultCloseOperation(JFrame.EXIT_ON_CLOSE);
        frame.getContentPane().add(new LineDrawing ());
        frame.setVisible(true);
    }

}
Now let’s take a look at the lines that were generated:
In this example, I used the same code from the previous example to create the JFrame. However, you’ll notice some differences from the previous example’s code. First of all, I did use asterisks (*) in the import statements. Using asterisks for imports in programming (any program, not just Java) is a practice known as star importing-this is where you import all the classes in a particular package or sub-package rather than importing the classes you need one-by-one. Some programmers aren’t fond of star imports and claim it’s bad practice, but I personally find them to be a more efficient method of importing.
The other difference between this code and the previous example’s code is that there is another class above the main class. The other class I created-LineDrawing-extends Java’s JComponent class, which means that my LineDrawing class will be able to access all of the JComponent class’s methods (which we need for line drawing).
My LineDrawing class contains a single method-paint()-which takes in a single parameter-g, which is an object of Java’s Graphics class (which is imported through the star import I used for Java’s java.awt package). The paint() method draws two parallel lines on the JFrame object I created. But how does paint() exactly draw the lines on the JFrame object? Pay attention to this line of code-frame.getContentPane().add(new LineDrawing ()). This line of code allows us to draw the lines on the JFrame window through using the .getContentPane() and .add() methods. In the .add() method, I passed in new LineDrawing() as this method’s parameter; this line of code creates a new object of the LineDrawing class inside the JFrame object. The LineDrawing class object will automatically activiate the class’s paint() method, which will draw the two parallel lines inside the JFrame window.
Now, you’re probably wondering how the .drawLine() method exactly works. This method takes in four parameters, which can be either integers or decimals. The first and third parameters represent the x-coordinates of the first and second point in the line, respectively. The second and fourth parameters represent the y-coordinates of the first and second point in the line, respectively. In this example, the four parameters I passed into the first line were 100, 75, 125, and 150-this means that the first line’s endpoints will be located at (100, 75) and (125, 150).
Now, there’s something that you should keep in mind when dealing with JFrame coordinates. JFrame doesn’t go by the same coordinate plane that you likely learned about in pre-algebra class. Rather, JFrame uses it’s own coordinate plane where all x- and y-axis values are positive and the axis values (for both axes) range from 0 to the height and width of the window (in pixels). In this case, since the JFrame window I created is 600×600 pixels, the value ranges for both axes would be from 0 to 600.
Here’s an illustration to show the difference between a standard coordinate plane and a JFrame coordinate plane:
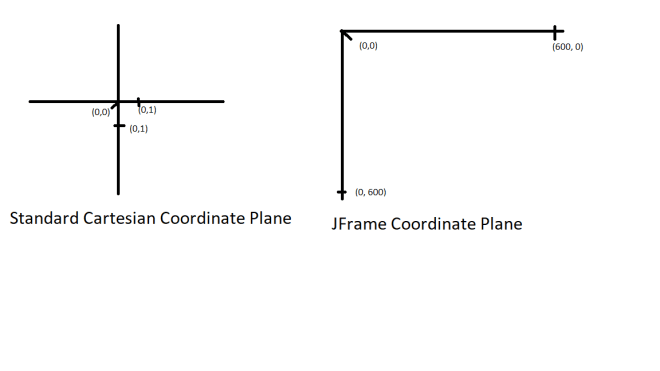
A standard (or Cartesian) coordinate plane contains four quadrants-two of which contain one positive and one negative coordinate (such as (3, -2) or (-4, 5)). The other two quadrants contain either two positive coordinates or two negative coordinates (such as (4, 1) or (3, 3)).
A JFrame coordinate plane, on the other hand, only contains one quadrant which can only contain two positive coordinates (such as (15,20) or (35, 30)). Since JFrame coordinate planes only contain positive integers, trying to run a line of code like this g.drawLine(-100, 75, -125, 150) would give you an error since JFrame coordinate planes have no negative coordinates on either the x- or y-axis. Another difference between JFrame coordinate planes and standard Cartesian coordinate planes is that Cartesian coordinate planes can stretch on to infinite lengths while JFrame coordinate planes can only stretch as far as the window’s pixel size. In this example, the JFrame window is set to a size of 600×600 pixels, which means that the maximum possible value on both the x-axis and y-axis is 600. Thus, the maximum possible coordinate for our window would be (600, 600).
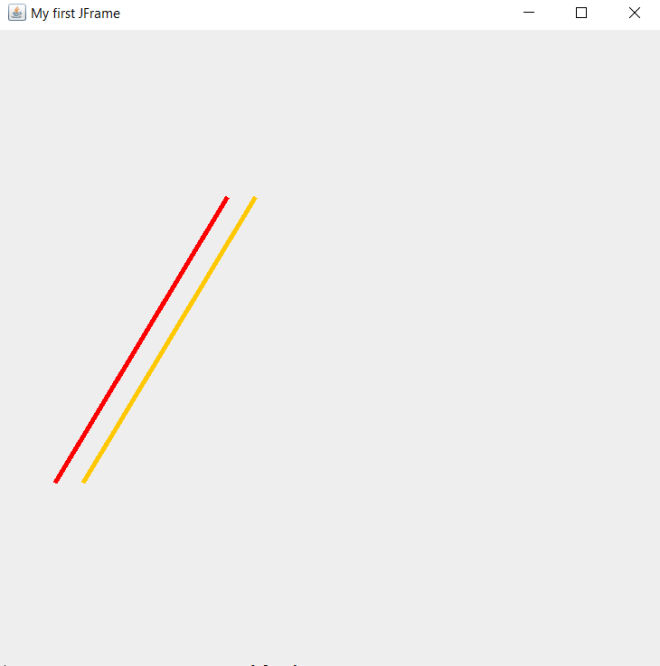
Now, it’s pretty impressive that we managed to draw our own lines on the console. However, the lines look quite boring. What if you wanted to add some color to the lines? Here’s the code to do so (note: I made the lines bigger than they were in the previous example):
import javax.swing.*;
import java.awt.*;
import javax.swing.JComponent;

class LineDrawing extends JComponent {

    public void paint(Graphics g)
    {
        g.setColor(Color.RED);
        g.drawLine(50, 400, 200, 150);
        g.setColor(Color.ORANGE);
        g.drawLine(75, 400, 225, 150);
    }
}

public class Graphics101 {

    public static void main(String[] args) {
        JFrame frame = new JFrame("My first JFrame");
        frame.setSize(600, 600);
        frame.setDefaultCloseOperation(JFrame.EXIT_ON_CLOSE);
        frame.getContentPane().add(new LineDrawing ());
        frame.setVisible(true);
    }

}

In this example, I still draw the lines onto the window through the LineDrawing class’s paint() method. However, I did add two lines of code to the paint() method-both of these lines contain the Graphics class’s .setColor() method and pass in Color.[name of color] as the method’s parameter. In this case, passing in a HEX code, RGB code, or HSL value won’t work here; you’ll need to use the exact name of a color. Java’s Graphics class has several predefined colors; you can see which colors are available to you through a quick scroll of the Intellisense window that appears after you type Color.. In this example, I set the colors of the two lines to RED and ORANGE, respectively.
- Something to keep in mind when setting the colors for lines-run the
.setColor()method BEFORE running the.drawLine()method. You’ll want to set the color of the line before actually drawing it onto the JFrame.
Now, what if you wanted to add some more style to the lines you created? Let’s say you wanted to change the lines’ thickness. Here’s the code to do so (note: I didn’t change line sizes this time):
import javax.swing.*;
import java.awt.*;
import javax.swing.JComponent;

class LineDrawing extends JComponent {

    public void paint(Graphics g)
    {
        Graphics2D g2 = (Graphics2D) g;
        g.setColor(Color.RED);
        g2.setStroke(new BasicStroke(4));
        g.drawLine(50, 400, 200, 150);
        g.setColor(Color.ORANGE);
        g2.setStroke(new BasicStroke(4));
        g.drawLine(75, 400, 225, 150);
    }
}

public class Graphics101 {

    public static void main(String[] args) {
        JFrame frame = new JFrame("My first JFrame");
        frame.setSize(600, 600);
        frame.setDefaultCloseOperation(JFrame.EXIT_ON_CLOSE);
        frame.getContentPane().add(new LineDrawing ());
        frame.setVisible(true);
    }

}
As you may have noticed, I did make some modifications to the previous example’s code. First of all, I did create a new object of the Graphics class in the .paint() method-g2. All this does is allow us to have access to more Graphics class methods, which we’ll need for this code.
The new Graphics class method we’ll be using is .setStroke(), which allows us to set a line’s thickness (in pixels). The parameter you’d use for the .setStroke() method is new BasicStroke (int)-with int being the thickness (in pixels) you want to use for the line. In this example, I used 4 (pixels) as the thickness for both lines.
Last but not least, let’s explore how to make our lines dotted. Here’s the code we’ll be using to do just that:
import javax.swing.*;
import java.awt.*;
import javax.swing.JComponent;

class LineDrawing extends JComponent {

    public void paint(Graphics g)
    {
        Graphics2D g2 = (Graphics2D) g;
        g.setColor(Color.RED);

        float[] dashingPattern = {12f, 6f};
        Stroke stroke = new BasicStroke(5, BasicStroke.CAP_BUTT, BasicStroke.JOIN_MITER, 1.0f, dashingPattern, 0.0f);
        g2.setStroke(stroke);
        g.drawLine(50, 400, 200, 150);

        g.setColor(Color.ORANGE);

        float[] dashingPattern2 = {9f, 5f};
        Stroke stroke2 = new BasicStroke(5, BasicStroke.CAP_BUTT, BasicStroke.JOIN_MITER, 1.0f, dashingPattern2, 0.0f);
        g2.setStroke(stroke2);
        g.drawLine(75, 400, 225, 150);
    }
}

public class Graphics101 {

    public static void main(String[] args) {
        JFrame frame = new JFrame("My first JFrame");
        frame.setSize(600, 600);
        frame.setDefaultCloseOperation(JFrame.EXIT_ON_CLOSE);
        frame.getContentPane().add(new LineDrawing ());
        frame.setVisible(true);
    }

}

    public static void main(String[] args) {
        JFrame frame = new JFrame("My first JFrame");
        frame.setSize(600, 600);
        frame.setDefaultCloseOperation(JFrame.EXIT_ON_CLOSE);
        frame.getContentPane().add(new LineDrawing ());
        frame.setVisible(true);
    }

}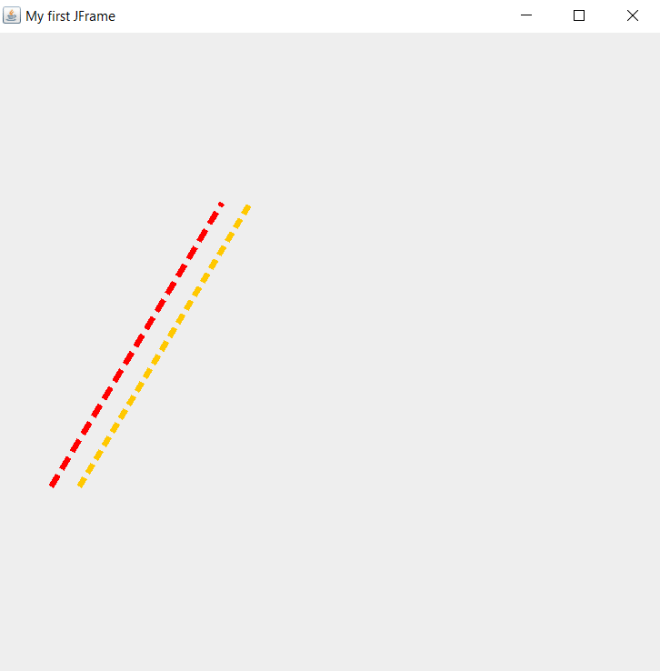
In this example, there is another addition to the code. This time around, I added three lines of code before each .drawLine() method call. The first line creates a floating-point list that defines each line dash pattern. Each list takes two values-both floating-point numbers (and both ending with f). The first value of each list specifies the length of each dash (in pixels) and the second value of each list specifies the space between each dash (also in pixels).
The second new line of code creates an object of the Stroke class; for an explanation of each parameter in the object of the Stroke class, refer to this Oracle documentation-https://docs.oracle.com/javase/7/docs/api/java/awt/BasicStroke.html#BasicStroke(float,%20int,%20int,%20float,%20float[],%20float).
The third new line simply calls the .setStroke() method and passes in the Stroke object we created in the previous line.
- Keep in mind that you’d always want to set the styling for your lines (e.g. color, thickness, dashing) before you draw the line in your JFrame.
As you can see, we have succesfully created dashed lines in our JFrame.
Thanks for reading,
Michael