Hello everybody,
Michael here, and today’s post will be a little different. To celebrate my 100th post (and third anniversary of this blog’s launch), I thought I’d try something new on this blog.
Most of my posts cover programming tools-over the course of this blog’s run, I’ve covered R, MySQL, Java, Python, and HTML. This post will cover using Git and GitHub, which aren’t programming tools per se like Java or Python, but they’re still important for any developer to know.
Let’s get started. Before diving into GitHub, we need to discuss Git and the differences between Git and GitHub. The main difference between Git and GitHub is that Git is software while GitHub is a cloud-based web service. More specifically, Git is a distributed version control software that is designed to track changes in source code during the development process; one of the aims of Git is to coordinate development work amongst different programmers (if you work in software development or tech like I do, you’ll often be working with teams of other programmers/developers on pieces of code together). GitHub, to be specific, is a cloud-based version-controlled Microsoft-owned web service that hosts Git repositories (more on this later).
Although Git and GitHub are two different services, you can use Git without GitHub but not vice versa.
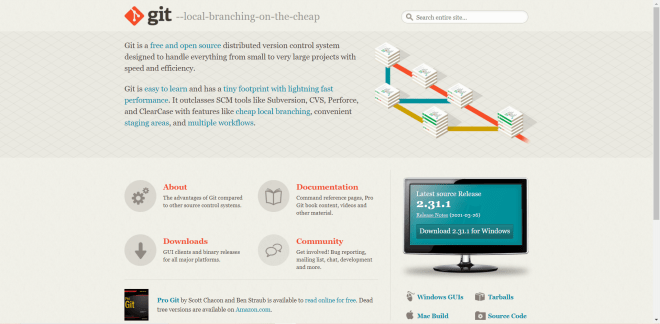
Now, before we start working with GitHub, we would first need to install Git to our devices. To do so, go to this website: https://git-scm.com/. Then click on the Download 2.31.1 for Windows button if you’re working on a Windows device. If you’re working with a Mac, click the Mac Build button to see an explanation on how to install Git on a Mac.

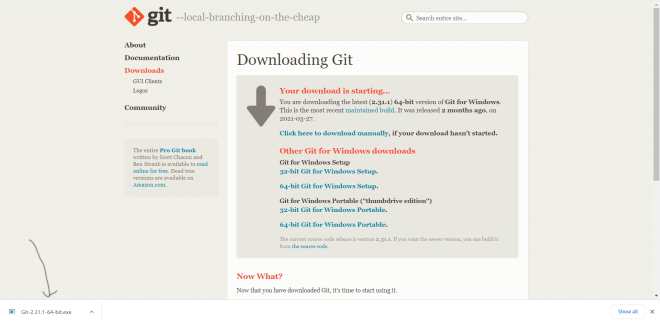
- Even though the button says Download 2.31.1 for Windows, you might see a different version. Git version 2.31.1 is the latest version as of June 2021.
Once you click the Download 2.31.1 for Windows button, click on the EXE file that appears after clicking download. You will then see the Git installer wizard pop up.
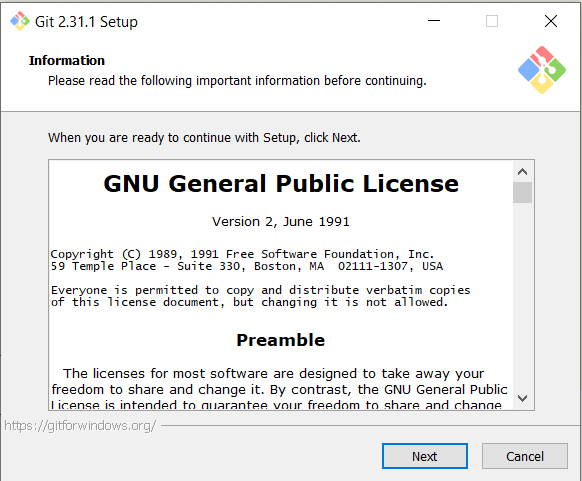
Now, let’s go through the Git installer wizard step by step. First, scroll through the license agreement and click Next:

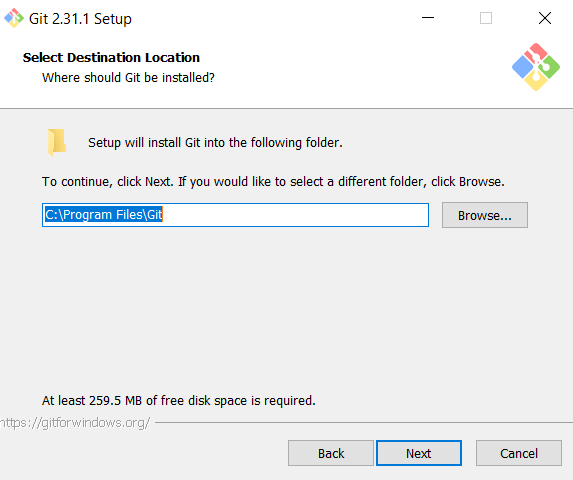
For this step, you can either leave the Git destination folder location as-is or you can click Browse if you want to install Git in a different folder (or even create a new folder to install Git into)-just remember where you installed Git on your computer. After your done configuring the Git destination location, click Next:

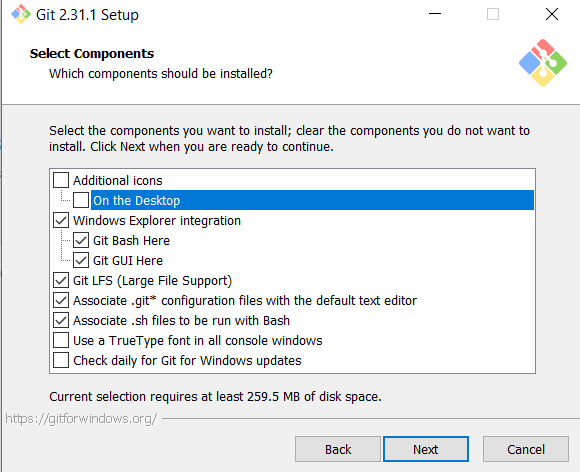
I would leave this part as-is, but if you want to add or remove components to your Git installation, check and un-check the components boxes where you wish to make the installation changes. When you’re done configuring the Git components, click Next:

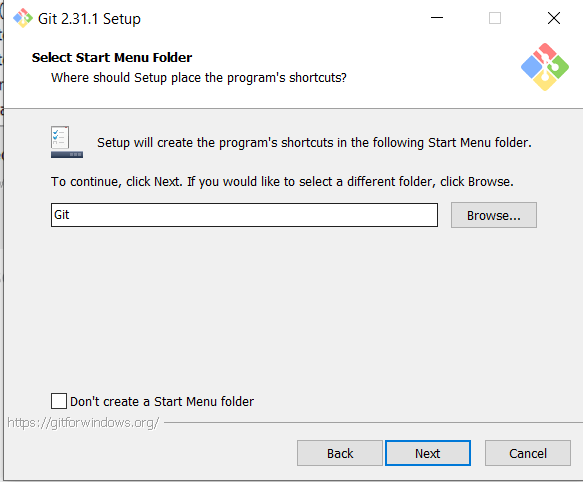
Again, here’s another thing I’d leave as-is, but if you want to create Git launching shortcuts in another folder, click Browse (you can also check Don’t create a Start Menu folder if you don’t want to create Git launching shortcuts):

Now, you can leave the drop-down as-is and keep Vim as Git’s default text editor (Git uses text editors when committing changes in a repository-more on this later). You can also select another text editor from the drop-down (personally, I like using Notepad as the default Git editor):

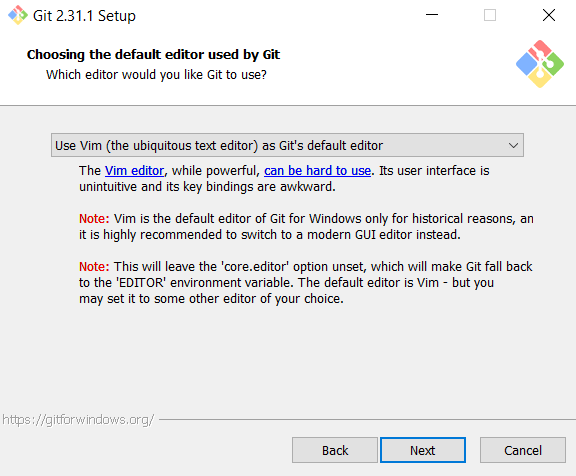
The reason why you might not want Vim as Git’s default text editor is because, while Vim is a powerful Git text editor, its not user-friendly and honestly pretty annoying to use (take it from a developer who’s tried to use Vim himself). Notepad, on the other hand, works just as well as Vim and is way easier to use (though choose whatever text editor suits you best-they all do the same thing). Once you’ve chosen a text editor, click Next.
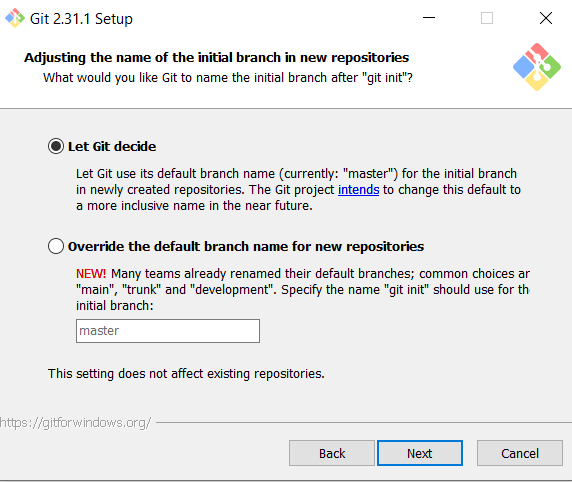
All Git repositories have a main branch and one or more sub-branches. You can either let Git decide the name of the main branch (which in this version is called the master branch) or override Git’s default name for main branches. If you choose the latter option, enter the name you want to use for your main branch in the text-box below:

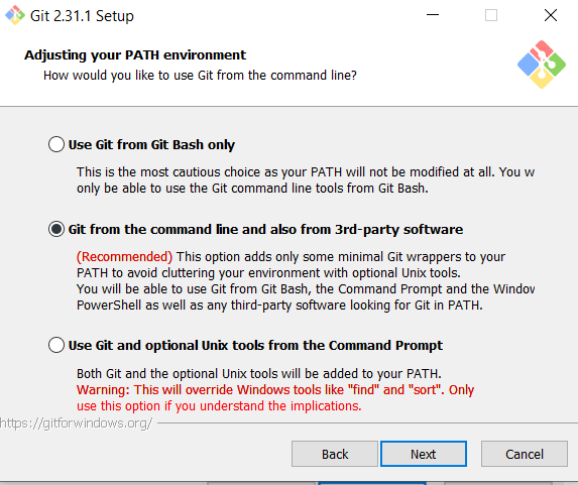
For this page, I would recommend choosing the Git from the command line… option as it will allow you to use Git from the Command Prompt (or any command-line tool like Atom Text Editor’s terminal). If you choose Use Git from Git Bash only, you will only be able to use Git from the Git Bash terminal (basically Git’s version of the command prompt). When you’ve chosen a PATH environment, click Next:

Keep clicking Next to scroll through the rest of the Git installation wizard, leaving all selections as is until you get to the final page of the wizard:

Click Install to install Git to your computer. To confirm that Git was successfully installed on your computer, run the git --version command on your command prompt like so:

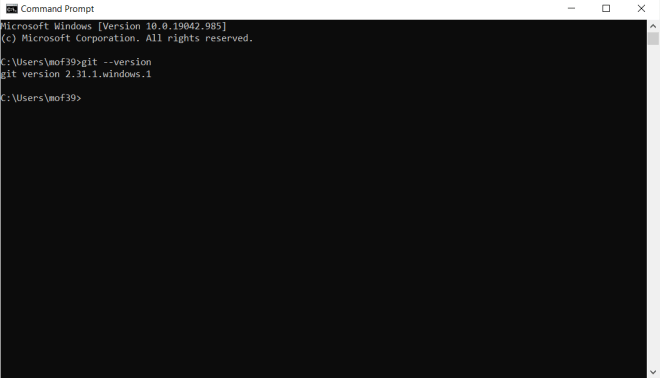
As you can see, we’ve installed Git version 2.31.1 on this computer.
Now that I’ve discussed some Git basics, let’s discover GitHub:


GitHub is a collaborative code-hosting version-controlled web platform founded in 2008 (with a beta version first deployed in late 2007); GitHub was acquired by Microsoft in 2018. To use GitHub, you’ll first need to sign up for it by clicking the Sign up for GitHub button-you can either sign up for a free account or a paid subscription. However, keep in mind that all your GitHub history is public with a free account-the only way to keep some (or all) of your GitHub history private is with a paid subscription to GitHub (which I’d highly recommend you get if you’re going to store sensitive/proprietary data on GitHub). I already signed up for a public GitHub account, since it’s free and I’m not storing any proprietary/sensitive data.
Now, after you create your account, you’ll see a screen that looks like this-this is the homepage for my GitHub organization (mfletcher2021). On the left-hand side of the screen, you’ll see all the GitHub repositories that I’ve created:
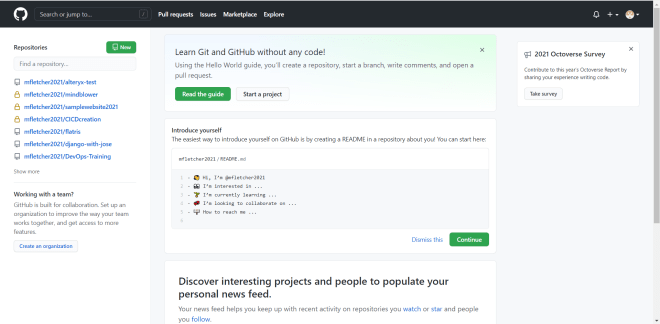
In GitHub context, an organization is basically a hub where multiple developers can collaborate on one or more projects (if you’ve worked in tech, odds are your project team uses GitHub organizations). GitHub creates a default organization for you when you sign up for the service, but if you’d like to create a new organization click on the Create an organization button.
Upon clicking this button, you should see a screen that looks like this. I’d recommend choosing the Free plan (unless you’re a company running a major development project):

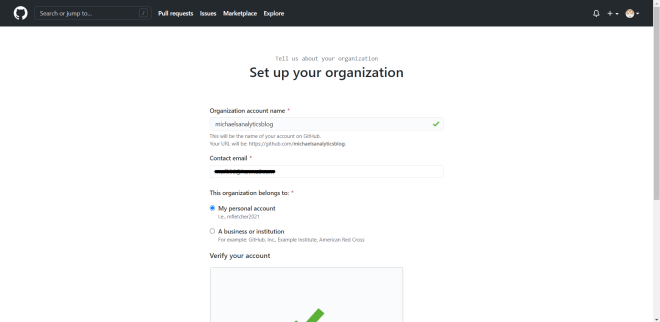
After choosing your plan, you will be taken to this page, where you will need to set an organization name, a contact e-mail (the e-mail where you will get updates about changes made to all project repos that you have access to), specify where the organization belongs to (either to your personal account or to a business/institution), and solve the stupid CAPTCHA puzzle to verify your account:

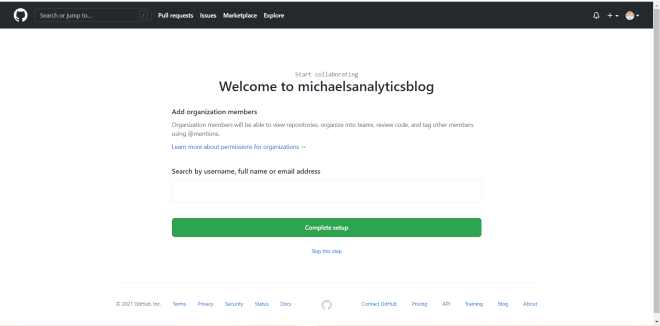
After you’ve set up your organization, you’ll be taken to this page. Here, you can add members to your organization and invite them to collaborate on your project(s). You don’t need to add any members right away-if you choose to do this, click the Skip this step link:

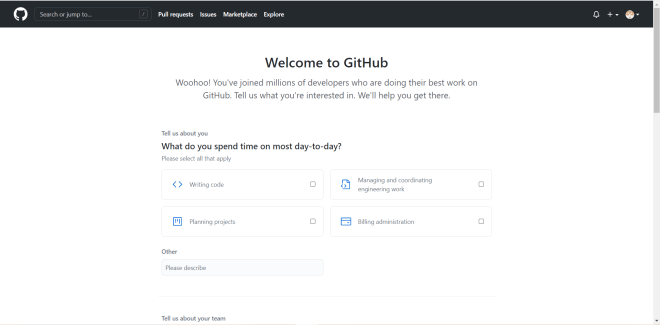
After adding members (or not), this is the last screen you’ll be taken to. Fill out this survey to get started developing (sadly, there’s no skip option for this survey, but you can leave it empty and hit Submit):
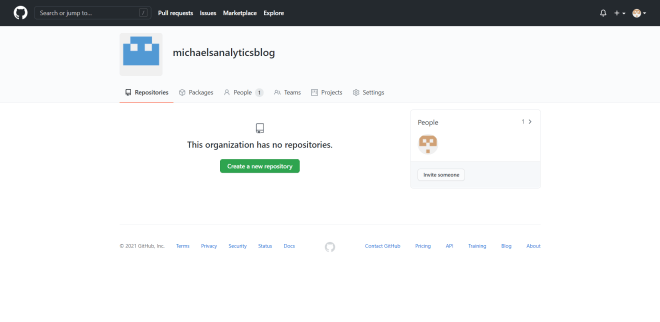
Once your organization is created, you should see a page that looks like this:
If you’ve never worked with Git or GitHub, you’re probably wondering “What the heck is a repository?”. A repository (or repo for short-I’ll use these terms interchangeably) is a storage hub for all of your project files (which can be any file under the sun). GitHub repos can also be used to store any ideas or developer notes that you’d like to share with the other developers on your project team.
To create a repo in your organization, click on Create a new repository. Once you do so, you will see this screen. Set the name of the repo, give a description of the repo if you want, and add a README file, .gitignore file, and a license if you want-I won’t cover these three things here as they are beyond the scope of this lesson:
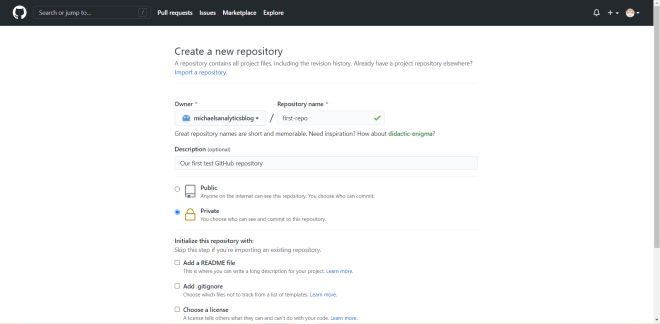
- The good news is that, even if you’re on a free plan, you can still create a private repo, which would give you full control as to who can see and/or make changes to the repo.
Once you’re done configuring the settings for your repo, click on the Create button to create your first GitHub repo. Once you’ve created the repo, you’ll see a page that looks like this:


This page confirms that the Git repo has been created but currently has nothing in it.
As you will see on this page, there are several commands to use to upload a project folder to your GitHub repository. However, I like to use a different set of commands when uploading anything to a GitHub (or other Git-based) repo.
First, before you start creating the Git repo, open the command prompt:

Next, locate the directory where your main project folder sits. To go to that directory, run the cd [your directory here] command to locate your project directory on the command prompt.
- An easier way to navigate to your directory would be to type
cdon the command prompt, locate your main project folder in your computer’s file explorer program, and drag the folder to the command prompt. The directory path to the folder will auto-populate. - I couldn’t upload the folder I used to WordPress, but if you want to code-along with this post, any folder will work.
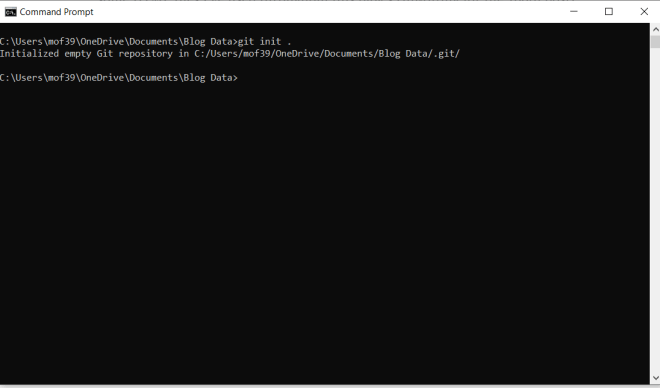
Now, before we send all of this folder’s code to a GitHub repo, we’ll need to create an empty Git repo in the project folder. To do this, run the command git init . (be sure you’re in your main project folder path in command prompt):

If you go to your project folder on your computer’s file explorer program, you should see that an empty Git repo has been created (it’s the folder named .git):

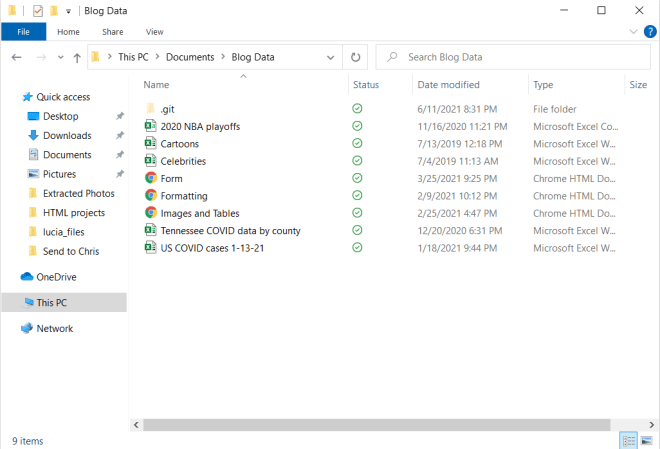
- An important thing to note is that, unless you get an error message, the Git repo was successfully created. However, sometimes if you’re using a Windows OS like I am, the Git repo is hidden (it was hidden the first time I ran this command). If you can’t see the Git repo after creating it, go to your computer’s settings, search for the For developers settings (if you’re on a Windows OS), go to the Change settings to show hidden and system files (which is under the File Explorer list), click the Show settings link and in the menu that appears, select the Show hidden files, folders, and drives radio button and click Apply. The empty Git repo should now be visible.
Another important thing to know about Git & GitHub is that they work with the concept of branches. In the context of Git & GitHub, branches are isolated development environments in a repo that allows a developer (or teams of developers) to manipulate code, develop new features for a project, or debug a project.
Usually, GitHub repos have a default branch (usually named master or main) which contains the main code/files for your project. Any other branch you create serves as a copy of the main branch.
- Whenever I work on a Git-repo based project (such as projects that use DevOps or GitHub), I like to create two branches-a master branch and a development branch. I use the master branch to store the main (or master) code while I use the development branch for debugging and manipulating code.
Now, to create master and development branches in your Git repo run these two commands in order-git checkout -b master and git checkout -b development.

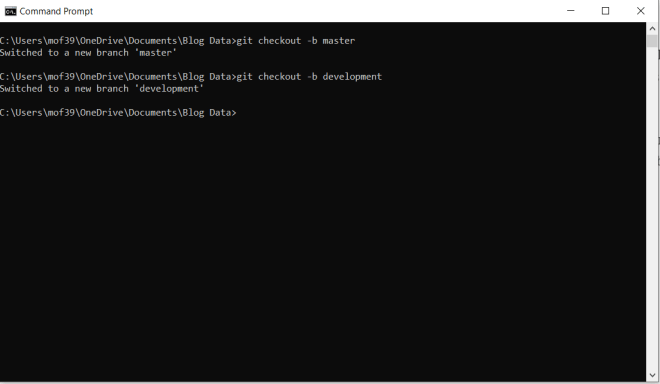
- Be sure to run the
-b mastercommand before running the-b developmentcommand, as you will need to ultimately make the commits (more on those later) to your Git repo in the development branch. - Also be sure you’re in your main project directory when creating the branches (and for all steps to push code to your GitHub repo for that matter)
Now comes the fun stuff-adding and committing all the project files to the Git repo. To add files to your Git repo, run the command git add .. To commit files to your Git repo, run the command git commit ..
What is a Git commit exactly? A commit is Git jargon for a change made anywhere in your repo-such as a change made to a file (or files) in your repo or the addition/deletion of file(s).
- Be sure to run the
git add .command before thegit commit .command or else the files won’t be committed to the repo.

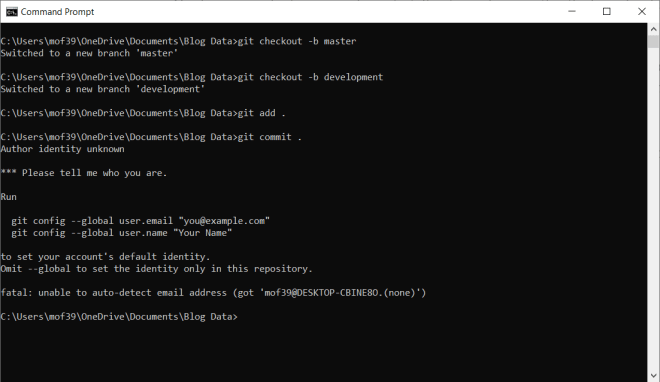
Now, as you can see here, I was able to run git add . just fine. However, I ran into an error when I tried to run git commit .. As it turns out, there are two Git credentials I need to configure before I make any commits-an email and a user-name. These will be easy credentials to configure and as it turns out, the error message generated gives us the exact syntax of the two commands to use.
Let’s run these two commands:

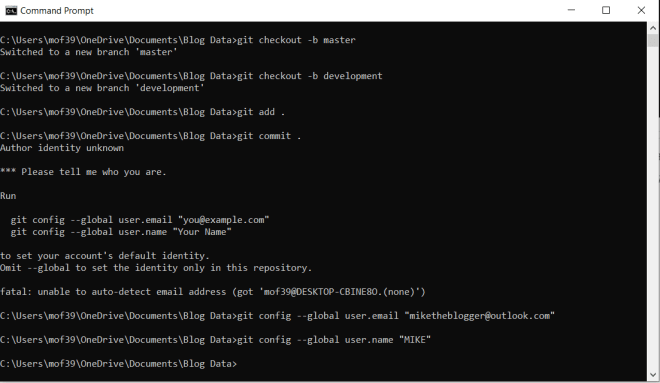
- You may recall that
miketheblogger@outlook.comwas a throw-away e-mail account I created for an HTML lesson.
Wonderful! Now let’s re-try the git commit . command:
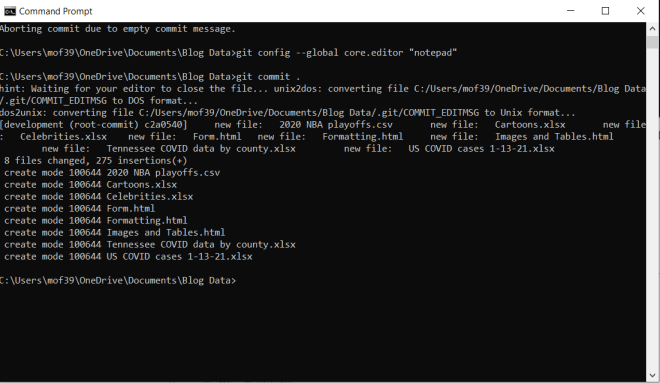
Awesome! Looks like everything committed to the repo.
Now, while the git commit . command is running, you’ll notice that Git’s default text editor Vim pops up. You will recall that earlier in this post, I said that Vim is a very-powerful albeit not user-friendly Git text editor. To change the default Git text editor, run this command before running git commit .–git config --global core.editor "[your preferred text editor]".
Since I chose Notepad as my default Git text editor, a Notepad window that looks like this will appear while the git commit . command is running:

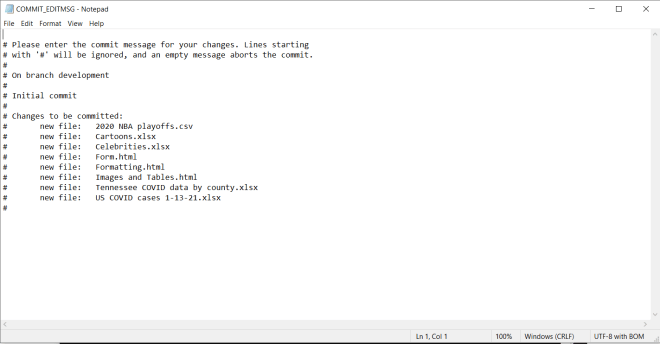
Remove the pound sign (#) from any lines that contain files that you want to commit to the Git repo-any line with a pound sign will be treated as a comment and won’t be committed to the repo.
Once the git commit . command has run, the last two things you’ll need to do are to tell the command prompt is where your GitHub repo is located and push the code to the repo you specified.
- If you wondering what the period (.) means on the
git add .andgit commit .commands, it means everything-as in, add & commit all project files to the Git repo. You can exclude certain file types and/or directories from being added & committed either by using Git’s EXCLUDE file (found in the .git/info/ folder) or by creating a GITIGNORE in the Git repo-however excluding files is beyond the scope of this lesson.
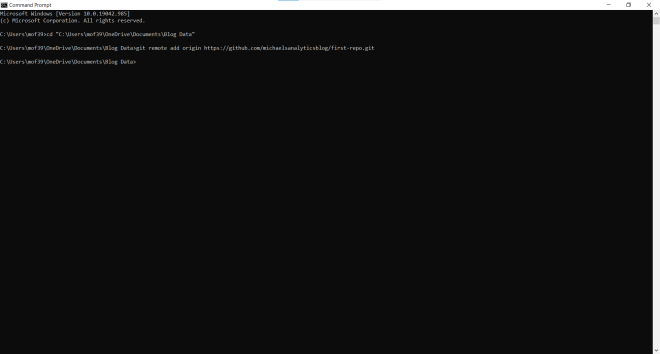
To tell the command prompt where your GitHub (or other Git-based) repo is located, run the command git remote add origin [path to your GitHub repo]:

Last but not least, run the command git push -u origin --all to push the code into your GitHub repo:
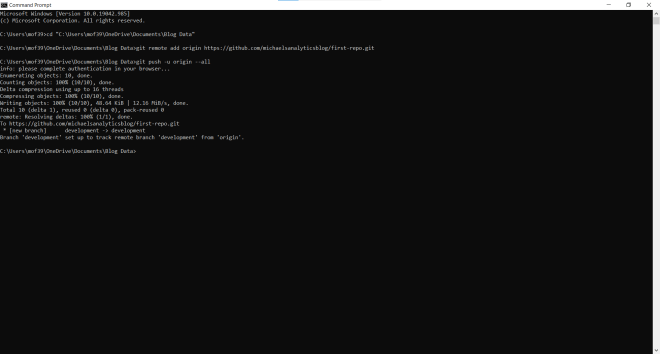
- Once you run this command, you will get a pop-up window asking you to sign in to your GitHub account if you’re not already signed in to GitHub.
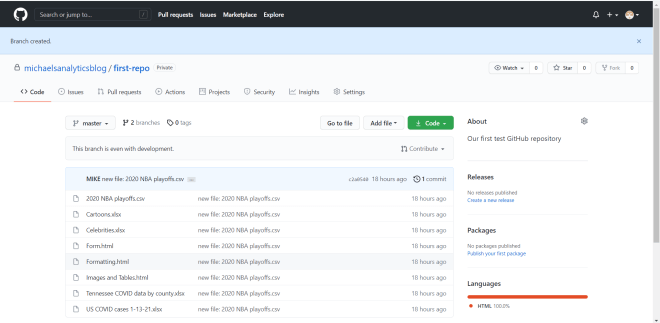
After the git push -u origin --all command finishes running, refresh your GitHub repo to see all of your files on the development branch:
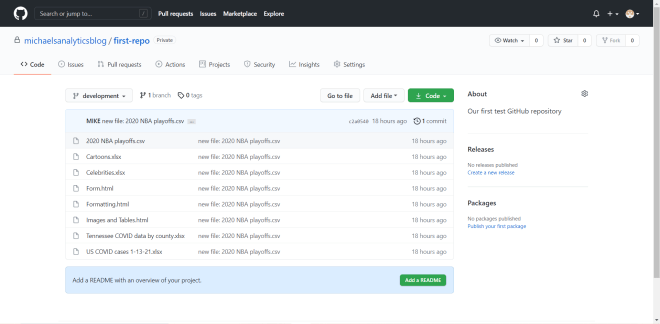
As you can see, all of the files in the Git repo have been pushed to the development branch of the GitHub repo.
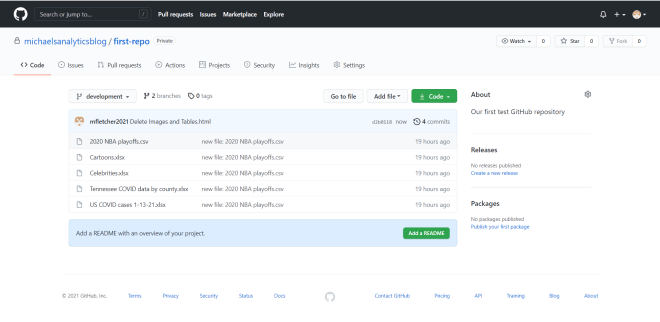
However, click on the development dropdown and you’ll notice something missing-the master branch. There’s an easy way to fix this problem, though.
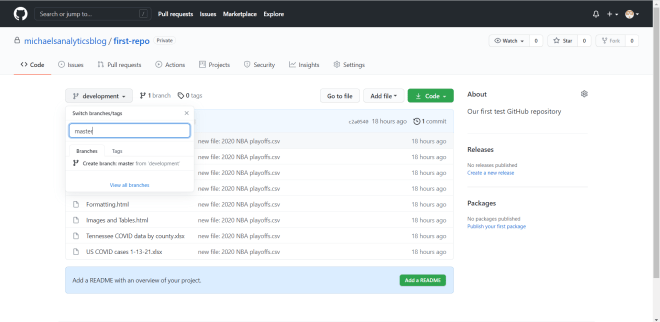
Click on the development drop-down, type in the word master, and click on Create branch master from development to create the master branch from the development branch.
As you can see, a master branch has now been created-it also contains all files from the Git repo that we pushed into the development branch:
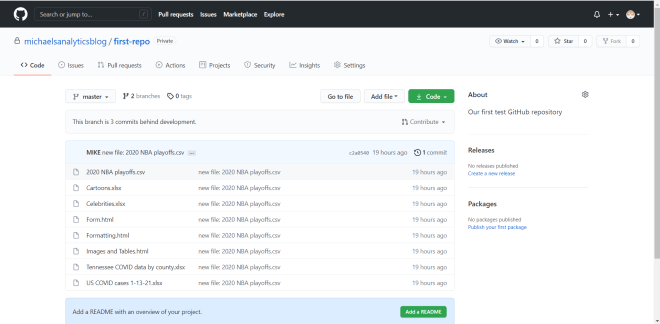
- You can run a
git pullcommand to merge the development branch code and master branch code together, but in this casegit pullwasn’t necessary.
Awesome! Now the last thing I want to cover is the concept of pull requests in Git & GitHub. Earlier, I mentioned that branches are isolated environments where a developer (or team of developers) can manipulate and debug code without affecting the master/main code. Well, what if you wanted to incorporate any changes you made in the development branch (or any branch for that matter) into the master branch? You’d create a pull request to merge the revised development branch with the master branch.
As a simple example to demonstrate pull requests, I’ll delete the three HTML files from the development branch (but not the master branch):
As you can see, the three HTML files are no longer on the development branch, but they’re still on the master branch. How do we get the HTML files off the master branch? Create a pull request!
To create a GitHub pull request, click on the Pull requests tab in GitHub:
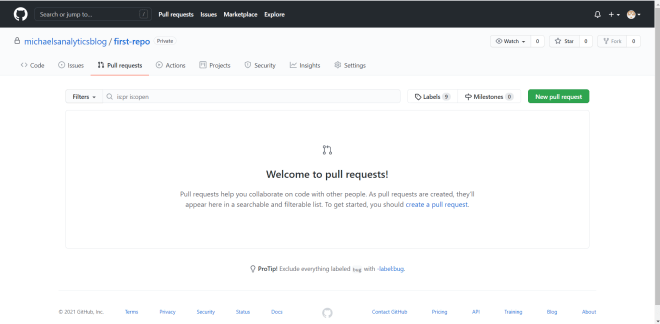
Once at the Pull requests interface, click on New pull request to create a new pull request.
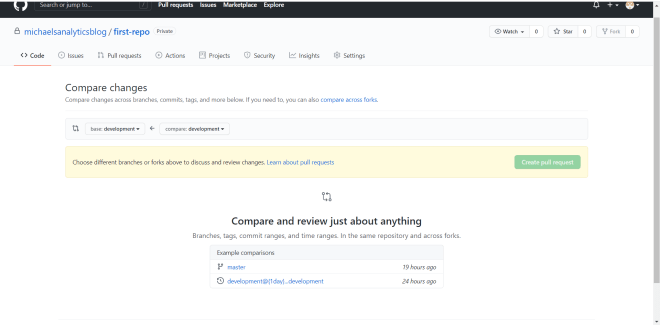
Take a look at the two dropdowns on the interface. The compare is where the branch where the changes were made-in this case, it’s the development branch. The base is the branch where you want to incorporate the changes-in this case, it’s the master branch.
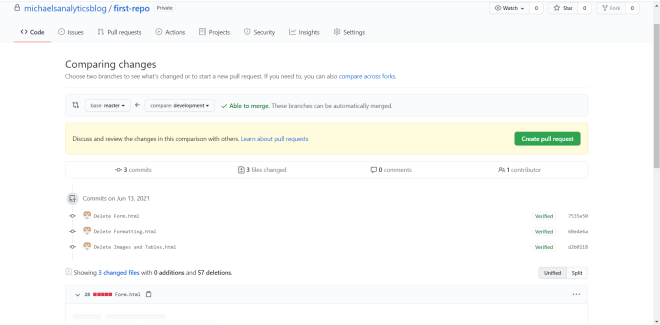
Once you configure the branches you want to merge together, you should see an Able to merge message if you can successfully merge the branches together. You will also see a list of all the changes that were made on the development branch (which will be merged onto the master branch). Click on Create pull request to create the pull request.
Upon clicking Create pull request, you will see this interface:
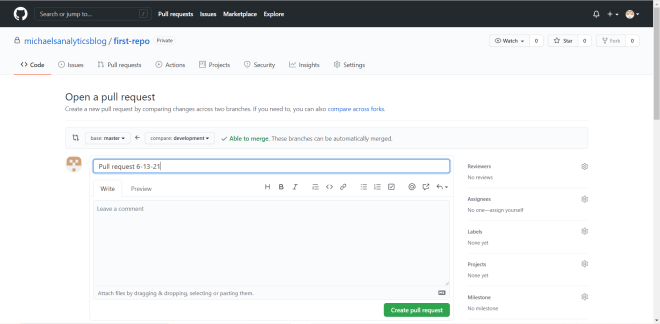
Give your pull request a title, include a message if you want, and click Create pull request to execute the pull request. As you can see on the right-hand side of the interface, there are other settings you can configure for your pull request, such as Reviewers. The Reviewers setting allows you to choose an individual (preferably someone with access to the GitHub repo) to review and approve the pull request before it’s executed.
So, you might think that this would be the last step to execute your pull request, right? Nope! Upon clicking the Create pull request button for the second time, you’ll be taken to this page:
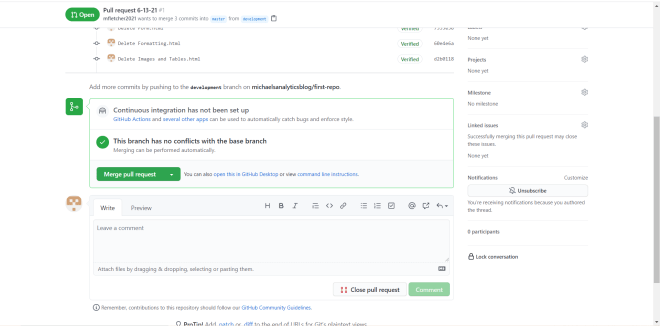
Click on Merge pull request to execute the branch-merging (the pull request was already executed in the previous step). After clicking Merge pull request, click on Confirm merge to confirm the execution of the branch-merging.
- Feel free to add a comment-it’s not necessary to execute the branch merging however.
Once the branch-merging has completed, you should see a purple Merged icon appear on this page to confirm that the branches have been successfully merged:

Now, click on first-repo to go back to the main page of your repo. Then click on the dropdown and go to your repo’s master branch:
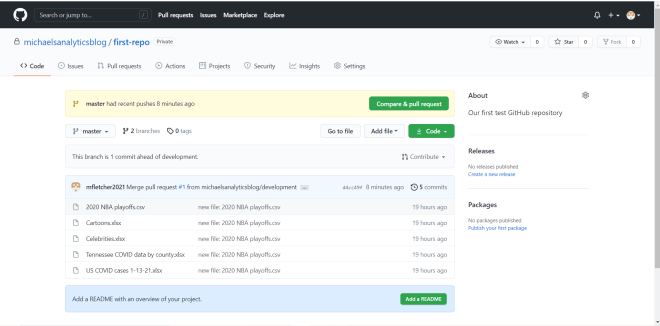
As you can see, the three HTML files that I deleted from the development branch have also been deleted from the master branch, confirming that the changes from the development branch successfully merged into the master branch. Awesome!
Thanks for reading all of my posts these last 3 years! Hopefully you’ve picked up some new skills throughout this blog’s run.
Here’s to the next 100 posts!
Michael