Michael here, and as I previously promised, here’s part 2 of my five-year blog anniversary post (after all, what fun it is to split the 5-year anniversary letter into two posts).
My Answer To Michael’s Five-Year Coding Challenge
Also, as I previously promised on the last post, I will discuss my solution for Michael’s Five-Year Coding Challenge. I know I said you can use any programming language you like for this challenge (as long as your code follows certain criteria outlined in my previous post https://michaelsprogrammingbytes.com/2023/06/13/the-glorious-five-year-plan-part-one/), but here’s my approach using Python!
secretCode = {'Z': 'A', 'Y': 'B', 'X': 'C', 'W': 'D', 'V': 'E', 'U': 'F', 'T': 'G', 'S': 'H', 'R': 'I', 'Q': 'J', 'P': 'K',
              'O': 'L', 'N': 'M', 'M': 'N', 'L': 'O', 'K': 'P', 'J': 'Q', 'I': 'R', 'H': 'S', 'G': 'T', 'F': 'U', 'E': 'V',
              'D': 'W', 'C': 'X', 'B': 'Y', 'A': 'Z'}
encodedString = """Gszmp blf gl zoo nb ivzwvih uli urev dlmwviufo bvzih. R dlfowm'g szev pvkg gsrh yolt ifmmrmt uli zh olmt zh R wrw drgslfg blfi dlmwviufo hfkklig.  slkv blf ovzimvw hlnvgsrmt zolmt gsv dzb gsvhv ozhg urev bvzih-zmw, svb, nzbyv blf tzrmvw z olev lu kiltiznnrmt (zmw kviszkh mvd qly hprooh) rm gsv kilxvhh. Gszg dlfow xvigzrmob nzpv nv z evib szkkb dirgvi. Sviv'h gl nzmb, nzmb nliv bvzih lu xlwrmt gltvgsvi! Nrxszvo"""
punctuation = ['\'', '.', '!', '(', ')', '-']
decodedString = ''

for e in encodedString:
    for k, v in secretCode.items():
        if e == k:
            decodedString += v
        elif e.lower() == k.lower():
            decodedString += v.lower()

    if e == ' ':
        decodedString += ' '
    elif e in punctuation:
        decodedString += e

print(decodedString)
As you can see, I solved this coding challenge with 20 simple lines of Python code (not including the output). How did I accomplish this? Here are 10 things I kept in mind when solving my own puzzle:
I used the secretCode dictionary to set my reverse substitution cipher (HINT: even though there are both uppercase and lowercase letters, you won’t need two separate dictionaries for the cipher-I’ll explain why).
I created a list containing all of the punctuation in this message-you’ll see why it’s important later. The list is aptly named punctuation.
I used the decodedString variable to store the decoded message-I personally thought it was more convinient than figuring out how to replace all the characters in encodedString one by one.
I created a nested for-loop to iterate both through the characters in encodedString and the items (that is, both keys and values) in the secretCode dictionary.
In the nested loop where I iterate through the items of the secretCode dictionary (for k, v in secretCode.items()), I check if each character in the encodedString string equals the current corresponding key in the secretCode dictionary and if so, I append the corresponding value to the decodedString string.
Remember how I said that even though my secret message contains both upper and lower-case letters you won’t need to create two dictionaries? Well, the statement elif e.lower() == k.lower() handles this scenario in just two lines of code by checking to see if the lowercase version of the character in encodedString equals the lowercase version of the corresponding key and if so, I append the lowercase corresponding value to the decodedString string.
How would I handle spaces and punctuation in the encodedString? Well, in the case of spaces, if a character in encodedString is a space, I append it to the decodedString just as I did with the letters.
The same logic applies for any punctuation in encodedString, but this time, I check to see if a character equals any element in the punctuation list that I mentioned in item #2.
One thing I kept in mind when checking for spaces and punctuation in encodedString-I kept the if-elif statement pair OUTSIDE of the dictionary loop because if I placed those statements inside that loop, I would’ve ended up with a ton of spaces and punctuation. However, placing this code outside of the dictionary loop ensures that I end up with the correct amount of spaces and punctuation.
Last but not least, I printed the decodedString message. Without further ado, here it is:
Thank you to all my readers for five wonderful years. I wouldn't have kept this blog running for as long as I did without your wonderful support. hope you learned something along the way these last five years-and hey maybe you gained a love of programming (and perhaps new job skills) in the process. That would certainly make me a very happy writer. Here's to many many more years of coding together! Michael
Trust me, dear readers, I mean every word of this. I wouldn’t kept this blog running as long as I did without you!
One More Note
I know I’ve emphasized this over these last two posts, but thank you, thank you, thank you loyal readers for reading my blog for the last five years. Hopefully you’ll keep coming back for more, because boy do I have several more years of great coding content I can provide (and you bet it’ll still be good when I hit year 10 and beyond)!
However, there is someone I wanted to acknowledge on this five-year anniversary. Rather, a furry friend I’d like to mention.
His name is Simba (or Orange Boy) and he is my fluffy orange cat who certainly helped me during the blog’s early days (and yes, he was there when I wrote the welcome post). Here he is on the night of September 17, 2018, likely looking over me as I wrote another post (or searching for a post college job, as I was in the thick of job hunting in fall 2018). He is certainly a good fluffy boy!
Also, here’s Simba with Marbles, his sister (the brown cat aka Pretty Girl), who accompanied me during writing every now and then:
The kitties on Christmas morning 2017-pre blog days.
Michael here, and today is a very big day for Michael’s Programming Bytes (or for the nostalgic and longtime readers, Michael’s Analytics Blog). Know why?
This little pet project of mine turns 5 today! Yes, five wonderful years ago, on June 13, 2018, I was just a month removed from college when I got the idea to start this very blog. Anyone remember my welcome post, aptly titled Welcome?
Reflections, reflections and a glimpse into my thought process these last five years…
Where do I begin? How did I start this blog?
OK, so I know I mention this blog’s origin story on my About page, but for those who don’t feel like navigating to the About page-or just want a quick summary of this blog’s story well, here it is.
As I mentioned earlier in this post, I launched this blog on June 13, 2018 with my Welcome message-my first official lesson was posted 12 days later on June 25, 2018. It was a very simple lesson on how to run basic R commands-here’s the link: R Lesson 1: Basic R commands.
Looking back on that first R lesson, I thought it was a very fitting way to begin my blogging journey. See, I’d been taking some really fun data analytics courses during my last semester of undergrad (this was Spring 2018, a few months before the launch). One such course was in R, which I was quite fascinated with (well, aside from the fact that there was a programming language called R).
After finishing undergrad in April 2018, I intially sought out data analytics jobs. However, I realized that I wanted to have an easy means to showcase my data analytics skills to potential employers. Hence, on June 13, 2018, I launched this blog-then known as Michael’s Analytics Blog.
If you’ve perused the entire 145-post catalog (and kudos if you have), you’ll likely have noticed that almost every single post from 2018-my first year active-is majority data analytics, though my long-lost MySQL series from fall 2018 does go into very very basic database building. There’s a good reason for that. Since I mentioned that I intially wanted a career purely in data analytics, I thought what better way to showcase my analytical skills than through writing? After all, I thought this could certainly double as my “data analyst portfolio”.
I know my earliest posts were purely analytical, but come the beginning of 2019, I wanted to explore other aspects of programming. With that said, on January 11, 2019, I wrote my first real non-analytical post-Java Lesson 1: Introduction to Java & “Hello World”. This post covered a very basic Java concept-System.out.println()-and the Hello world schtick most developers learn about when they first start learning about the craft of coding (if you’re a developer, odds are you’ll remember learning about how to print Hello world during your early coding days).
My first year of blogging only covered three major programming tools-Java, R and MySQL. After all, those were the only three programming tools I had any experience in coming out of college, so it’s not like I could cover more adavanced concepts. However, that changed once I began my tech job in the summer of 2019, as I also introduced Python into my blog’s repetoire with the post Python Lesson 1: Intro to Python on August 5, 2019.
As I gained more on-the-job and self-taught skills, I was able to cover more interesting programming topics (to me at least). Aside from Python, I was able to introduce HTML (February 2, 2021), GitHub (on the blog’s third anniversary), CSS (March 19, 2022), and Bootstrap (September 7, 2022). Throughout this blog’s five-year run, I’ve certainly broadened my focus from purely data analytics content to topics such as creating graphics, natural language processing, AI, web development, code management and much much more. To be honest, when I began this blog, I thought I’d still be posting purely analytics content five years in-after all, that was the intial aim of this blog and why the original name was Michael’s Anlaytics Blog.
However, I realized that as my programming knowledge grew, my blog’s content should expand in scope-and that’s exactly how things have played out. To be honest, I think it not only makes my blog more interesting to anyone who wants to read it (and binge the five years worth of posts) but also serves as a showcase for my versatile programming skills (and creativity too). In case you’ve read my entire blog catalog, I’ve covered 8 programming tools total (and that number will likely grow).
Throughout these last five years, I’ve made sure to keep my blog as interesting as possible for you all. As you might have noticed, I RARELY use the free datasets provided by tools such as R and Python. Why is that? It’s a personal creative choice on my part to ensure more interesting content for you all, my loyal readers. Let’s be honest, what would be a more interesting dataset to analyze-the one on petal and sepal width (if you know, you know) that’s been analyzed to death or one covering COVID in the early days of the pandemic (R Analysis 9: ANOVA, K-Means Clustering & COVID-19)? Throughout this blog’s run, I’ve included analyses on various topics such as COVID (in 2020), the 2020 NBA playoffs, the MCU, and much much more.
The one rare time I did use a pre-made dataset was for my Python MNIST 2-part post in 2022/2023 (Python Lesson 38: Building Your First Neural Network (AI pt. 2) and Python Lesson 39: One Simple Way To Improve Your Neural Network’s Accuracy (AI pt. 3)). However, I only did so because I felt that MNIST was a perfect way to get you all familiar with neural networks-plus, datasets for neural networks are considerably larger than datasets for other kinds of analyses, so I felt using a premade dataset was better in this situation. However, premade datasets will usually be the exception and not the rule for me, so for as long as I’m running this blog (which I hope will be for many years to come) I’ll try to keep things interesting for you all as much as I can.
Another thing I feel makes my blog stand out from the hundreds of other coding blogs out there is that most coding/tech blogs tend to specialize in one area of coding/tech, such as AI, Python, game development, etc. However, my blog is like a jack-of-all-coding trades-you don’t know what I’ll cover next. Plus, if you want to learn how to create amazing data visualizations, work with GitHub, analyze natural language through code, figure out how to solve calculus problems, work with basic web development, and so much more, this blog has you covered (and there’s certainly room to cover many, many more cool things in the long-term).
A 5-year message to you all
Unlike my 4th anniversary post, I don’t have any major updates for this blog (and no, another name change isn’t looming). However, before I go, I did want to leave you all with a message.
Oh, did I say I was gonna leave you with a message. Well, if you thought it was going to be some generic “thank-you-for-five-amazing-years” message, you’re wrong. Instead, to celebrate five years of Michael’s Programming Bytes/Michael’s Analytics Blog (however you want to refer to this blog), I’ve hidden my thank-you message in the form of a coding challenge. You ready?
Michael’s Five Year Coding Challenge
So, you think you’ve got what it takes to solve my five-year coding challenge and decode my five-year message? Before you begin problem solving, here’s the message I’d like you to decode:
Gszmp blf gl zoo nb ivzwvih uli urev dlmwviufo bvzih. R dlfowm'g szev pvkg gsrh yolt ifmmrmt uli zh olmt zh R wrw drgslfg blfi dlmwviufo hfkklig.

R slkv blf ovzimvw hlnvgsrmt zolmt gsv dzb gsvhv ozhg urev bvzih-zmw, svb, nzbyv blf tzrmvw z olev lu kiltiznnrmt (zmw kviszkh mvd qly hprooh) rm gsv kilxvhh. Gszg dlfow xvigzrmob nzpv nv z evib szkkb dirgvi. Sviv'h gl nzmb, nzmb nliv bvzih lu xlwrmt gltvgsvi!

Nrxszvo
But wait, here’s the best part…
…you, yes you, can help me solve this puzzle. Since it’s my five year blog anniversary, I thought I’d experiment with something new-a coding challenge where you (or any of my readers) can participate.
What might you get out of it? Well, I’ll pick my top five submissions to showcase on my next post (assuming I get at least five submissions, of course). Do you also run a coding/programming blog? Let me know and I’d be glad to give it a shoutout here.
Some things to keep in mind before I consider sharing your work
To celebrate five years of this blog, I thought I’d celebrate the larger spirit of coding (corny I know)! With that said, feel free to use any programming tool to solve this puzzle-even if I haven’t covered it here.
You have until June 21, 2023 at 12AM US Central Time to show me what you created. If you’re wondering what this cutoff means in your timezone, here’s a handy timezone converter-https://www.timeanddate.com/worldclock/converter.html.
Although I said you can solve this puzzle using any programming tool of your choosing, there are three rules I’d like you to adhere to:
You MUST have the correct answer (which I will share in part 2, along with my approach for solving the problem).
You MUST use a reverse substitution cipher to decode the message. If you don’t know what a reverse substitution cipher is, it goes something like this: A = Z, B = Y, C = X and so on until Z = A.
You MUST send me both the code and the output (and please, please send the code in a .txt file)
Send me your work to the email miketheblogger@outlook.com (yes, I have a separate email for blog matters). Also send me the outputs in whatever formats works best-be it on a .txt file, through screenshots, or really whatever works for you.
Thanks for reading, and be sure to keep an eye out for part 2 of my five-year anniversary celebration. Yes, I decided to pull an Avengers: Infinity War here (if you know, you know) and split my big five-year celebration post into two. After all, let’s keep the fun going for one more post! Can’t wait to see you solve the code (and don’t worry-I’ll share my answer in the next post)!
Michael here, and today I thought I’d celebrate the blog’s fourth anniversary (yes, I’ve been active for that long) to introduce more exciting updates to my blog (and no, there won’t be a third home). Yes, I’m still keeping my tradition of anniversary posts every June 13.
If you’ve been reading my WordPress site throughout the years, you’ll notice that not much has changed. From the blog’s name, layout, and content, not much has changed at all-after all, I’ve strived (and will continue to strive) to give you all great programming content. Hey, if it ain’t broke, don’t fix it.
But as the years have gone by, I’ve realized that this little blog of mine could use a little revamping every now and then-and to be honest, this blog is looong overdue for a little facelift.
First off, let’s start with the About Me page. Hoo boy, this may have worked when I launched this blog in 2018, but it looks awfully dated now. After all, I’m no longer a 22-year-old recent college graduate but now a 26-year-old working professional who now has had almost three years of programming job experience under his belt (when I launched this blog, I had no programming job experience, just some coding knowledge from courses I took in my last year of undergrad). Plus, I’ve been out of school for four years now-I started this blog about a month and a half after college graduation.
Now, after a little tweaking, let’s see the new About Me page:
OK, so I couldn’t capture the whole about me page in a single screenshot, but wouldn’t you say this looks much better. I describe myself and give a little more background as to why I pursued a career in coding so that you all can know why I do what I do. I also included a link to my Medium account-as many of you know, I started publishing my blogs to Medium as well as WordPress beginning in October 2021.
I also include a picture of myself, just so you-the readers-know what I look like.
Also, for those who may be wondering, I took this picture in June 2021 at Radnor Lake State Park in Nashville, TN. Perfect outdoor area to visit if you’re ever in Nashville.
Now, the next major update I made is post-tagging. As you readers likely have noticed, I tend to jump back and forth between programming tools a lot in my posts (e.g. in 2018, I jumped from a series of R lessons to a series of MySQL lessons and back to another series of R lessons). The reason I do this is because I like to cover a variety of programming tools to keep this blog interesting-after all, I’ve covered SEVEN different programming tools (GitHub, Python, Java, MySQL, R, HTML, and CSS) over the course of this blog’s four-year run. Since I’ve covered so many different programming tools, I know it can get messy if you’re looking for lessons pertaining to a certain tool (such as R). That’s why I’m going back and tagging all 126 of my posts (including this post). Take a look at my first R lesson from June 25, 2018:
Notice something different on the bottom? If you’ve visited my blog, you’ll notice that I didn’t have tags on my posts up until now. In this post, I just have a single tag-R-which if you click on it, you’ll see all the R posts I’ve written on this blog (well, all the R posts I’ve tagged so far):
Programming tools like R and MySQL aren’t the only things to get their own tags. Let’s say you wanted to find posts that use music-related datasets. Well, click on any post that has a music tag and watch what happens:
In this example, after I clicked on a post with a music tag, I can see all my posts that have a music tag-most of which are also MySQL lessons. For those that have read my blog for a long time, you’ll likely remember that I utilized a dataset of American music from 2000-2018 when I published my MySQL lesson series in the summer and fall of 2018.
Also, even though this is not an update, I just wanted to remind you all that, if you ever wanted to reach out to me directly, I’ve had a handy-dandy contact form on my blog since Day 1:
Hey, it’s simple, but it works. Plus, anything you post on this form will go to an e-mail account I actually check, not a throwaway account. I’d love to answer some of your coding/programming questions.
Also, last but not least, the biggest update I have for you all. You ready?
I’m changing the name of the blog! Yes, when I first created this blog, I settled on the name Michael’s Analytics Blog because, after all, my name is Michael and I was going to share solely data analytics lessons with you all (I was in the midst of a marathon of a post-college job hunt in data analytics when I launched this blog). However, throughout the years, my blog’s focus has certainly broadened from just data analytics to more programming tools such as Python, web development (with HTML and CSS) and even GitHub (recall my celebratory 100th post A Very Special 100th Post: The Basics of Git & GitHub).
So without further ado, here’s my new blog name:
Yes, this blog will now be known as Michael’s Programming Bytes. I also now have a tagline-Byte sized programming classes for all coding learners.
Honestly, with the direction the blog has taken over the last several years, I thought it was fitting to retire the Michael’s Analytics Blog name (not that there was anything wrong with it) and introduce the Michael’s Programming Bytes name. How did I land on this name? Well, think about this, dear readers. Over the last four years, I’ve given you all “bytes” of programming knowledge in seven different programming tools with each post. Plus, bytes are the smallest units of computer memory storage, and this is a programming blog after all, so I thought the name fit well.
As I just mentioned, I also have a blog tagline now-Byte sized programming classes for all coding learners. I am giving you all “byte”-sized programming “classes” with each post (hey, two programming puns in one).
Yes, I wanted to go all-in on the programming wordplay with the new blog name & tagline. I think you coders will get a kick out of it. Still keeping the red border on my blog-red is my favorite color after all.
Now that I have a new blog name, I’ll change the blog domain as well. Will keep you posted on that.
Thanks for reading these last four years! Here’s to many many more years of providing great programming content for you all.
Michael here, and today’s post will be a little different. To celebrate my 100th post (and third anniversary of this blog’s launch), I thought I’d try something new on this blog.
Most of my posts cover programming tools-over the course of this blog’s run, I’ve covered R, MySQL, Java, Python, and HTML. This post will cover using Git and GitHub, which aren’t programming tools per se like Java or Python, but they’re still important for any developer to know.
Let’s get started. Before diving into GitHub, we need to discuss Git and the differences between Git and GitHub. The main difference between Git and GitHub is that Git is software while GitHub is a cloud-based web service. More specifically, Git is a distributed version control software that is designed to track changes in source code during the development process; one of the aims of Git is to coordinate development work amongst different programmers (if you work in software development or tech like I do, you’ll often be working with teams of other programmers/developers on pieces of code together). GitHub, to be specific, is a cloud-based version-controlled Microsoft-owned web service that hosts Git repositories (more on this later).
Although Git and GitHub are two different services, you can use Git without GitHub but not vice versa.
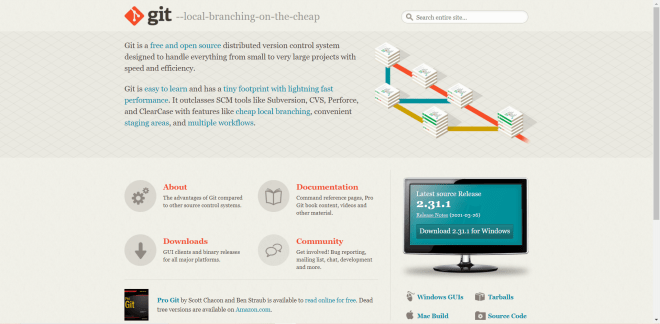
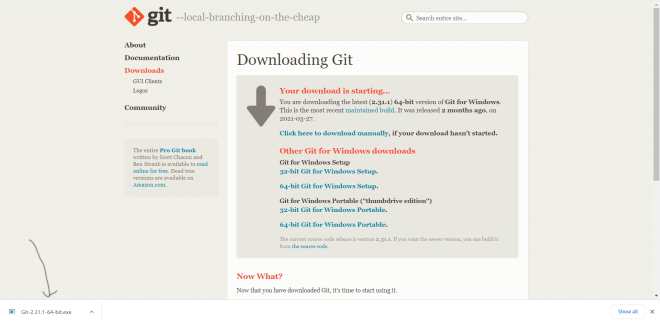
Now, before we start working with GitHub, we would first need to install Git to our devices. To do so, go to this website: https://git-scm.com/. Then click on the Download 2.31.1 for Windows button if you’re working on a Windows device. If you’re working with a Mac, click the Mac Build button to see an explanation on how to install Git on a Mac.
Even though the button says Download 2.31.1 for Windows, you might see a different version. Git version 2.31.1 is the latest version as of June 2021.
Once you click the Download 2.31.1 for Windows button, click on the EXE file that appears after clicking download. You will then see the Git installer wizard pop up.
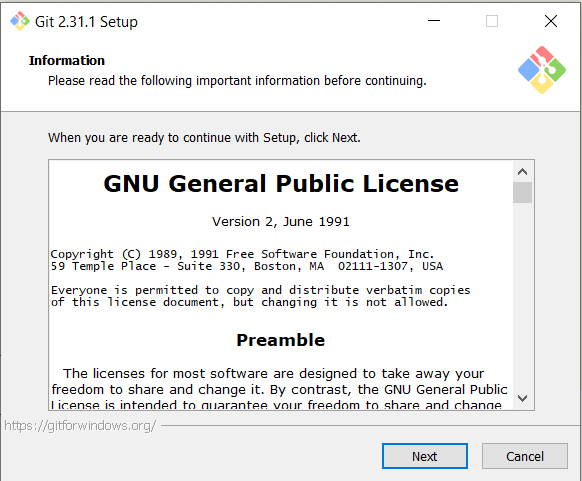
Now, let’s go through the Git installer wizard step by step. First, scroll through the license agreement and click Next:
For this step, you can either leave the Git destination folder location as-is or you can click Browse if you want to install Git in a different folder (or even create a new folder to install Git into)-just remember where you installed Git on your computer. After your done configuring the Git destination location, click Next:
I would leave this part as-is, but if you want to add or remove components to your Git installation, check and un-check the components boxes where you wish to make the installation changes. When you’re done configuring the Git components, click Next:
Again, here’s another thing I’d leave as-is, but if you want to create Git launching shortcuts in another folder, click Browse (you can also check Don’t create a Start Menu folder if you don’t want to create Git launching shortcuts):
Now, you can leave the drop-down as-is and keep Vim as Git’s default text editor (Git uses text editors when committing changes in a repository-more on this later). You can also select another text editor from the drop-down (personally, I like using Notepad as the default Git editor):
The reason why you might not want Vim as Git’s default text editor is because, while Vim is a powerful Git text editor, its not user-friendly and honestly pretty annoying to use (take it from a developer who’s tried to use Vim himself). Notepad, on the other hand, works just as well as Vim and is way easier to use (though choose whatever text editor suits you best-they all do the same thing). Once you’ve chosen a text editor, click Next.
All Git repositories have a main branch and one or more sub-branches. You can either let Git decide the name of the main branch (which in this version is called the master branch) or override Git’s default name for main branches. If you choose the latter option, enter the name you want to use for your main branch in the text-box below:
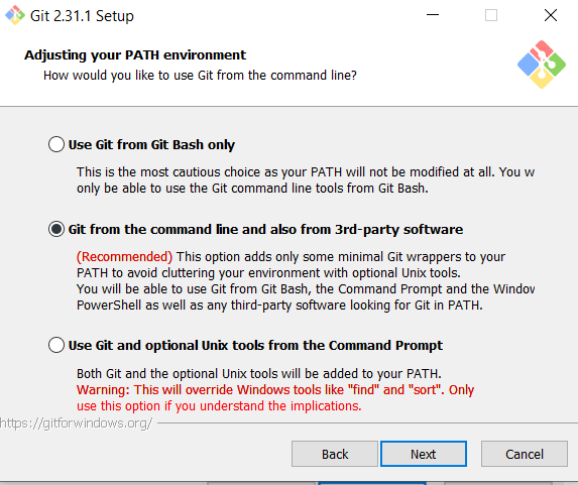
For this page, I would recommend choosing the Git from the command line… option as it will allow you to use Git from the Command Prompt (or any command-line tool like Atom Text Editor’s terminal). If you choose Use Git from Git Bash only, you will only be able to use Git from the Git Bash terminal (basically Git’s version of the command prompt). When you’ve chosen a PATH environment, click Next:
Keep clicking Next to scroll through the rest of the Git installation wizard, leaving all selections as is until you get to the final page of the wizard:
Click Install to install Git to your computer. To confirm that Git was successfully installed on your computer, run the git --version command on your command prompt like so:
As you can see, we’ve installed Git version 2.31.1 on this computer.
Now that I’ve discussed some Git basics, let’s discover GitHub:
GitHub is a collaborative code-hosting version-controlled web platform founded in 2008 (with a beta version first deployed in late 2007); GitHub was acquired by Microsoft in 2018. To use GitHub, you’ll first need to sign up for it by clicking the Sign up for GitHub button-you can either sign up for a free account or a paid subscription. However, keep in mind that all your GitHub history is public with a free account-the only way to keep some (or all) of your GitHub history private is with a paid subscription to GitHub (which I’d highly recommend you get if you’re going to store sensitive/proprietary data on GitHub). I already signed up for a public GitHub account, since it’s free and I’m not storing any proprietary/sensitive data.
Now, after you create your account, you’ll see a screen that looks like this-this is the homepage for my GitHub organization (mfletcher2021). On the left-hand side of the screen, you’ll see all the GitHub repositories that I’ve created:
In GitHub context, an organization is basically a hub where multiple developers can collaborate on one or more projects (if you’ve worked in tech, odds are your project team uses GitHub organizations). GitHub creates a default organization for you when you sign up for the service, but if you’d like to create a new organization click on the Create an organization button.
Upon clicking this button, you should see a screen that looks like this. I’d recommend choosing the Free plan (unless you’re a company running a major development project):
After choosing your plan, you will be taken to this page, where you will need to set an organization name, a contact e-mail (the e-mail where you will get updates about changes made to all project repos that you have access to), specify where the organization belongs to (either to your personal account or to a business/institution), and solve the stupid CAPTCHA puzzle to verify your account:
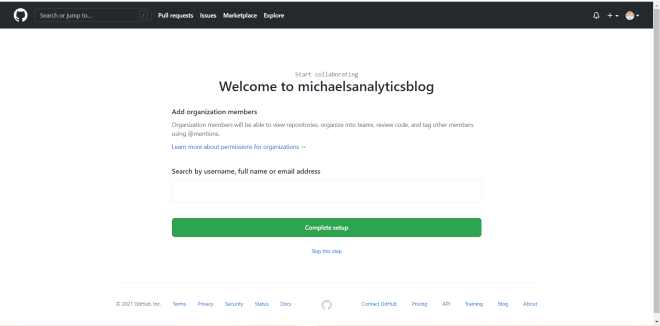
After you’ve set up your organization, you’ll be taken to this page. Here, you can add members to your organization and invite them to collaborate on your project(s). You don’t need to add any members right away-if you choose to do this, click the Skip this step link:
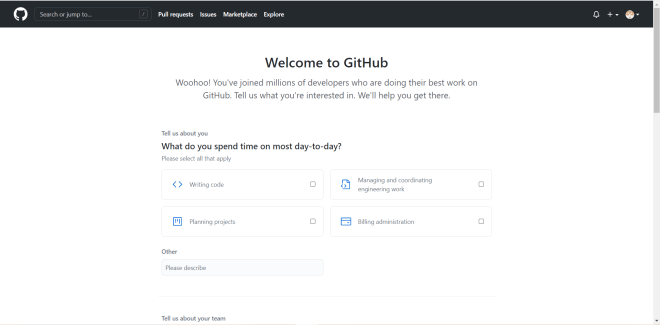
After adding members (or not), this is the last screen you’ll be taken to. Fill out this survey to get started developing (sadly, there’s no skip option for this survey, but you can leave it empty and hit Submit):
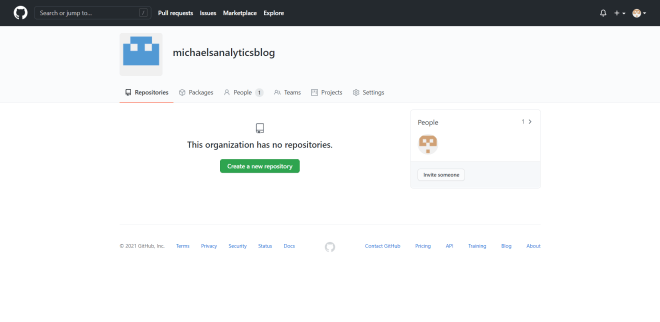
Once your organization is created, you should see a page that looks like this:
If you’ve never worked with Git or GitHub, you’re probably wondering “What the heck is a repository?”. A repository (or repo for short-I’ll use these terms interchangeably) is a storage hub for all of your project files (which can be any file under the sun). GitHub repos can also be used to store any ideas or developer notes that you’d like to share with the other developers on your project team.
To create a repo in your organization, click on Create a new repository. Once you do so, you will see this screen. Set the name of the repo, give a description of the repo if you want, and add a README file, .gitignore file, and a license if you want-I won’t cover these three things here as they are beyond the scope of this lesson:
The good news is that, even if you’re on a free plan, you can still create a private repo, which would give you full control as to who can see and/or make changes to the repo.
Once you’re done configuring the settings for your repo, click on the Create button to create your first GitHub repo. Once you’ve created the repo, you’ll see a page that looks like this:
This page confirms that the Git repo has been created but currently has nothing in it.
As you will see on this page, there are several commands to use to upload a project folder to your GitHub repository. However, I like to use a different set of commands when uploading anything to a GitHub (or other Git-based) repo.
First, before you start creating the Git repo, open the command prompt:
Next, locate the directory where your main project folder sits. To go to that directory, run the cd [your directory here] command to locate your project directory on the command prompt.
An easier way to navigate to your directory would be to type cd on the command prompt, locate your main project folder in your computer’s file explorer program, and drag the folder to the command prompt. The directory path to the folder will auto-populate.
I couldn’t upload the folder I used to WordPress, but if you want to code-along with this post, any folder will work.
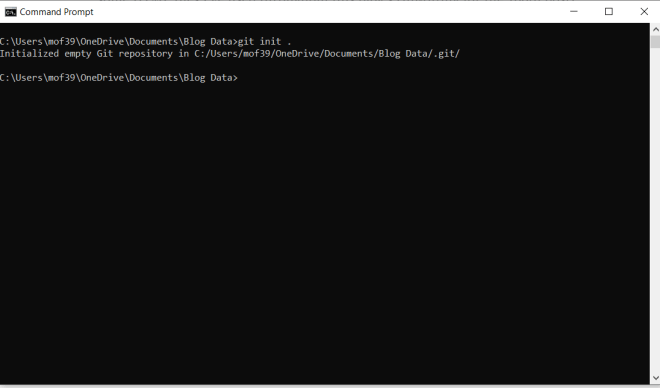
Now, before we send all of this folder’s code to a GitHub repo, we’ll need to create an empty Git repo in the project folder. To do this, run the command git init . (be sure you’re in your main project folder path in command prompt):
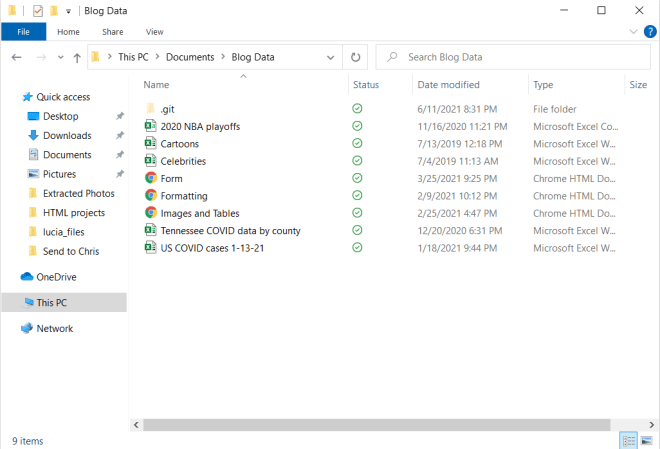
If you go to your project folder on your computer’s file explorer program, you should see that an empty Git repo has been created (it’s the folder named .git):
An important thing to note is that, unless you get an error message, the Git repo was successfully created. However, sometimes if you’re using a Windows OS like I am, the Git repo is hidden (it was hidden the first time I ran this command). If you can’t see the Git repo after creating it, go to your computer’s settings, search for the For developers settings (if you’re on a Windows OS), go to the Change settings to show hidden and system files (which is under the File Explorer list), click the Show settings link and in the menu that appears, select the Show hidden files, folders, and drives radio button and click Apply. The empty Git repo should now be visible.
Another important thing to know about Git & GitHub is that they work with the concept of branches. In the context of Git & GitHub, branches are isolated development environments in a repo that allows a developer (or teams of developers) to manipulate code, develop new features for a project, or debug a project.
Usually, GitHub repos have a default branch (usually named master or main) which contains the main code/files for your project. Any other branch you create serves as a copy of the main branch.
Whenever I work on a Git-repo based project (such as projects that use DevOps or GitHub), I like to create two branches-a master branch and a development branch. I use the master branch to store the main (or master) code while I use the development branch for debugging and manipulating code.
Now, to create master and development branches in your Git repo run these two commands in order-git checkout -b master and git checkout -b development.
Be sure to run the -b master command before running the -b development command, as you will need to ultimately make the commits (more on those later) to your Git repo in the development branch.
Also be sure you’re in your main project directory when creating the branches (and for all steps to push code to your GitHub repo for that matter)
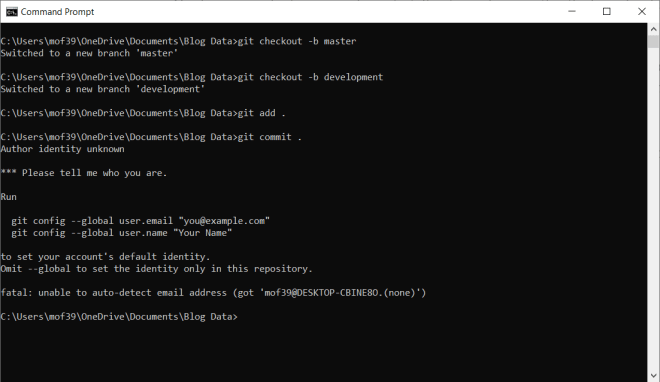
Now comes the fun stuff-adding and committing all the project files to the Git repo. To add files to your Git repo, run the command git add .. To commit files to your Git repo, run the command git commit ..
What is a Git commit exactly? A commit is Git jargon for a change made anywhere in your repo-such as a change made to a file (or files) in your repo or the addition/deletion of file(s).
Be sure to run the git add . command before the git commit . command or else the files won’t be committed to the repo.
Now, as you can see here, I was able to run git add . just fine. However, I ran into an error when I tried to run git commit .. As it turns out, there are two Git credentials I need to configure before I make any commits-an email and a user-name. These will be easy credentials to configure and as it turns out, the error message generated gives us the exact syntax of the two commands to use.
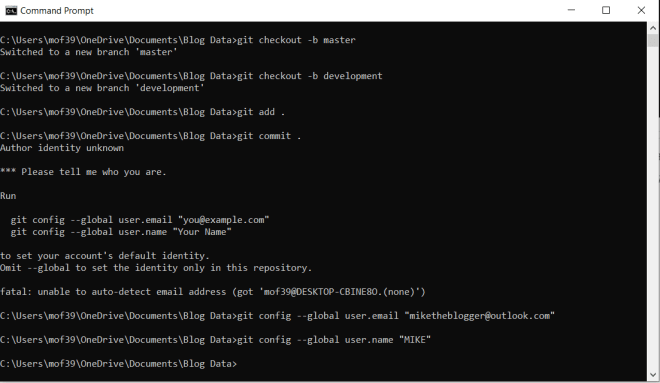
Let’s run these two commands:
You may recall that miketheblogger@outlook.com was a throw-away e-mail account I created for an HTML lesson.
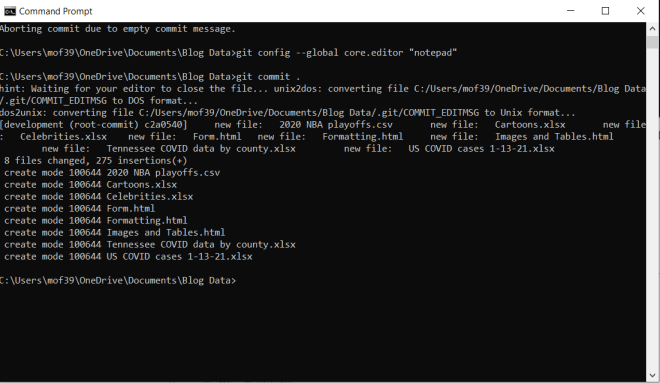
Wonderful! Now let’s re-try the git commit . command:
Awesome! Looks like everything committed to the repo.
Now, while the git commit . command is running, you’ll notice that Git’s default text editor Vim pops up. You will recall that earlier in this post, I said that Vim is a very-powerful albeit not user-friendly Git text editor. To change the default Git text editor, run this command before running git commit .–git config --global core.editor "[your preferred text editor]".
Since I chose Notepad as my default Git text editor, a Notepad window that looks like this will appear while the git commit . command is running:
Remove the pound sign (#) from any lines that contain files that you want to commit to the Git repo-any line with a pound sign will be treated as a comment and won’t be committed to the repo.
Once the git commit . command has run, the last two things you’ll need to do are to tell the command prompt is where your GitHub repo is located and push the code to the repo you specified.
If you wondering what the period (.) means on the git add . and git commit . commands, it means everything-as in, add & commit all project files to the Git repo. You can exclude certain file types and/or directories from being added & committed either by using Git’s EXCLUDE file (found in the .git/info/ folder) or by creating a GITIGNORE in the Git repo-however excluding files is beyond the scope of this lesson.
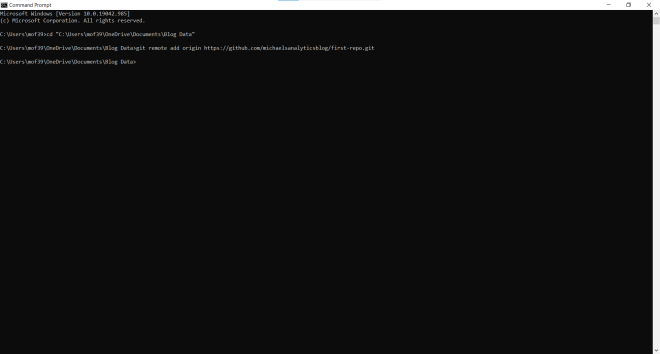
To tell the command prompt where your GitHub (or other Git-based) repo is located, run the command git remote add origin [path to your GitHub repo]:
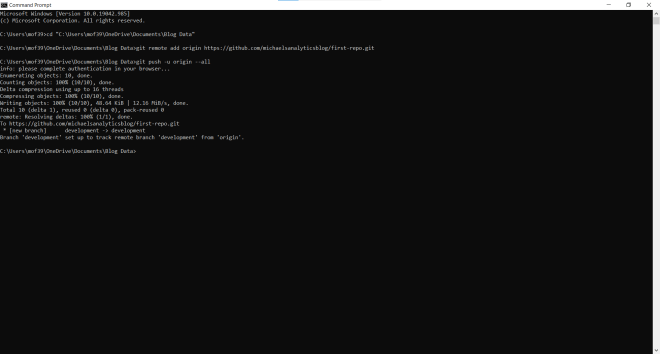
Last but not least, run the command git push -u origin --all to push the code into your GitHub repo:
Once you run this command, you will get a pop-up window asking you to sign in to your GitHub account if you’re not already signed in to GitHub.
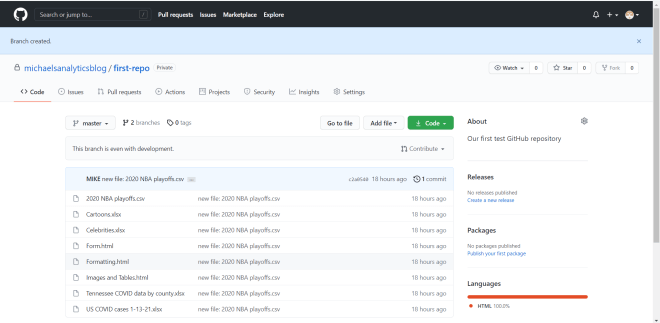
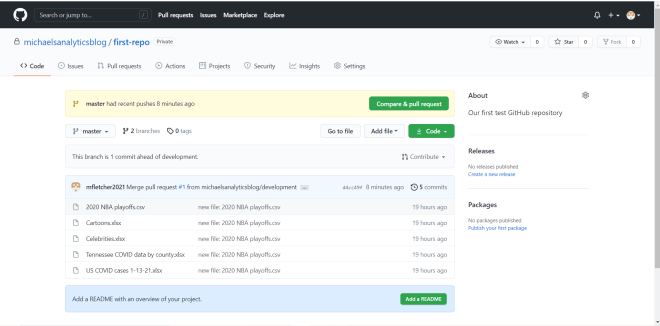
After the git push -u origin --all command finishes running, refresh your GitHub repo to see all of your files on the development branch:
As you can see, all of the files in the Git repo have been pushed to the development branch of the GitHub repo.
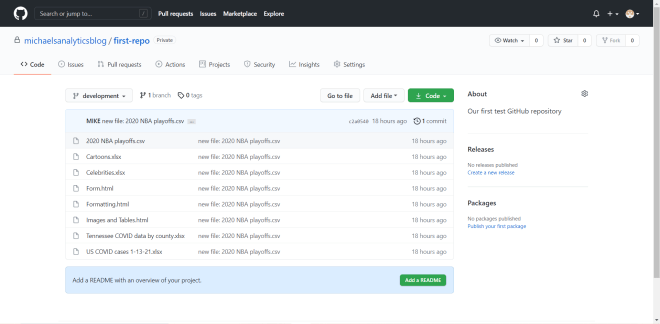
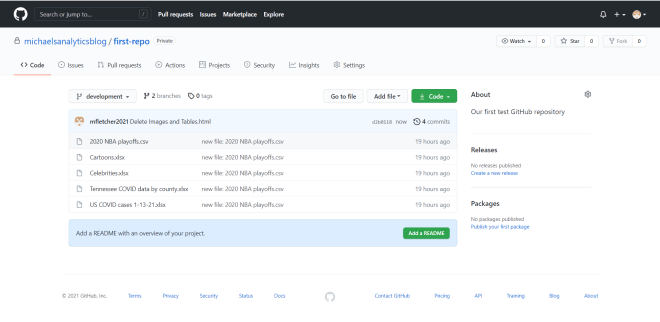
However, click on the development dropdown and you’ll notice something missing-the master branch. There’s an easy way to fix this problem, though.
Click on the development drop-down, type in the word master, and click on Create branch master from development to create the master branch from the development branch.
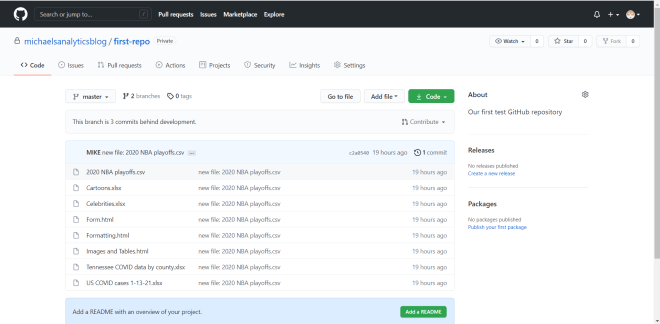
As you can see, a master branch has now been created-it also contains all files from the Git repo that we pushed into the development branch:
You can run a git pull command to merge the development branch code and master branch code together, but in this case git pull wasn’t necessary.
Awesome! Now the last thing I want to cover is the concept of pull requests in Git & GitHub. Earlier, I mentioned that branches are isolated environments where a developer (or team of developers) can manipulate and debug code without affecting the master/main code. Well, what if you wanted to incorporate any changes you made in the development branch (or any branch for that matter) into the master branch? You’d create a pull request to merge the revised development branch with the master branch.
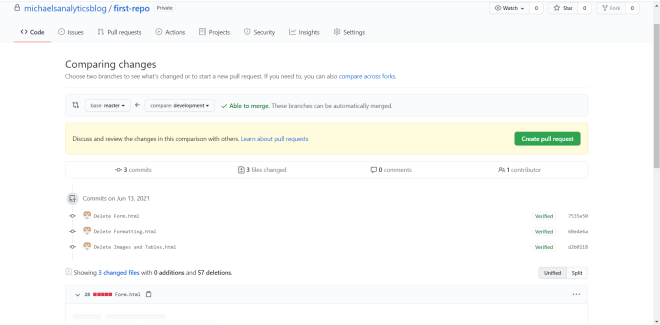
As a simple example to demonstrate pull requests, I’ll delete the three HTML files from the development branch (but not the master branch):
As you can see, the three HTML files are no longer on the development branch, but they’re still on the master branch. How do we get the HTML files off the master branch? Create a pull request!
To create a GitHub pull request, click on the Pull requests tab in GitHub:
Once at the Pull requests interface, click on New pull request to create a new pull request.
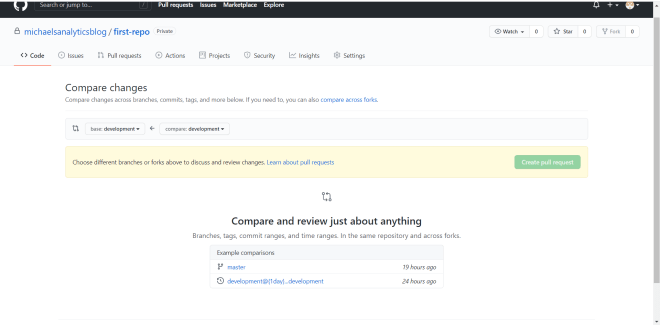
Take a look at the two dropdowns on the interface. The compare is where the branch where the changes were made-in this case, it’s the development branch. The base is the branch where you want to incorporate the changes-in this case, it’s the master branch.
Once you configure the branches you want to merge together, you should see an Able to merge message if you can successfully merge the branches together. You will also see a list of all the changes that were made on the development branch (which will be merged onto the master branch). Click on Create pull request to create the pull request.
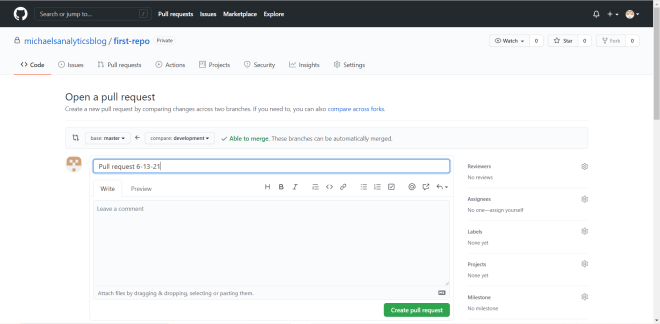
Upon clicking Create pull request, you will see this interface:
Give your pull request a title, include a message if you want, and click Create pull request to execute the pull request. As you can see on the right-hand side of the interface, there are other settings you can configure for your pull request, such as Reviewers. The Reviewers setting allows you to choose an individual (preferably someone with access to the GitHub repo) to review and approve the pull request before it’s executed.
So, you might think that this would be the last step to execute your pull request, right? Nope! Upon clicking the Create pull request button for the second time, you’ll be taken to this page:
Click on Merge pull request to execute the branch-merging (the pull request was already executed in the previous step). After clicking Merge pull request, click on Confirm merge to confirm the execution of the branch-merging.
Feel free to add a comment-it’s not necessary to execute the branch merging however.
Once the branch-merging has completed, you should see a purple Merged icon appear on this page to confirm that the branches have been successfully merged:
Now, click on first-repo to go back to the main page of your repo. Then click on the dropdown and go to your repo’s master branch:
As you can see, the three HTML files that I deleted from the development branch have also been deleted from the master branch, confirming that the changes from the development branch successfully merged into the master branch. Awesome!
Thanks for reading all of my posts these last 3 years! Hopefully you’ve picked up some new skills throughout this blog’s run.
It’s Michael, and today’s post will be a little different. Why would that be?
Well, today is the blog’s two year anniversary. Yup-hard to believe I launched this blog two years ago. And harder to believe that I was still living at my childhood home in Miami Springs, FL when I got the idea to launch this blog.
Just like I did for the Thank You For 1 Year post I wrote for the blog’s first anniversary, this post will be my annual appreciation/thank-you post to all of the amazing readers of this blog.
So, where do I begin? How about a little by-the-numbers rundown of this blog’s content?
Since the launch of the blog, we’ve had:
71 posts (with this post being the 71st)
19 R lessons
9 R analyses
15 Java lessons
3 Java program demos
10 Python lessons
1 Python program demo
and 10 MySQL lessons (though it’s been ages since I’ve posted any SQL content)
Impressive, right? Now, it may surprise you to learn that this blog has been viewed all around the world, not just in the US. Let’s see where in the world has this blog been viewed:
the United States
Thailand
Vietnam
Saudi Arabia
the United Kingdom
Brazil
the Philippines
India
France
Italy
New Zealand
Russia
Well, looks like this blog has captured the attention of readers worldwide. Now, let’s see what the top 5 most viewed posts are, starting with my most viewed to date (I provided links to each post):
It looks like my very first lesson is the most viewed post to date. Honestly, I thought that my post on COVID-19 would take the top spot, given that it was my first post about a current event AND that the COVID-19 pandemic is still going on.
Now, let’s do a top 5 most viewed posts year-by-year breakdown (links provided to all posts):
Looks like my R posts have the most popular, as the R posts take up 7 of the spots on these lists. Also, my COVID-19 R analysis is the most viewed post to date in 2020 (which isn’t surprising given the current pandemic situation).
This blog has certainly come a long way since its inception two years ago. But none of these amazing stats would be possible without you-the readers. You come from all over the world, but you all come to this blog for the same purpose-to learn-and I appreciate all of you. Your support motivates me to create more great content for guys to read-and don’t worry, I’ve got years of content to come. I’m not ending this blog anytime soon.
Happy 2nd birthday Michael’ Analytics Blog! Looking forward to another great year of programming content!
This is Michael, and today is the one-year anniversary of this blog’s launch. To everybody who has ever read and/or subscribed to this blog, thank you. Thank you for reading all my data analytics and programming lessons this past year. I started this blog on June 13, 2018 not only to keep my analytical/programming skills sharp but also to show what I know and share my knowledge with others. I hope you all learned something from this blog too.
So, thank you all for reading, and here’s to more amazing content in the second year,