Hello everybody,
Michael here, and today I decided to do something I haven’t done here in a while-introduce a new programming language (the last time I introduced a new programming language was with Python in August 2019). The newest programming language (and 5th overall) will be HTML, which stands for Hypertext Markup Language; this language is used to code web pages. I will eventually cover CSS (Cascading Style Sheets) as well; CSS is the language used to style HTML web pages.
Now, before we begin, let’s install Atom text editor-this will be the text editor that I will use to create HTML/CSS web pages. Here is the link to download it-atom.io. By the way, this software is completely open-source, which means it won’t cost you anything in subscription/license fees!
Here’s what the landing page for Atom text editor looks like:


To create a new HTML project, you should first create a new folder on your computer (it doesn’t matter where on the computer you put the folder but I’d suggest putting it in Documents). Then, once you create the folder, go to the File tab on the top ribbon and click File –> New File (or use the CTRL+N shortcut).
Once you create a new folder, then click on File –> Add Project Folder (or use the CTRL+Shift+A cut). Then click on the folder you created.
After clicking on the folder, it will appear in Atom text editor (my folder’s name is HTML projects):


To add projects to the folder, right click the folder and select the New File option (or use the A shortcut). After doing this, pick a name for the file; you can name the file whatever you want, but be sure to use .html at the end of the name-otherwise you won’t be able to properly run the exercises (I will call this file Intro.html).
Now, here’s what a blank HTML file looks like on Atom text editor:


Now, let’s type in the word html. Here’s the code that appears:
<!DOCTYPE html>
<html lang="en" dir="ltr">
  <head>
    <meta charset="utf-8">
    <title></title>
  </head>
  <body>

  </body>
</html>
This is the basic outline for all HTML files. Even though there is nothing in the title or body, this code still gives us a working HTML page. To open the HTML file, right click the file name under the Project tab (or use the CTRL+Shift+C shortcut) and then click the Copy Full Path option. Then paste the file path onto the URL space-the file will open in a separate tab in your browser (or a new window if you opened a new window).
- If you want an easier way to open your HTML file, simply go to your computer’s File Explorer program, locate your HTML file, and click on it to open it-it will open in a new window.
Here’s what the HTML file looks like with just the basic outline:


The basic outline-only HTML file returns a blank webpage with the file name as the tab name.
- I used Google Chrome for this lesson, but any web browser will work for these exercises.
Now, why is a blank webpage returned and why was the file name set as the tab name? Let’s take another look at the HTML code:
<!DOCTYPE html>
<html lang="en" dir="ltr">
  <head>
    <meta charset="utf-8">
    <title></title>
  </head>
  <body>

  </body>
</html>
To understand the basics of HTML, you need to understand these two tags-<title> and <body>. The <title> tag is where the webpage (or tab) title is stored-if there is no value in the <title> tag, the webpage title defaults to the tab title. The <body> tag stores the actual content of the webpage-if there is nothing in the <body> tag, you will see a blank webpage.
You may be wondering why <title> and <body> (and all of the other tags such as <head> and <html>) appear twice-once with a backslash and once without. The backslash indicates where a tag ends; the formal name for the tag with the backslash is the end tag while the formal name for the tag without the backslash is the start tag. For instance, <body> indicates the beginning of the webpage’s body of content while </body> indicates the end of the body of content. Likewise, <html...> indicates the starting point for the webpage while </html> indicates the ending point for the webpage.
Now, let’s add some content to our webpage:
<!DOCTYPE html>
<html lang="en" dir="ltr">
  <head>
    <meta charset="utf-8">
    <title>The first HTML lesson</title>
  </head>
  <body>
      <h1>Welcome to our first HTML lesson</h1>
      <h2>Here is our first HTML webpage</h2>
  </body>
</html>
Here’s what the webpage looks like now:


So, how was I able to not only change the tab name but also add content to the webpage? Well, to change the webpage name, I had to insert a value into the <title> tag; in this case, I used the title The first HTML lesson. As you can see, the tab also now has the title The first HTML lesson.
The first line of content on the webpage-Welcome to our first HTML lesson-was used as the value for the <h1> tag. The second line of content-Here is our first HTML webpage-was used as the value for the <h2> tag. The <h1> and <h2> parameters represent headings in HTML-<h1> is used for the most important/main heading while <h2> is used for the second-most important heading. There are six heading tags in HTML-<h1> to <h6>; <h1> is used for the most significant/main headings while <h6> is used for the least significant headings.
Now, let’s add another line of content to this webpage. Here’s the new code:
<!DOCTYPE html>
<html lang="en" dir="ltr">
  <head>
    <meta charset="utf-8">
    <title>The first HTML lesson</title>
  </head>
  <body>
      <h1>Welcome to our first HTML lesson</h1>
      <h2>Here is our first HTML webpage</h2>
      <p>This wasn't too hard to create, was it?</p>
  </body>
</html>

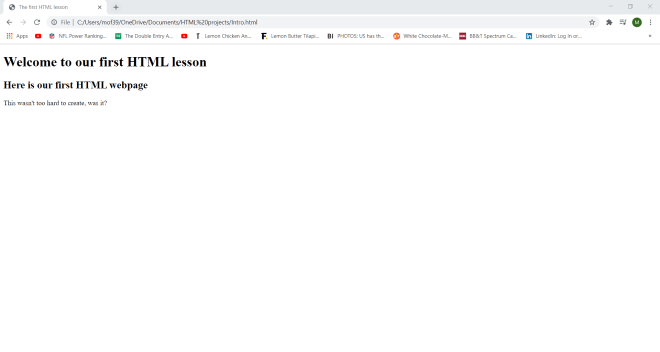
As you can see, I added a new line to the webpage-This wasn't too hard to create, was it?. To add this line to the webpage, I used the <p> tag, which stands for the paragraph tag. The paragraph tag allows you to add regular, non-header text to a webpage.
Last but not least, I wanted to show you something cool that you could do with the <p> tag. Here’s the code that I will use:
<!DOCTYPE html>
<html lang="en" dir="ltr">
  <head>
    <meta charset="utf-8">
    <title>The first HTML lesson</title>
  </head>
  <body>
      <h1>Welcome to our first HTML lesson</h1>
      <h2>Here is our first HTML webpage</h2>
      <p>Lorem ipsum dolor sit amet, consectetur adipisicing elit, sed do eiusmod tempor incididunt ut labore et dolore magna aliqua. Ut enim ad minim veniam, quis nostrud exercitation ullamco laboris nisi ut aliquip ex ea commodo consequat. Duis aute irure dolor in reprehenderit in voluptate velit esse cillum dolore eu fugiat nulla pariatur. Excepteur sint occaecat cupidatat non proident, sunt in culpa qui officia deserunt mollit anim id est laborum.</p>
  </body>
</html>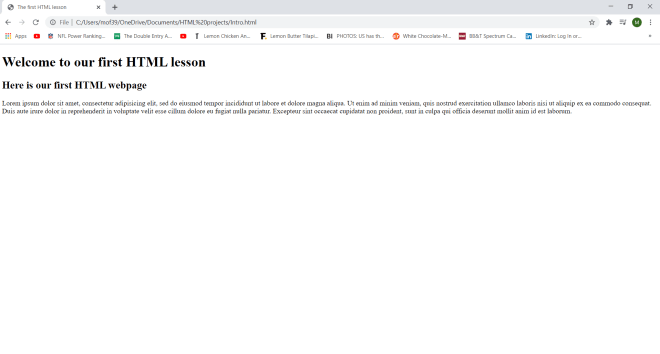
If you ever need a placeholder for real content on your webpage, type lorem into Atom text editor and the text lorem ipsum dolor... will pop up. Lorem ipsum is Latin placeholder text that is commonly used in web/graphic design and publishing in order to showcase and test out the visual appearance of content (like a book or webpage). The lorem ipsum placeholder text actually comes from a book written by the ancient Roman scholar Cicero in 45 BC (little bit of trivia for you all).
Thanks for reading,
Michael