HTML Lesson 7: Forms pt.2 (More Fun With Forms)

Advertisements

Hello everyone,

Michael here, and today’s lesson will be a continuation of the previous HTML forms lesson. In this post, I’ll cover some more neat things you can do with HTML forms.

In the previous lesson, I covered four input types for HTML forms-checkboxes, radio buttons, text boxes, and submit buttons. However, there are several more input types that you can use to make your forms more versatile.

Let’s start by exploring three new elements-tel, email , and password. These three elements allow a user to input their phone number, email, and password into a form, respectively. Here’s here we would incorporate these elements into the form:

<!DOCTYPE html>
<html lang="en" dir="ltr">
  <head>
    <meta charset="utf-8">
    <title></title>
  </head>
  <body>
    <h1>Sign up for membership:</h1>
    <form action="Submitted.html" method="POST">
      <label for="first">Please enter your first name:</label><br>
      <input type="text" id="first" name="first"><br>
      <br>
      <label for="last">Please enter your last name:</label><br>
      <input type="text" id="last" name="last"><br>
      <br>
      <label for="Email">Please enter your e-mail:</label><br>
      <input type="email" id="Email" name="Email" placeholder="email@user.com"><br>
      <br>
      <label for="pwd">Please create a password:</label><br>
      <input type="password" id="pwd" name="pwd" placeholder="password"><br>
      <br>
      <label for="phone">Please enter your phone number:</label><br>
      <input type="tel" id="phone" name="phone" pattern="[0-9]{3}-[0-9]{3}-[0-9]{4}"><br>
      <br>
      <input type="submit" value="Submit">
    </form>
  </body>
</html>

In this form, I included two text box elements, a submit button, and fields for users to input their e-mail address, password, and phone number.

How exactly did I code out the e-mail address, password, and phone number fields? Let’s take a closer look at each field:

Here’s the code I used for the e-mail field:

<input type="email" id="Email" name="Email" placeholder="email@user.com"><br>

To add an e-mail address input field to the form, the input type is email. I also used an optional attribute called placeholder, which allows me to set a placeholder for the email field (in this case, I used email@user.com as the value for the placeholder); the field placeholder will be displayed until the user types something into the field.

  • Recall from the previous lesson that you need to set the id of the input tag to be equal to the for of the corresponding label in order to connect the input field with the corresponding label.

Now let’s take a look at the password field:

<input type="password" id="pwd" name="pwd" placeholder="password"><br>

To add a password input field to the form, the input type is password (pretty self-explanatory right?). As with the e-mail field, you can also add a placeholder attribute to the password field (I used password as the placeholder value).

Lastly, here’s the telephone number field:

<input type="tel" id="phone" name="phone" pattern="[0-9]{3}-[0-9]{3}-[0-9]{4}"><br>

To add a telephone number input field, the input type is tel. However, let’s take a look at the pattern attribute. The pattern attribute allows you to indicate the pattern for the phone number; this is useful since different countries have different phone number patterns. For this example, I’ll use a US phone pattern (three digits-three digits-four digits).

You’ll also notice that I used regular expressions to specify the phone number pattern; I did do a Java lesson on regular expressions a while back, so if you want a refresher, here’s where to go: Java Lesson 18: RegEx (or Regular Expressions).

Now, let’s input data into this form and see what it looks like:

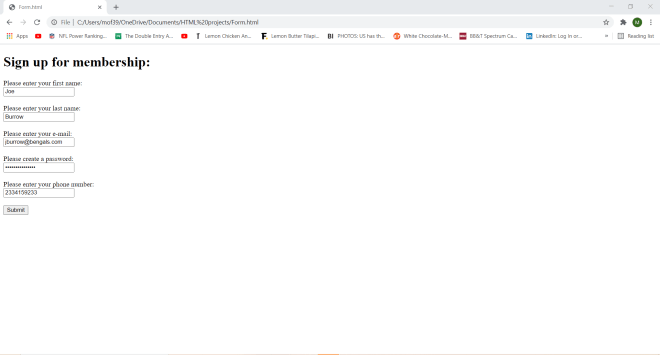
As you can see, the password is shown as a series of black dots so that it can’t be seen by anybody.

Interestingly, the phone number dashes don’t automatically show up in the phone number field.

Now let’s play around with some other input elements-color and number:

<!DOCTYPE html>
<html lang="en" dir="ltr">
  <head>
    <meta charset="utf-8">
    <title></title>
  </head>
  <body>
    <h1>Order your shirt and shoes:</h1>
    <form action="Submitted.html" method="POST">
      <label for="first">Please enter your first name:</label><br>
      <input type="text" id="first" name="first"><br>
      <br>
      <label for="shirtcolor">What is your favorite shirt color?</label><br>
      <input type="color" id="shirtcolor" name="shirtcolor"><br>
      <br>
      <label for="size">What is your shoe size?</label><br>
      <input type="number" id="size" name="size" min="5" max="15"><br>
      <br>
      <input type="submit" value="Submit">
    </form>
  </body>
</html>

In this form, I included a text box element, a submit button, a color picker, a number picker, and a submit button.

How did I create the color picker and number picker inputs? Let’s first take a look at the code to create the color picker:

<input type="color" id="shirtcolor" name="shirtcolor"><br>

To add a color picker to a form, set the input type to color.

Now here’s the code to create the number picker:

<input type="number" id="size" name="size" min="5" max="15"><br>

To add a number picker to a form, set the input type to number. You can customize the min and max parameters to your choosing; in this example, I set min to 5 and max to 15; this indicates that the number picker I created has a range of 5-15. I could’ve also set a step attribute, which would’ve specified how to increment the numbers in the number picker. For instance, if I used 5 as the value for step, I would’ve only seen 5, 10, and 15 on the number picker since I would only see increments of 5 (starting with 5) on the number picker.

The color picker displays a built-in color picker tool for you to choose a certain color. Pretty self-explanatory right?

For the most part, the color picker should work on any browser (I’m using Google Chrome) but there may be a few browsers that don’t support the color picker.

Anyway, here’s the neat thing about the color picker-you can customize the color you want according to RGB scales, HSL scales, or color hex codes. Let me explain what each of these color scales mean:

  • RGB stands for red, green, and blue. R, G, and B can be represented by any number from 0-255, which represent the intensity of the red, green, and blue hues, respectively, in the custom color. A 0 for any parameter of RGB represents the least intense hue of red, green or blue while a 255 for any RGB parameter is the most intense hue.
  • HSL stands for hue, saturation, and lightness. H represents a degree on the color wheel and can be represented with any number from 0-360; 0 is pure red, 120 is pure green, and 240 is pure blue. S & L represent a color’s saturation and lightness, respectively; both S & L are represented with percentages from 0-100. For S, 0% represents gray and 100% represents full color. For L, 0% represents black and 100% represents white.
  • Color hex codes store colors as six-character hexadecimal codes (recall from Java Lesson 5: Java Numbering Systems that the hexadecimal system encompasses both 0-9 and the letters A-F). Color hex codes can range from #000000 (pure black) to #FFFFFF (pure white).
    • Keep your eyes peeled for a future lesson on color and programming color scales.

The number picker allows you choose a number between 5 and 15. Why between 5 and 15? Take a closer look at this line of code:

<input type="number" id="size" name="size" min="5" max="15"><br>

In the <input> tag, I set min to 5 and max to 15, thus making the range of numbers you can choose from between 5-15.

Last but not least, let’s play around with some date-time form tools-more specifically, let’s focus on date and time:

<!DOCTYPE html>
<html lang="en" dir="ltr">
  <head>
    <meta charset="utf-8">
    <title></title>
  </head>
  <body>
    <h1>Flight finder:</h1>
    <form action="Submitted.html" method="POST">
      <label for="datepicker1">Pick the date you want to depart for your vacation</label><br>
      <input type="date" id="datepicker1" name="datepicker1"><br>
      <br>
      <label for="datepicker2">Pick the date you want to return from your vacation</label><br>
      <input type="date" id="datepicker2" name="datepicker2"><br>
      <br>
      <label for="time1">What time would you like to depart? (flights shown within 90 minutes of selected time)</label><br>
      <input type="time" id="time1" name="time1"><br>
      <br>
      <<!DOCTYPE html>
<html lang="en" dir="ltr">
  <head>
    <meta charset="utf-8">
    <title></title>
  </head>
  <body>
    <h1>Flight finder:</h1>
    <form action="Submitted.html" method="POST">
      <label for="datepicker1">Pick the date you want to depart for your vacation</label><br>
      <input type="date" id="datepicker1" name="datepicker1" min="2021-03-25" max="2022-03-25"><br>
      <br>
      <label for="datepicker2">Pick the date you want to return from your vacation</label><br>
      <input type="date" id="datepicker2" name="datepicker2" min="2021-03-25" max="2022-03-25"><br>
      <br>
      <label for="time1">What time would you like to depart? (flights shown within 90 minutes of selected time)</label><br>
      <input type="time" id="time1" name="time1"><br>
      <br>
      <label for="time2">What time would you like to return? (flights shown within 90 minutes of selected time)</label><br>
      <input type="time" id="time2" name="time2"><br>
      <br>
      <label for="layover">How many layovers do you want?</label><br>
      <input type="number" id="layover" name="layover" min="0" max="3"><br>
      <br>
      <input type="submit" value="Submit">
    </form>
  </body>
</html>

In this form, I have two date pickers (created with the date input type), two time pickers (created with the time input type), a number picker, and a submit button.

For both of the date pickers, I used the min and max attributes to set a range for the dates; for both date pickers, min is 2021-03-25 and max is 2022-03-25-this means that March 25, 2021 (today) is the earliest date you can pick while March 25, 2022 (a year from now) is the latest date you can pick.

The time pickers allow you to select any time between midnight and 11:59 PM. To select a time on the time picker, you’d need to scroll through the hour and minute sections to pick the hour and minute you want. You would also need to specify whether you want the time to be AM or PM.

  • The date input type allows you to create a date picker while the time input type allows you to create a time picker, but if you wanted a date AND time picker, use the input type datetime-local (you won’t be able to specify a time zone, however).

Thanks for reading,

Michael

HTML Lesson 6: Forms pt.1

Advertisements

Hello everybody,

Michael here, and today’s lessons will be on creating forms in HTML. Forms are used to process user input in HTML webpages.

Here’s a simple example of an HTML form:

<!DOCTYPE html>
<html lang="en" dir="ltr">
  <head>
    <meta charset="utf-8">
    <title></title>
  </head>
  <body>
    <h1>Here's an HTML form:</h1>
    <form>
      <label for="first">Please enter your first name:</label><br>
      <input type="text" id="first" name="first"><br>
      <label for="last">Please enter your last name:</label><br>
      <input type="text" id="last" name="last"><br>
      <br>
      <input type="submit" value="Submit">
    </form>
  </body>
</html>

In this example, I created a simple HTML form where a user enters their first and last name and clicks the submit button. Granted, nothing will happen when I click the submit button since I didn’t program the button to do anything once it’s clicked, but I just wanted to include it here to show you all a simple example of an HTML form.

Anyway, what do all of the form tags I used mean? Let’s break it down:

  • To create the form, I use the <form> tag. I will also wrap all of the forms elements in this tag.
  • For the text boxes where the user enters their first and last name, I used the <input> tag for each of them and set the input type as text (which indicates a textbox input).
  • I also added labels on top of each of the text boxes with the <label> tag.
  • To create the submit button, I used another <input> tag but set the input type as submit.
  • As for the for label parameter, its value should be equal to the id value on the corresponding input element in order to connect the label with the corresponding input.
    • Specifying the for and id parameters will be especially important in CSS (which I’ll discuss more when I do my CSS series).

Now, let me show you a more complicated HTML form example:

<!DOCTYPE html>
<html lang="en" dir="ltr">
  <head>
    <meta charset="utf-8">
    <title></title>
  </head>
  <body>
    <h1>Here's an HTML form:</h1>
    <form>
      <label for="first">Please enter your first name:</label><br>
      <input type="text" id="first" name="first"><br>
      <label for="last">Please enter your last name:</label><br>
      <input type="text" id="last" name="last"><br>
      <br>
      <label for="gender">What is your gender?</label><br>
      <input type="radio" id="gender" name="gender">Male<br>
      <input type="radio" id="gender" name="gender">Female<br>
      <input type="radio" id="gender" name="gender">Other<br>
      <br>
      <input type="submit" value="Submit">
    </form>
  </body>
</html>

I expanded upon the previous example by adding some radio buttons to the form. Radio buttons are ideal if you want the user to only select ONE of several different choices; in this example, I added three radio buttons with the values Male, Female, and Other each wrapped in an <input> tag with type radio. I also added a corresponding label and specified the for parameter of the label along with the id parameter of each radio button in order to connect the label with each of the radio buttons.

  • If you want multiple radio buttons, you’ll unfortunately need to type them out 1-by-1. HTML doesn’t yet allow you to group several radio buttons inside a single input tag.

Now, let’s add some checkboxes to the form:

<!DOCTYPE html>
<html lang="en" dir="ltr">
  <head>
    <meta charset="utf-8">
    <title></title>
  </head>
  <body>
    <h1>Here's an HTML form:</h1>
    <form>
      <label for="first">Please enter your first name:</label><br>
      <input type="text" id="first" name="first"><br>
      <label for="last">Please enter your last name:</label><br>
      <input type="text" id="last" name="last"><br>
      <br>
      <label for="gender">What is your gender?</label><br>
      <input type="radio" id="gender" name="gender">Male<br>
      <input type="radio" id="gender" name="gender">Female<br>
      <input type="radio" id="gender" name="gender">Other<br>
      <br>
      <label for="age">What age range do you fall under?</label><br>
      <input type="checkbox" id="age" name="age">under 18<br>
      <input type="checkbox" id="age" name="age">18-29<br>
      <input type="checkbox" id="age" name="age">30-39<br>
      <input type="checkbox" id="age" name="age">40-49<br>
      <input type="checkbox" id="age" name="age">50-59<br>
      <input type="checkbox" id="age" name="age">60-69<br>
      <input type="checkbox" id="age" name="age">over 70<br>
      <br>
      <input type="submit" value="Submit">
    </form>
  </body>
</html>

To add checkboxes to an HTML form, set the input type of the <input> tag to checkbox and in order to create a group of checkboxes, set the id parameter of each checkbox to be equal to the for parameter of the corresponding <label> tag.

  • The <label> tag is optional, but if you choose not to include a <label> tag (or even if you did), use the same value for the id parameters for all of your checkboxes.

Now that we’ve discussed some basic elements of HTML forms, there’s another point I want to bring up. All input elements in HTML must have a name attribute for their value to be submitted-though in this example, nothing happens when you hit the submit button.

Now, let me show you how to make something happen when you click the submit button; I’ll use the same code I used for the previous example but this time, I’ll add another HTML page-Submitted.html-that the user will be redirected to once they hit the submit button. Here’s the code for Submitted.html:

<!DOCTYPE html>
<html lang="en" dir="ltr">
  <head>
    <meta charset="utf-8">
    <title></title>
  </head>
  <body>
    <h1>Thank you for registering!</h1>
  </body>
</html>

And here’s the revised code for the previous example:

<!DOCTYPE html>
<html lang="en" dir="ltr">
  <head>
    <meta charset="utf-8">
    <title></title>
  </head>
  <body>
    <h1>Here's an HTML form:</h1>
    <form action="Submitted.html">
      <label for="first">Please enter your first name:</label><br>
      <input type="text" id="first" name="first"><br>
      <label for="last">Please enter your last name:</label><br>
      <input type="text" id="last" name="last"><br>
      <br>
      <label for="gender">What is your gender?</label><br>
      <input type="radio" id="gender" name="gender">Male<br>
      <input type="radio" id="gender" name="gender">Female<br>
      <input type="radio" id="gender" name="gender">Other<br>
      <br>
      <label for="age">What age range do you fall under?</label><br>
      <input type="checkbox" id="age" name="age">under 18<br>
      <input type="checkbox" id="age" name="age">18-29<br>
      <input type="checkbox" id="age" name="age">30-39<br>
      <input type="checkbox" id="age" name="age">40-49<br>
      <input type="checkbox" id="age" name="age">50-59<br>
      <input type="checkbox" id="age" name="age">60-69<br>
      <input type="checkbox" id="age" name="age">over 70<br>
      <br>
      <input type="submit" value="Submit">
    </form>
  </body>
</html

Now let’s fill out the form…

…and hit submit to see what happens:

Notice that the Forms.html code looks nearly identical to the Forms.html code from the previous example with one small change-the line <form action="Submitted.html">. The action parameter tells the form what to do once the submit button is clicked-in this case, the user will be redirected to the Submitted.html webpage where they will see the message Thank you for registering!.

  • In the <form action="..."> line, I was able to simply write Submitted.html because I saved Sumbitted.html and Forms.html in the same directory on my computer. If you have two HTML files on your computer that you want to connect that are in different directories, you would need to specify the file path of the file that you want to connect to.

Whenever you use the action parameter to redirect the user to another webpage, by default, the new webpage opens in the same window where the current webpage is located. However, we can change that with the target parameter. Here’s how to do so:

<!DOCTYPE html>
<html lang="en" dir="ltr">
  <head>
    <meta charset="utf-8">
    <title></title>
  </head>
  <body>
    <h1>Here's an HTML form:</h1>
    <form action="Submitted.html" target="_blank">
      <label for="first">Please enter your first name:</label><br>
      <input type="text" id="first" name="first"><br>
      <label for="last">Please enter your last name:</label><br>
      <input type="text" id="last" name="last"><br>
      <br>
      <label for="gender">What is your gender?</label><br>
      <input type="radio" id="gender" name="gender">Male<br>
      <input type="radio" id="gender" name="gender">Female<br>
      <input type="radio" id="gender" name="gender">Other<br>
      <br>
      <label for="age">What age range do you fall under?</label><br>
      <input type="checkbox" id="age" name="age">under 18<br>
      <input type="checkbox" id="age" name="age">18-29<br>
      <input type="checkbox" id="age" name="age">30-39<br>
      <input type="checkbox" id="age" name="age">40-49<br>
      <input type="checkbox" id="age" name="age">50-59<br>
      <input type="checkbox" id="age" name="age">60-69<br>
      <input type="checkbox" id="age" name="age">over 70<br>
      <br>
      <input type="submit" value="Submit">
    </form>
  </body>
</html>

Now let’s fill out the form and see what happens:

Notice how Submitted.html opened in a new webpage. This is because I added the target parameter to the <form action = "..."> tag. Setting the target parameter to _blank opens the Submitted.html webpage in a new tab. There are four values that you can use for the target parameter, which include:

  • _blank-The value I used for this example
  • _self-The Submitted.html webpage would be displayed in the current window; this is the default value for target if nothing else is specified
  • _parent-The form response is displayed in a parent frame
  • _top-The form response is displayed in the body of the window

Next, let’s discuss the two methods for submitting form data-get and post. To better explain these two methods, I’ll fill in the form I’ve been using with new data and show you what happens when you use the get and post methods.

Here’s the code for Form.html using the get method (to add the method, all I needed to do was specify method="get" in the <form> tag:

<!DOCTYPE html>
<html lang="en" dir="ltr">
  <head>
    <meta charset="utf-8">
    <title></title>
  </head>
  <body>
    <h1>Here's an HTML form:</h1>
    <form action="Submitted.html" method="GET">
      <label for="first">Please enter your first name:</label><br>
      <input type="text" id="first" name="first"><br>
      <label for="last">Please enter your last name:</label><br>
      <input type="text" id="last" name="last"><br>
      <br>
      <label for="gender">What is your gender?</label><br>
      <input type="radio" id="gender" name="gender">Male<br>
      <input type="radio" id="gender" name="gender">Female<br>
      <input type="radio" id="gender" name="gender">Other<br>
      <br>
      <label for="age">What age range do you fall under?</label><br>
      <input type="checkbox" id="age" name="age">under 18<br>
      <input type="checkbox" id="age" name="age">18-29<br>
      <input type="checkbox" id="age" name="age">30-39<br>
      <input type="checkbox" id="age" name="age">40-49<br>
      <input type="checkbox" id="age" name="age">50-59<br>
      <input type="checkbox" id="age" name="age">60-69<br>
      <input type="checkbox" id="age" name="age">over 70<br>
      <br>
      <input type="submit" value="Submit">
    </form>
  </body>
</html>

And here’s what happens when I submit the form:

As you can see, we were redirected to the Submitted.html webpage. However, pay attention to this part of the URL:

Submitted.html?first=Jimmy&last=John&gender=on&age=on

Both the get and post methods will redirect you to the Submitted.html webpage after you click the submit button on the form, but only get will actually display all of the form data on the URL; the data is appended at the end of the URL after the name of the webpage (Submitted.html in this example) followed by a question mark.

  • Security tip for you all-NEVER use the get method if your form has sensitive data (e.g. Social Security Numbers) as all of the data that is sent to the form will be visible in the URL!

Now let’s see what happens when you use the post method to submit this form:

<!DOCTYPE html>
<html lang="en" dir="ltr">
  <head>
    <meta charset="utf-8">
    <title></title>
  </head>
  <body>
    <h1>Here's an HTML form:</h1>
    <form action="Submitted.html" method="POST">
      <label for="first">Please enter your first name:</label><br>
      <input type="text" id="first" name="first"><br>
      <label for="last">Please enter your last name:</label><br>
      <input type="text" id="last" name="last"><br>
      <br>
      <label for="gender">What is your gender?</label><br>
      <input type="radio" id="gender" name="gender">Male<br>
      <input type="radio" id="gender" name="gender">Female<br>
      <input type="radio" id="gender" name="gender">Other<br>
      <br>
      <label for="age">What age range do you fall under?</label><br>
      <input type="checkbox" id="age" name="age">under 18<br>
      <input type="checkbox" id="age" name="age">18-29<br>
      <input type="checkbox" id="age" name="age">30-39<br>
      <input type="checkbox" id="age" name="age">40-49<br>
      <input type="checkbox" id="age" name="age">50-59<br>
      <input type="checkbox" id="age" name="age">60-69<br>
      <input type="checkbox" id="age" name="age">over 70<br>
      <br>
      <input type="submit" value="Submit">
    </form>
  </body>
</html>

Now pay attention to the URL that’s shown on the Submitted.html webpage:

C:/Users/mof39/OneDrive/Documents/HTML%20projects/Submitted.html

Notice that you don’t see any of the form data on the URL-this is because the post method does store the data you entered but doesn’t display that data on the URL.

  • Get is the default method for storing form data, but once again, if you’ve got sensitive data on your form, use the post method!!!

Thanks for reading,

Michael