Hello everybody,
Hope you all had a wonderful holiday celebration! I can’t wait to share all the amazing programming content I have for you this year!
For my first post of 2022, I will pick up I left off last year-we covered some basics of working with Java JFrames and also covered how to work with shapes and colors on the JFrame. Today’s post will cover how to add images to a JFrame.
Java applications (and applications in general) often use images on their GUIs. Before we start adding images to our JFrame, let’s create the JFrame window (this code will look familiar to you if you read my previous JFrame lesson):
public class Graphics101 {
public static void main(String[] args) {
JFrame frame = new JFrame("My first JFrame");
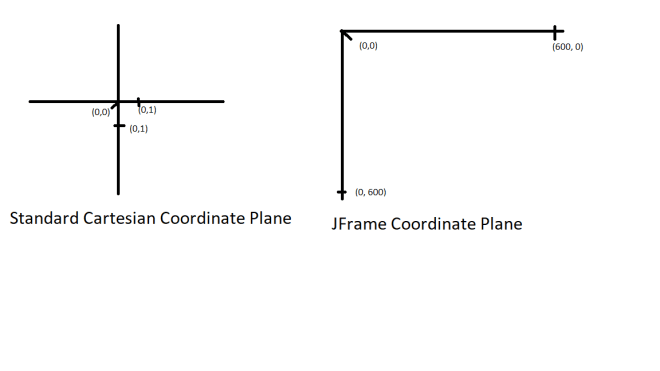
frame.setSize(600, 600);
frame.setDefaultCloseOperation(JFrame.EXIT_ON_CLOSE);
frame.setVisible(true);
}
}

As you can see, we have a basic 600 by 600 pixel window.
Now, how can we add an image to this window? Take a look at this code:
public class Graphics101 {

    public static void main(String[] args) {
        JFrame frame = new JFrame("My first JFrame");
        frame.setSize(600, 600);
        ImageIcon image1 = new ImageIcon("C:\\Users\\mof39\\Downloads\\xmas\\20211225_163232.jpg");
        frame.add(new JLabel(image1));
        frame.pack();
        frame.setVisible(true);
        frame.setDefaultCloseOperation(JFrame.EXIT_ON_CLOSE);
    }

}


Pay attention to these three lines of code:
ImageIcon image1 = new ImageIcon("C:\\Users\\mof39\\Downloads\\xmas\\20211225_163232.jpg");
frame.add(new JLabel(image1));
frame.pack();
The ImageIcon line stores the image I want to add as a variable; to add a new object of the ImageIcon class, I’d need to pass in the image’s file path (where it’s located on my computer) as the parameter for the object. The frame.add(new JLabel(image1)) line adds the image to my JFrame; the image1 variable is passed in as the parameter as an object of the JLabel class. The frame.pack() method simply tells Python to display the image on the JFrame.
- If you’re trying to create an image to add to the JFrame, always create an object of the
ImageIconclass-don’t use any other class to create an image to add to the JFrame. - Yes, I’m wearing a Santa hat in this photo (it was taken on Christmas Day 2021).
Now, even though we did successfully get the image displayed onto the JFrame, we’ve got an issue-the whole image won’t fit since it’s too big for the JFrame. How can we resize the image so that the whole image fits within the 600×600 pixel JFrame? Take a look at this code:
public class Graphics101 {

    public static void main(String[] args) {
        JFrame frame = new JFrame("My first JFrame");
        frame.setSize(600, 600);
        JLabel label = new JLabel();
        label.setIcon(new ImageIcon(new ImageIcon("C:\\Users\\mof39\\Downloads\\xmas\\20211225_163232.jpg").getImage().getScaledInstance(600, 600, Image.SCALE_SMOOTH)));
        frame.add(label);
        frame.pack();
        frame.setVisible(true);
        frame.setDefaultCloseOperation(JFrame.EXIT_ON_CLOSE);
    }

}

As you can see, I managed to get the whole image to fit into the JFrame. How did I do that? Pay attention to these lines of code:
JLabel label = new JLabel();
        label.setIcon(new ImageIcon(new ImageIcon("C:\\Users\\mof39\\Downloads\\xmas\\20211225_163232.jpg").getImage().getScaledInstance(600, 600, Image.SCALE_SMOOTH)));
        frame.add(label)
The JLabel line simply tells Java to add a new JLabel object to the JFrame; I will store the image I want to display in this JLabel.
The JLabel object’s .setIcon() method is the most important method in this group, as it creates the ImageIcon and resizes it to fit the JFrame window (via the .getScaledInstance() method), all in the same line of code. Pretty impressive right?
Now, the .getScaledInstance() method takes in three parameters-the width you want to use for the image (in pixels), the height you want to use for the image (also in pixels), and the scaling algorithm you’d like to use to scale the image to the JFrame-of which there are five: SCALE_DEFAULT, SCALE_FAST, SCALE_SMOOTH, SCALE_REPLICATE, and SCALE_AREA_AVERAGING. Since my JFrame window is 600×600 pixels, I used 600 for both the width and height parameters.
- In the
.getScaledInstance()method, when you’re indicating the scaling algorithm that you want to use, always includeImage.before the name of the scaling algorithm (e.g.Image.SCALE_SMOOTH).
The frame.add() method adds the JLabel object to the JFrame; since the resized image is stored in the JLabel object, the frame.add() method adds the resized image to the JFrame. Just as with the previous example, the frame.add() method is followed by the frame.pack() method, which displays the resized image onto the JFrame.
Looks much better. But what if you wanted to resize the image to different dimensions-dimensions that aren’t equal to the size of your JFrame window, in other words. Take a look at this code:
public class Graphics101 {

    public static void main(String[] args) {
        JFrame frame = new JFrame("My first JFrame");
        frame.setSize(600, 600);
        JLabel label = new JLabel();
        label.setIcon(new ImageIcon(new ImageIcon("C:\\Users\\mof39\\Downloads\\xmas\\20211225_163232.jpg").getImage().getScaledInstance(300, 300, Image.SCALE_SMOOTH)));
        frame.add(label);
        frame.pack();
        frame.setVisible(true);
        frame.setDefaultCloseOperation(JFrame.EXIT_ON_CLOSE);
    }

}

I used the same code for this example as I did for the previous example, however I did change the first two parameters of the .getScaledInstance() method from 600 and 600 to 300 and 300. You might think that this would simply resize the image, in which case you’d be half-right. The image is resized to 300×300 pixels, but so is the JFrame window. With that said, keep in mind that, whenever you want to resize an image to fit a JFrame, if the dimensions of your resized image aren’t the same as those of your JFrame window, the JFrame window will change its size to match the dimensions of the image set in the .getScaledInstance() method. In this example, since I changed the dimensions of the image to 300×300 pixels, the JFrame’s inital size settings (600×600) will be overwritten to 300×300 pixels.
Thank you for reading. I’ve got tons of great content for you all this year,
Michael