Hello everybody,
Michael here, and today’s post will cover how to create a PowerPoint presentations in R.
You’ll recall that in the previous post I discussed how you could create a Word document in R. To create a PowerPoint presentation in R, you’d also use the officer package-however, no need to use the dplyr package here.
After installing the officer package, let’s create a PowerPoint presentation using the read_pptx() function (this is the same idea as using the read_docx() function to create a new Word document):
slideshow <- read_pptx()- Also, just as you would with the
read_docx()function, remember to save the output of theread_pptx()function as a variable (I usedslideshowas the variable here).
Now, how would you add a slide to the presentation? More specifically, let’s say we wanted to add a title slide to the presentation. Here’s how to do so:
slideshow <- add_slide(slideshow, layout="Title Slide", master="Office Theme")To add a title slide to the presentation, use the add_slide() function and pass in these three parameters: the name of the PowerPoint object (slideshow in this case), the layout you’d like to use for the title slide (I used Title Slide but Title Only would work here too), and Office Theme for the master parameter.
- The
masterparameter lets you decide the theme you’d like to use for your PowerPoint, but the only theme that will work here isOffice Theme. This could be because theofficerpackage probably isn’t built to recognize all of PowerPoint’s different themes-that and different versions of PowerPoint come with distinct theme collections (though you’ll find the Office Theme across all versions of PowerPoint).
Now, here’s how you would add text to the title slide:
slideshow <- ph_with(slideshow, value = "Making a PowerPoint presentation with R", location = ph_location_type(type = "ctrTitle"))To add text to the title slide, use the ph_with() function and pass in three parameters-the PowerPoint object you want to add the text to, the text you want to add to the presentation as the value parameter, and the location of the text as the location parameter.
When setting the location of the text, you’ll need to use the ph_location_type() function and pass in a single parameter-the location of the text in the slideshow as the type parameter. Now, you may be wondering why I didn’t pass in title as the location type. The reason for this is because title wasn’t going to work with the title slide layout I chose-Title Slide. Had I used a Title Only layout, I could’ve passed in title as the location type. Here’s a visual explanation as to why I chose ctrTitle as the location type:
Structure of the Title Only slide layout:


Structure of the Title Slide layout:

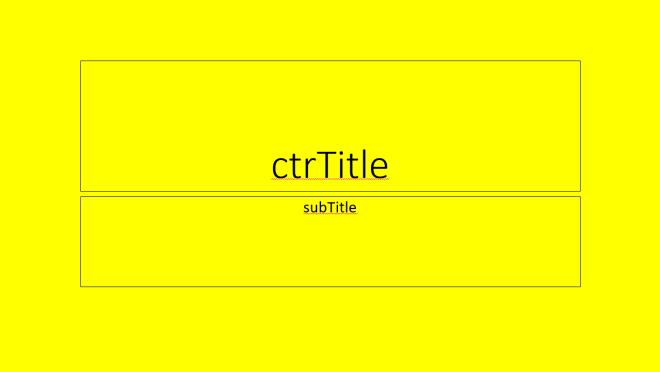
The ph_location_type function has several location types you can choose from, which include:
ctrTitlesubTitledtftrsldNumtitlebodypiccharttbldgmmediaclipArt
For now, I’m just going to explain title, ctrTitle and subTitle. The Title Only slide layout only has 1 location type-title-therefore title works as the location type here. However, you’ll see that the Title Slide layout has two location types-ctrTitle and subTitle; ctrTitle is the main title and subTitle is, well, the subtitle. Therefore, for the main title in the Title Slide layout, ctrTitle is the appropriate location type.
Since there’s a subtitle in the Title Slide, we’ll need to run the ph_with() function (along with the nested ph_location_type() function) again. The only differences are the text we’ll use along with the location type needed (subTitle rather than ctrTitle). Here’s the syntax needed:
slideshow <- ph_with(slideshow, value = "Created by Michael the Blogger", location = ph_location_type(type = "subTitle")) Nice! Now let’s add another slide, this time with a Title and Content layout:
slideshow <- add_slide(slideshow, layout = "Title and Content", master = "Office Theme")And with this slide, let’s add some text. Here’s the title text:
slideshow <- ph_with(slideshow, value = "About Me", location = ph_location_type(type = "title"))Now, why would I use title as the location type here? Take a look at the structure of the Title and Content layout:


The Title and Content layout has two parts-the title and the body.
Now, let’s add some content to this slide:
slideshow <- ph_with(slideshow, value = "My name is Michael and I launched this blog on June 13, 2018", location = ph_location_type(type = "body"))Great! Now let’s add another Title and Content slide-but this time, let’s have a bullet-point list in the body. But first, let’s add the title:
slideshow <- add_slide(slideshow, layout = "Title and Content", master = "Office Theme")

slideshow <- ph_with(slideshow, value = "Some facts about this blog", location = ph_location_type(type = "title"))
Now, let’s add the bullet-point list to the body:
slideshow <- ph_with(slideshow, value = c("This is the 103rd entry of this blog", "This blog covers 5 different programming tools", "I created an entry on Git & GitHub for my 100th post"), location = ph_location_type(type = "body"))To add a bullet-point list to a slide, pass in a vector c() containing all the elements you want to include in your bullet-point list; separate each element with a comma and enclose each element in double quotes.
Next, let’s say we wanted to a third Title and Content slide but this time, we’ll add an image as part of the content. Also, let’s change the font of the title:
slideshow <- add_slide(slideshow, layout = "Title and Content", master = "Office Theme")First off, here’s how to modify the font of the title. We’d start by creating a text object like this:
fontObject <- fp_text(font.size = 20, color = "blue", font.family = "Century Gothic")In this case, the purpose of the fontObject is to set the font formatting (which includes the coloring, size, and font family to use).
To see a list of font families that you can use, go to PowerPoint and click on the circled dropdown to see a list of available font families (NOTE: different PowerPoint versions will likely have different font families available for your use):


Now that we’ve got a font object set, let’s add a new slide that utilizes the fontObject (let’s also use the Title and Content layout):
slideshow <- add_slide(slideshow, layout = "Title and Content", master = "Office Theme")Now, before we add text to the slide, we’d need to store that text in a new object; this is because storing the text in a new object will allow us to add the text to the slide with the fontObject properties we set earlier. Here’s how to create the text object:
textObject <- fpar(ftext("Here is what I look like (from December 2020)", fontObject))To create a new text object, use the fpar function; pass in the ftext function and the fontObject as the parameters. Inside the nested ftext function, pass in the text you’d like to add as well as any optional styling parameter (e.g. bold).
- If you wanted to add two different lines of text, you’d need to use multiple
fparfunctions, each with a nestedftextfunction. You’d also need to wrap eachfpar–ftextfunction inside ablock_listfunction, which allows you to write multiple lines of text on the title (or content) of a slide.
Great! Now that we have the text object set, let’s add it to the title of the slide:
slideshow <- ph_with(slideshow, value = textObject, location = ph_location_type(type = "title"))- To add the content of a text object to a slide, use the
ph_with()function and set thevalueto the name of your text object (in this case, I kept it simple and just usedtextObject)
Now, let’s add an image to the body of this slide! Here’s how to do so:
slideshow <- ph_with(slideshow, external_img("C:/Users/mof39/OneDrive/Pictures/ball.png", width=6, height=6), location=ph_location_type(type="body"))To add an image to the slide, you’d first need to use the ph_with() function (much like you’d do when adding text to a slide). Inside the ph_with() function, you’d need to include three parameters-the slideshow that you’ll be adding the content to, the external_img() function with three parameters of its own, and a location parameter using the ph_location_type() function that indicates where in the presentation you would like to add your content.
Inside the external_img() function, you’ll need to include three parameters-the location on your computer where the image you’d like to add is stored (and yes, you’ll need to include the full path), the height and the width of the image (both in pixels).
Last but not least, let’s save this slideshow to your computer. Here’s how to do so:
print(slideshow, "C:/Users/mof39/OneDrive/Documents/Blog Slideshow.pptx")To save your slideshow to your computer, use the print function and pass in two parameters-the slideshow you created and the location on your computer where you want to save the slideshow (remember to save it with the PPTX extension).
Now, let’s open up the slideshow and see how R’s officer package worked it’s magic:

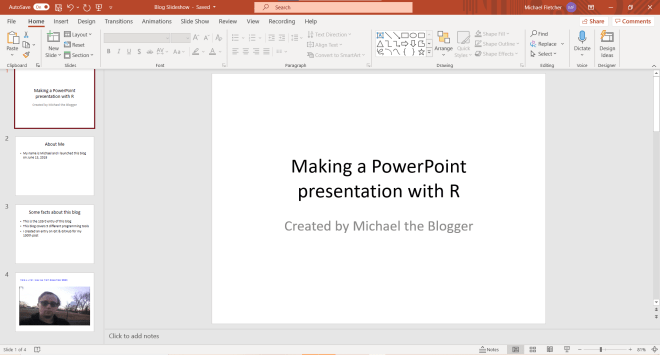
Upon opening the slideshow, you can see that the officer package worked its magic here! All four slides were successfully created.
Take a look at slide 4:

The image was successfully retrieved from my computer and displayed on this slide. The title text also successfully adopted the font style I had specified in fontObject (size 20 blue Century Gothic).
Thanks for reading,
Michael